


The Zoho CRM ecosystem on the marketplace hosts a Voximplant SIP webphone for convenient customer service and CRM in one window. Here is the link to the marketplace with Voximplant webphone in Zoho.
Voximplant SIP Webphone overview in Zoho CRM
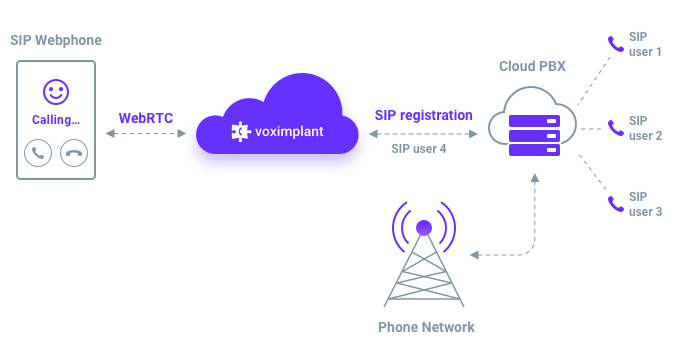
Integrate a SIP webphone into Zoho CRM to call your customers or answer their calls in a web browser (Web browser with WebRTC support. See the list of supported browsers here) using any SIP provider (SIP provider should be accessible from the Internet. The app won't work with SIP servers installed in LAN without access from the Internet). When integrated with the CRM, the extension increases the efficiency of your communication with customers. No installation or download is needed; just connect with your SIP provider.
Our webphone connects to your PBX via the Voximplant cloud. The architecture can be seen in the figure below.
Key features:
● Click-to-call from Zoho CRM
● Two lines per user are available
● Hold/unhold support
● Transfer calls to your colleagues
● Create or edit a lead if you receive a call from an unknown number
● See the lead associated with a number during a call
● Optional: call recording
Requirements
Webphone:
● UDP connection should be available; the required UDP ports are 8000-18000, 20000-30000;
● The list of addresses is available here.
SIP proxy:
● Ability to receive SIP traffic from Voximplant IPs, the list of addresses is available here;
● Ability to receive RTP traffic from Voximplant IPs, the list of addresses is available here.
Installation
You must first install Voximplant SIP Webphone Extension in the Zoho CRM interface. To do this, go to the marketplace in Zoho CRM and enter in the search "Voximplant SIP Webphone" or go directly to the link and click "Install". After installation, you will be redirected to the settings page.
Setup
Setting up an extension is a 2-step process:
- Creating and setting up configurations on the Voximplant platform;
- Adding and configuring users (operators) in the admin panel.
1. Creating and setting up scenarios on the Voximplant platform
Follow this link to learn how to do this or follow the steps below:
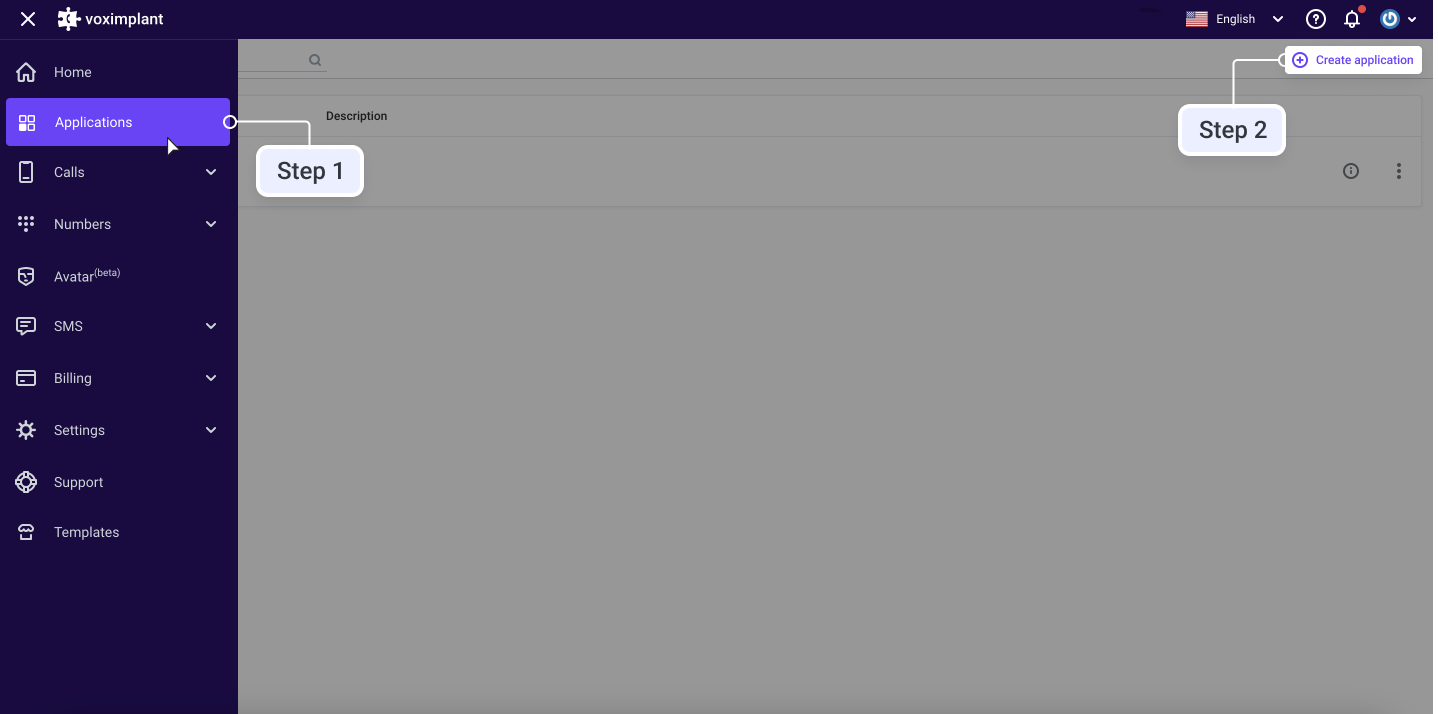
Step 1. Create a Voximplant Scenario Application
After registering a Voximplant account, create an application and a scenario. To do this, go to the Applications section in the menu and click the "Create Application" button.
Fill in application data.
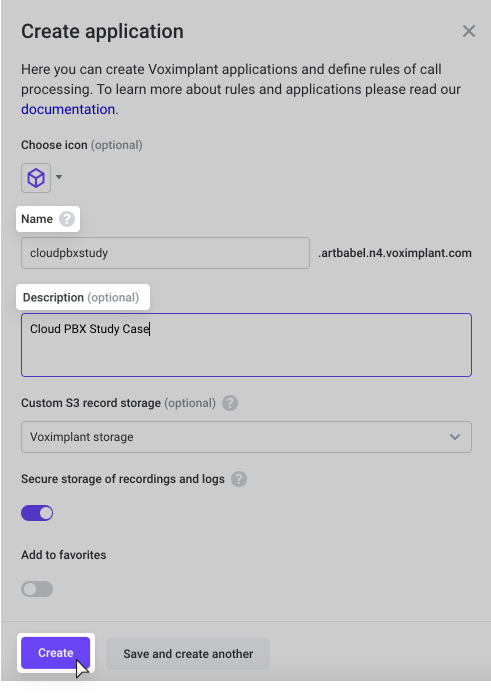
Once the application is created, you can log into it via the Application screen.

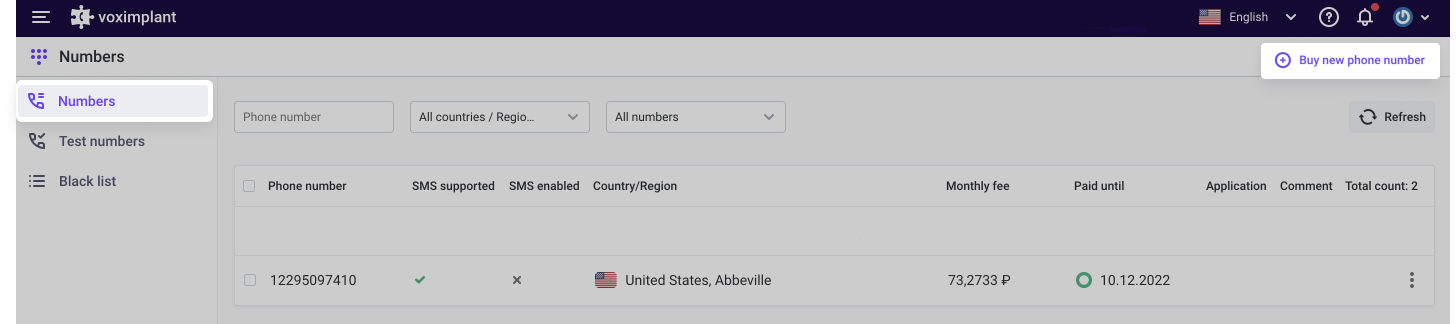
Step 2. Buy a Phone Number
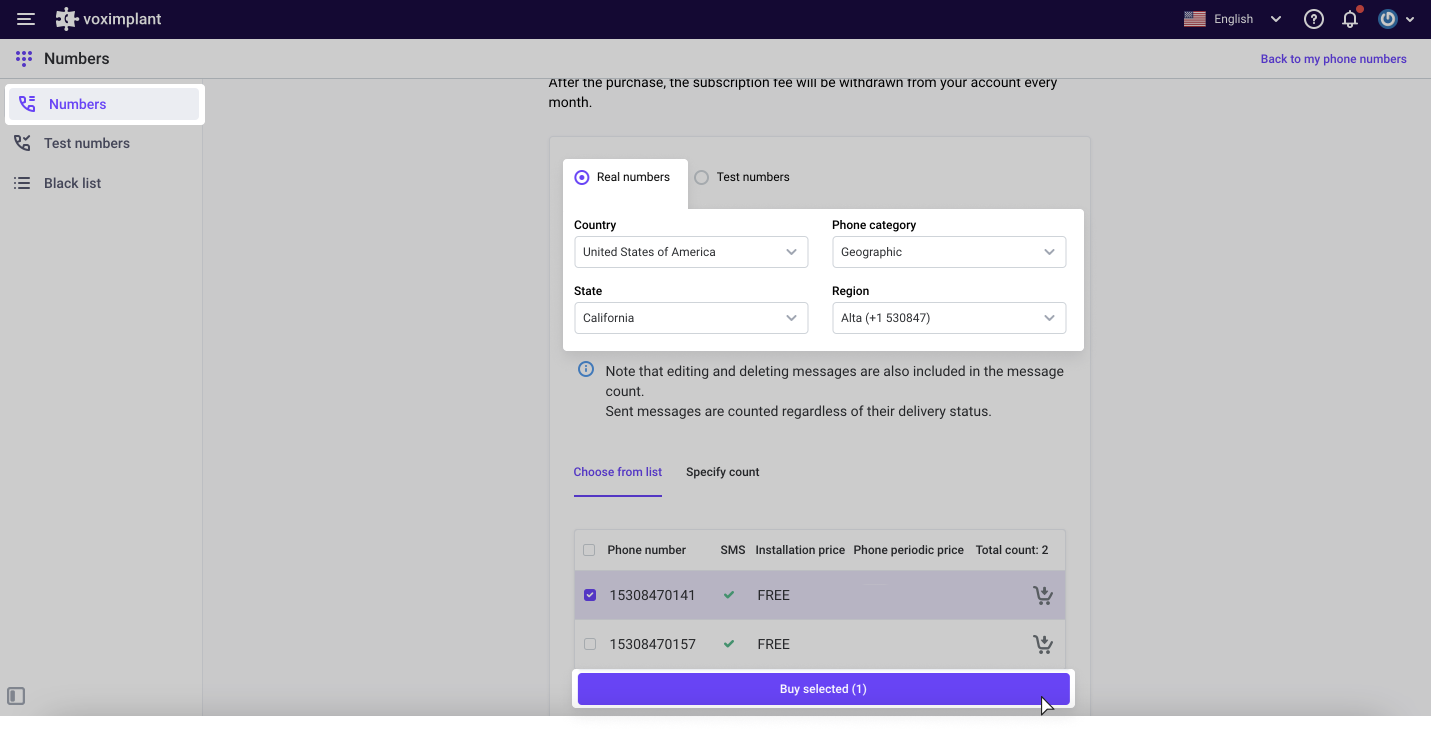
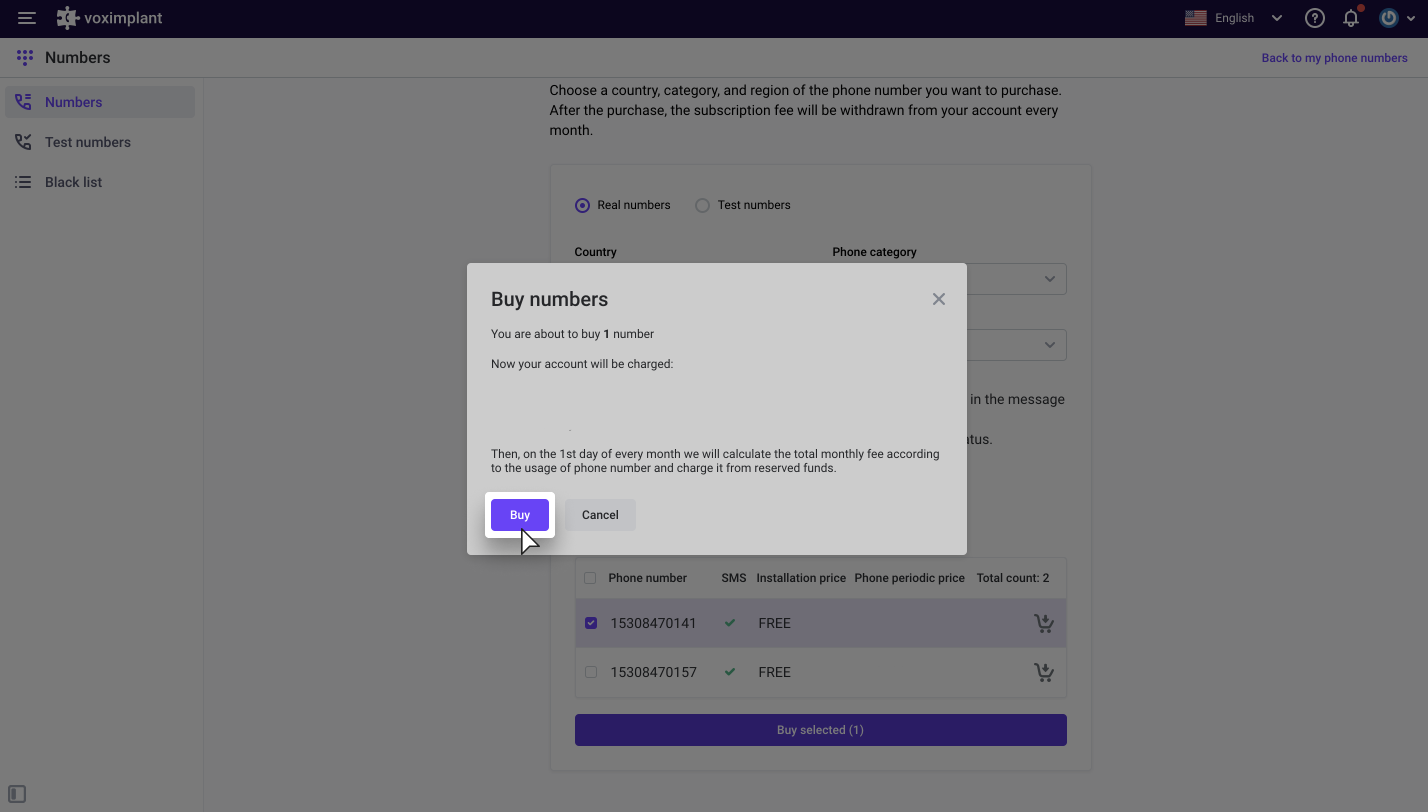
Voximplant makes it possible to have a variety of phone number categories. You can rent a landline number, a mobile number, or an 8800 number. To purchase a number, go to the Numbers section and click the Buy number button. The interface will prompt you to select the category and region. Then you can choose the appropriate number from the list.
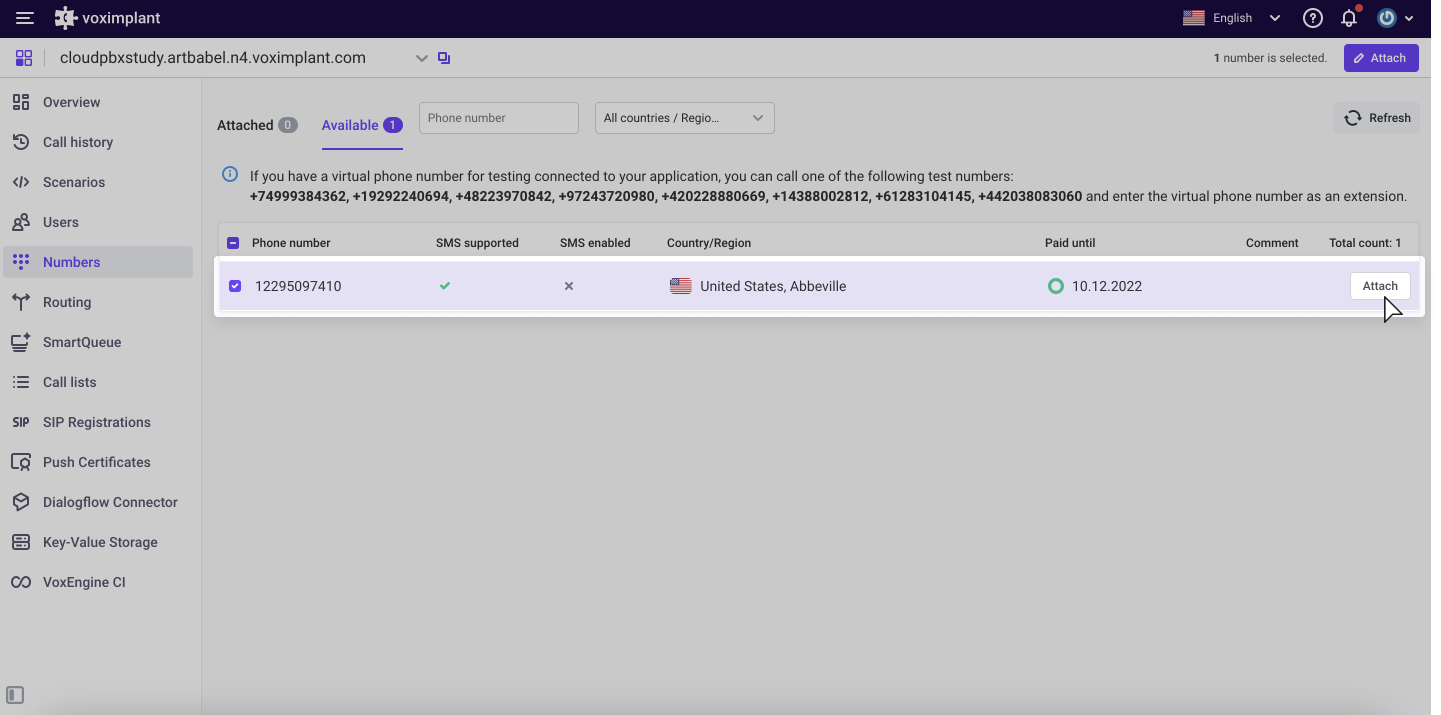
After purchasing a number, link it to the application. Go to the Numbers section in the application created earlier, then the Available tab and click the "Attach" button.
Step 3. Create New Scenario
Now go to the created application and create a call processing script, i.e., a JavaScript code that describes the call flow logic. Click the Scenario tab to see a scenario for the operation of your cloud PBX.
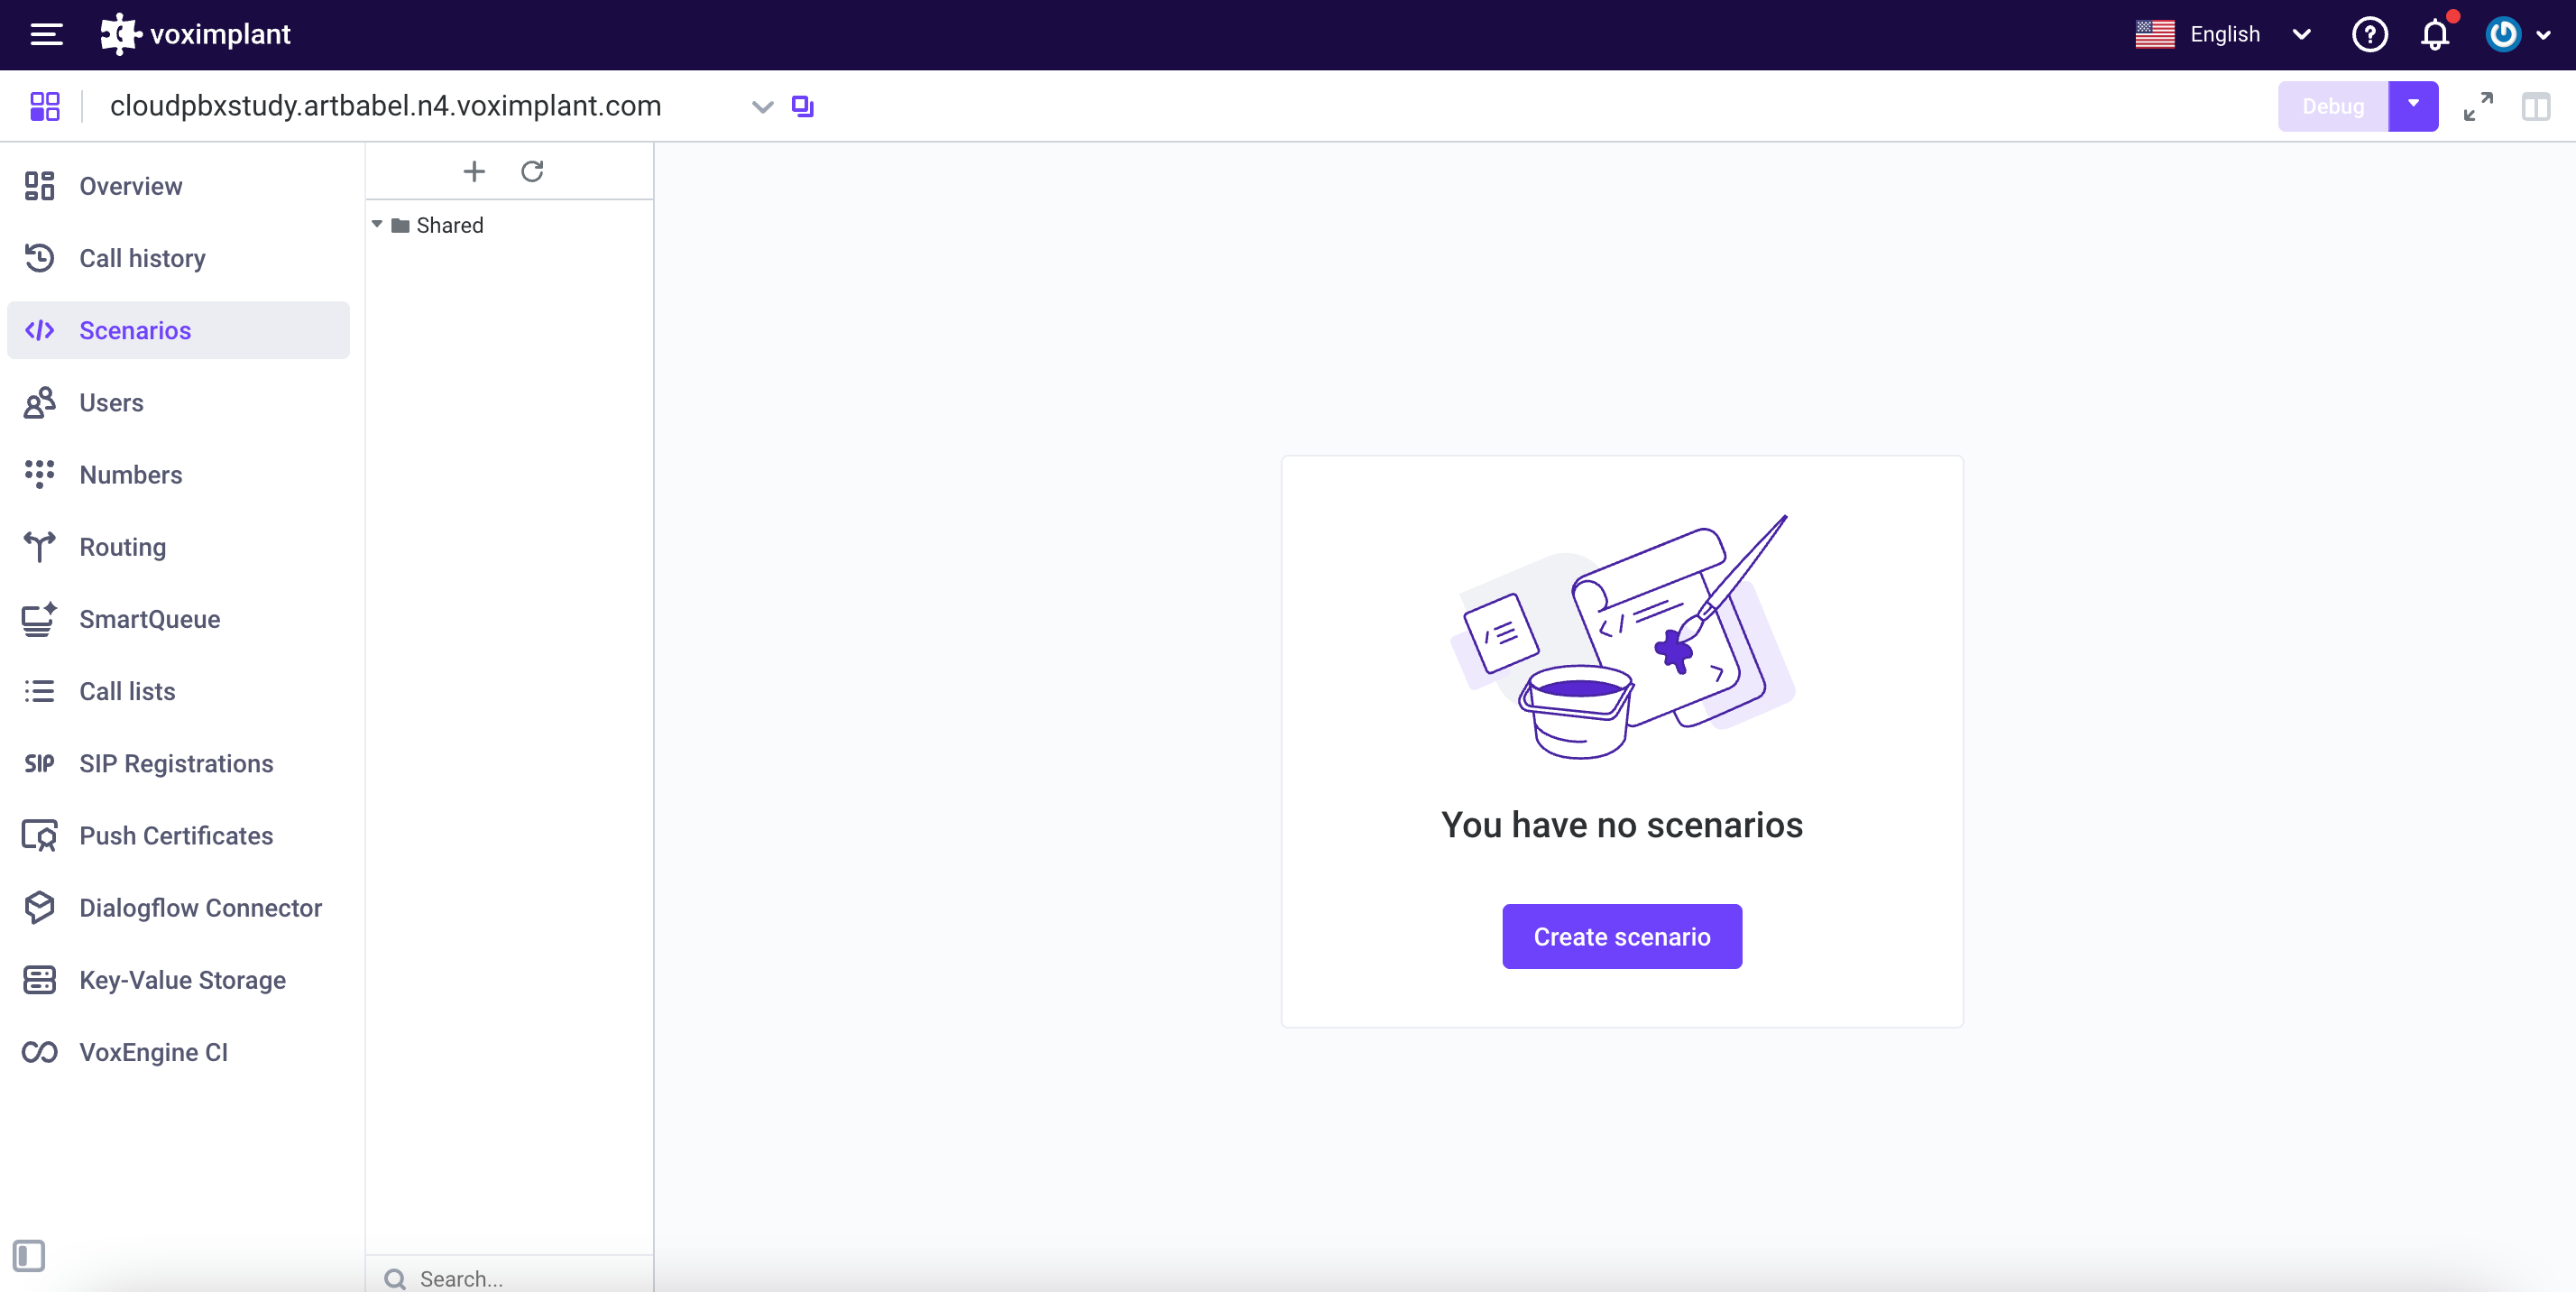
You must click the "Create script" button on the left side, specify the name of the script (for example, "for call"), and copy the code to the workspace.
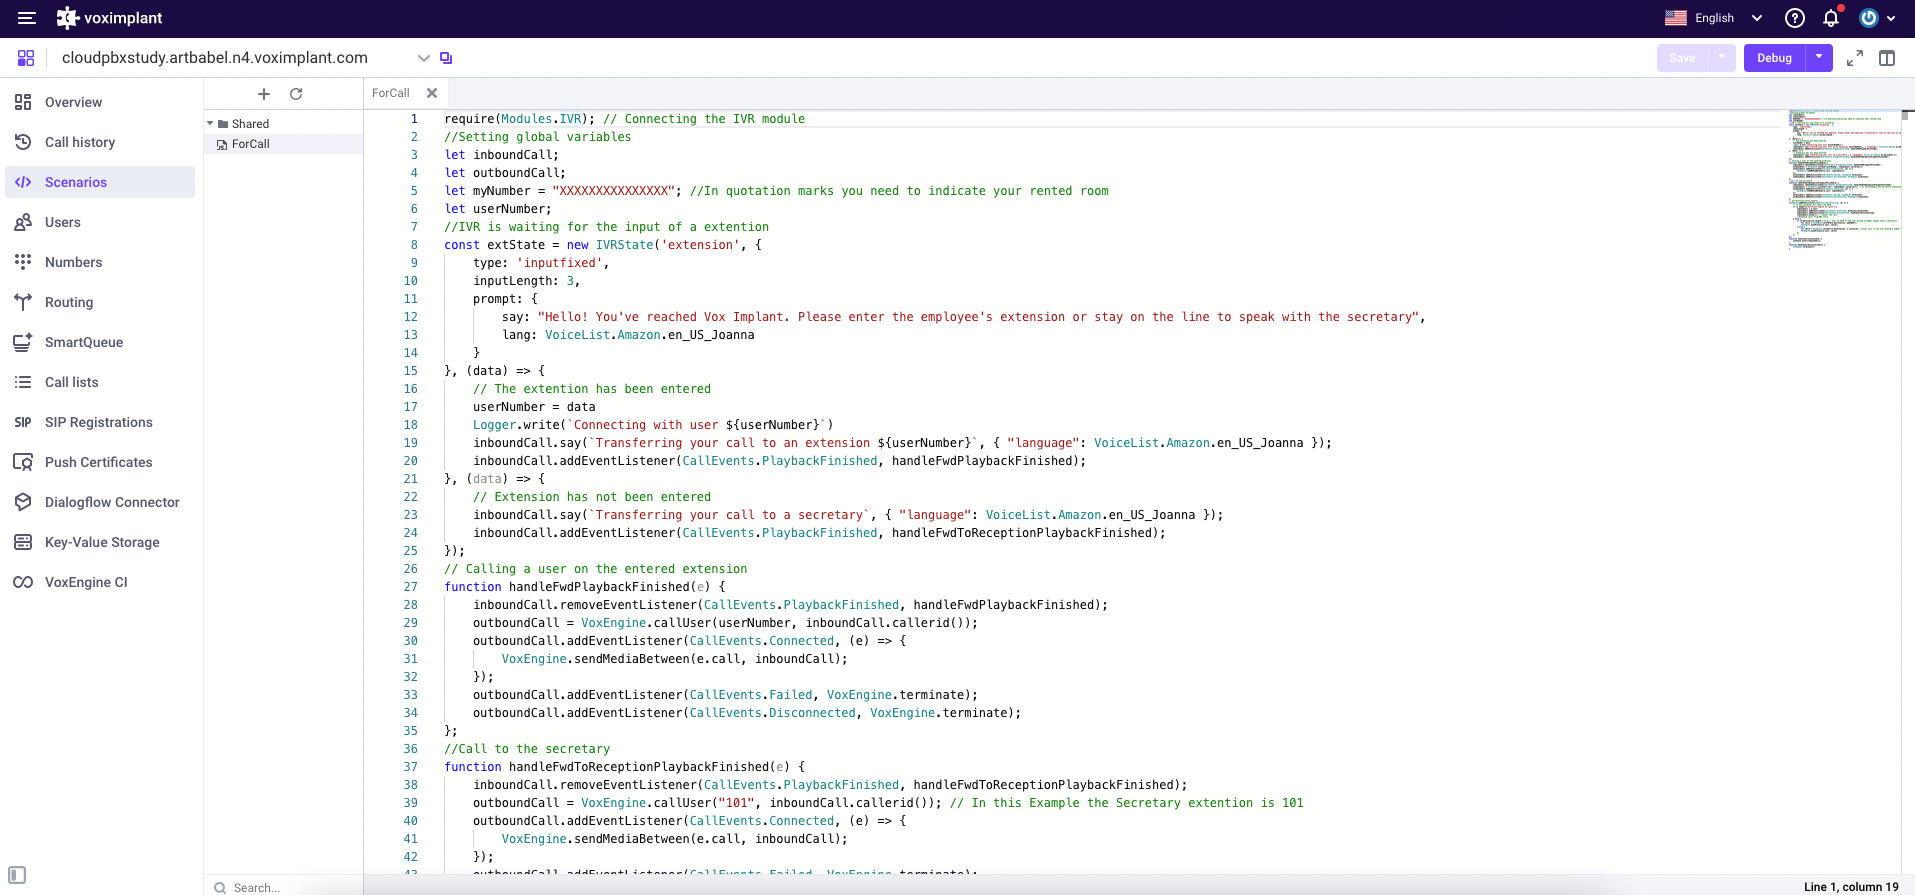
You need to specify your rented number in the script so that it is used for outgoing calls. To do this, in the line let myNumber, enter the number you rented earlier in quotes.

Below you can find code for this scenario.
require(Modules.IVR); // Connecting the IVR module
//Setting global variables
let inboundCall;
let outboundCall;
let myNumber = "XXXXXXXXXXXXXXXX"; //In quotation marks you need to indicate your rented room
let userNumber;
//IVR is waiting for the input of a extention
const extState = new IVRState('extension', {
type: 'inputfixed',
inputLength: 3,
prompt: {
say: "Hello! You've reached Vox Implant. Please enter the employee's extension or stay on the line to speak with the secretary",
lang: VoiceList.Amazon.en_US_Joanna
}
}, (data) => {
// The extention has been entered
userNumber = data
Logger.write(`Connecting with user ${userNumber}`)
inboundCall.say(`Transferring your call to an extension ${userNumber}`, { "language": VoiceList.Amazon.en_US_Joanna });
inboundCall.addEventListener(CallEvents.PlaybackFinished, handleFwdPlaybackFinished);
}, (data) => {
// Extension has not been entered
inboundCall.say(`Transferring your call to a secretary`, { "language": VoiceList.Amazon.en_US_Joanna });
inboundCall.addEventListener(CallEvents.PlaybackFinished, handleFwdToReceptionPlaybackFinished);
});
// Calling a user on the entered extension
function handleFwdPlaybackFinished(e) {
inboundCall.removeEventListener(CallEvents.PlaybackFinished, handleFwdPlaybackFinished);
outboundCall = VoxEngine.callUser(userNumber, inboundCall.callerid());
outboundCall.addEventListener(CallEvents.Connected, (e) => {
VoxEngine.sendMediaBetween(e.call, inboundCall);
});
outboundCall.addEventListener(CallEvents.Failed, VoxEngine.terminate);
outboundCall.addEventListener(CallEvents.Disconnected, VoxEngine.terminate);
};
//Call to the secretary
function handleFwdToReceptionPlaybackFinished(e) {
inboundCall.removeEventListener(CallEvents.PlaybackFinished, handleFwdToReceptionPlaybackFinished);
outboundCall = VoxEngine.callUser("101", inboundCall.callerid()); // In this Example the Secretary extention is 101
outboundCall.addEventListener(CallEvents.Connected, (e) => {
VoxEngine.sendMediaBetween(e.call, inboundCall);
});
outboundCall.addEventListener(CallEvents.Failed, VoxEngine.terminate);
outboundCall.addEventListener(CallEvents.Disconnected, VoxEngine.terminate);
};
// CallAlerting event handler
VoxEngine.addEventListener(AppEvents.CallAlerting, (e) => {
// If the incoming call came from PSTN
if (e.headers["VI-Client-Type"] == "pstn") {
inboundCall = e.call;
inboundCall.addEventListener(CallEvents.Connected, handleCallConnected);
inboundCall.addEventListener(CallEvents.Disconnected, handleCallDisconnected);
inboundCall.answer(); // answer the call
//Outbound calls from PBX users
} else {
if (e.destination.length > 3) { // Call to PSTN if the user dialed a number longer than 3 characters
let call2 = VoxEngine.callPSTN(e.destination, myNumber);
VoxEngine.easyProcess(e.call, call2);
} else {
let call3 = VoxEngine.callUser(e.destination, e.callerid); //Local call if the user dialed a number shorter than 3 characters
VoxEngine.easyProcess(e.call, call3)
};
};
});
function handleCallConnected(e) {
extState.enter(inboundCall);
}
function handleCallDisconnected(e) {
VoxEngine.terminate();
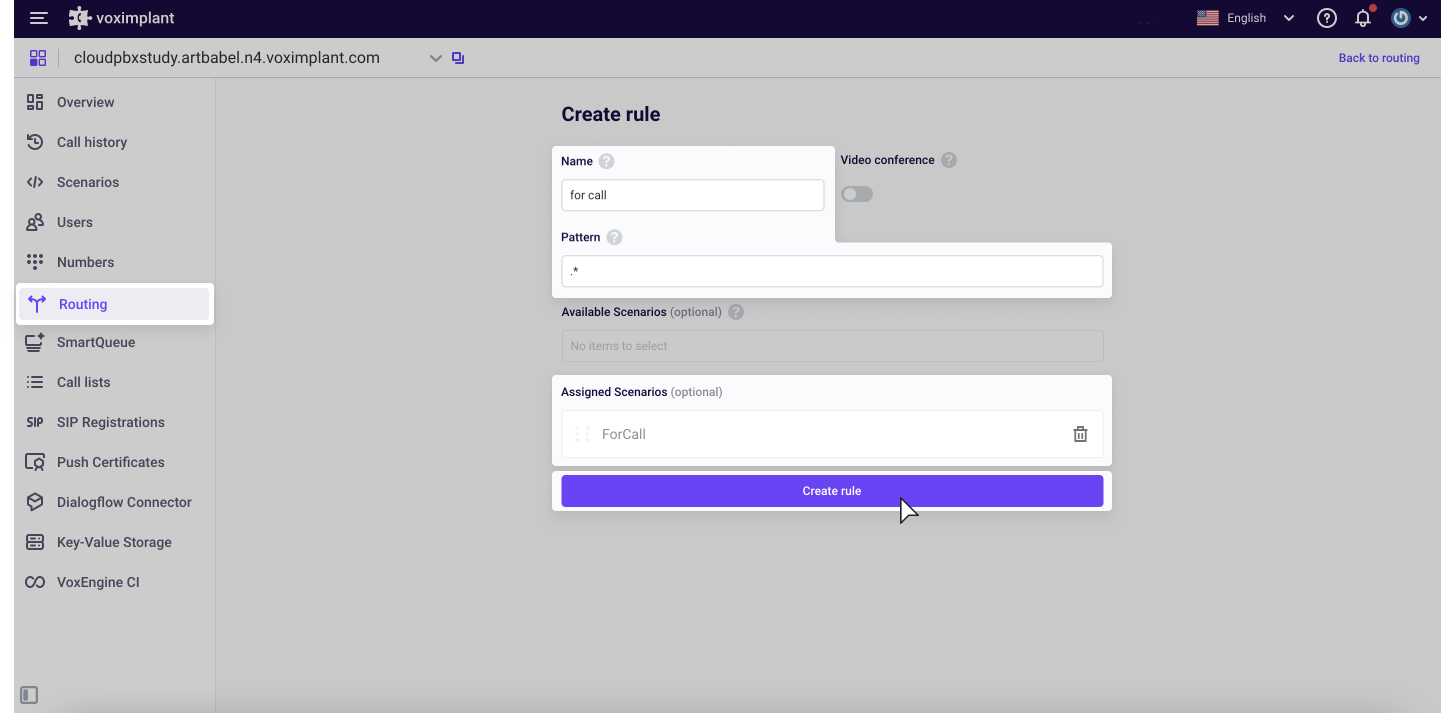
}Step 4. Create a Routing Rule
Routing rules are required to direct calls to the specified scenario. Go to the Routing section and create a rule for calls to be routed to the previously created script. In our case, we can use the mask and select our script.
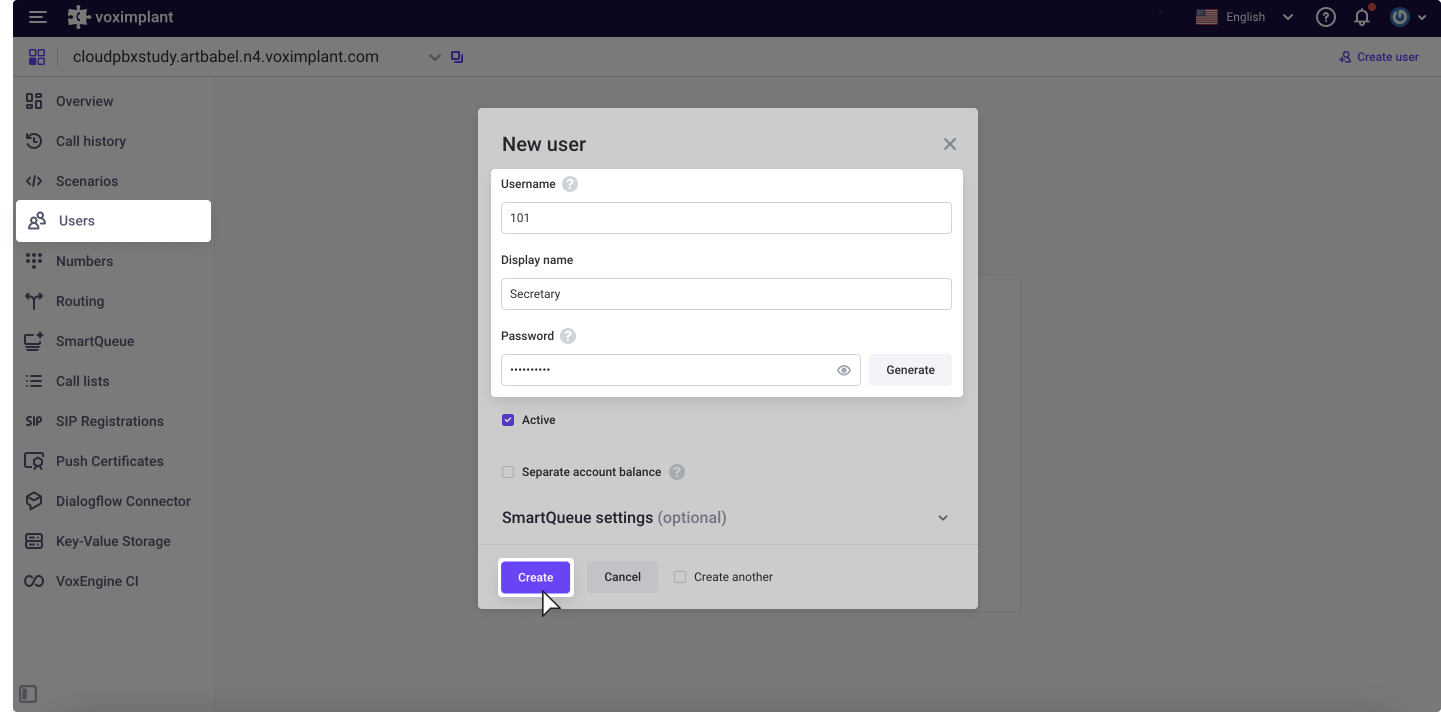
Step 5. Add New Users
The next step is to create internal users. These will later need to be registered on the softphone. Our scenario assumes that a username is a three-digit number and the number 101 is assigned to the Secretary.
In the application, go to the Users section and create users.
2. Adding and configuring users (operators) in the admin panel
Do the following to add your operator and set up a connection:
Step 1. Log in to Zoho
Go to the admin panel using the button located in the Settings section of the extension or follow the link and log in through your Zoho account.
Step 2. Create User
You will see the Manage Users And Registrations table that contains the Zoho accounts of your company. If some accounts are missing, click "LOAD USERS FROM CRM".

Click the "CREATE REG" button to connect your account to a SIP provider. Note that the first registration is free; each subsequent registration costs $7.
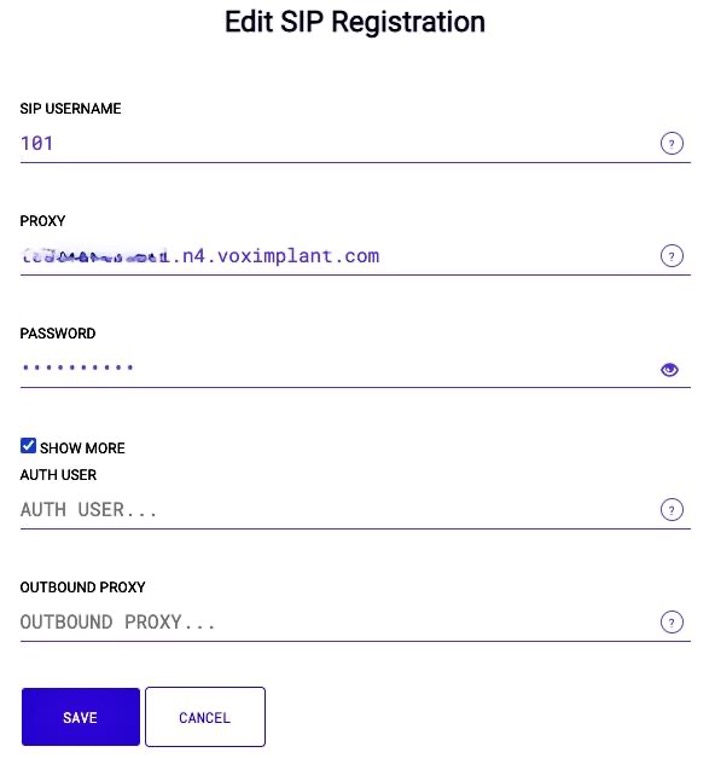
Step 3. SIP Registration
Fill in the "SIP USERNAME", "PROXY" and "PASSWORD" fields. Remember that "SIP USERNAME" must be an unoccupied name/number from your PBX pool.
Step 4. Manage Users
After filling in all required fields, click "SAVE". Then go to the "USERS" tab at the top of the screen. You will now see the SIP registration data for your Zoho account.

Note: The "EDIT REG" button allows you to change the parameters of the SIP registration. You can also detach the registration with the "DETACH REG" button to:
- Attach it to another account - use the detached name/number when creating or editing another SIP registration.
- Delete the registration
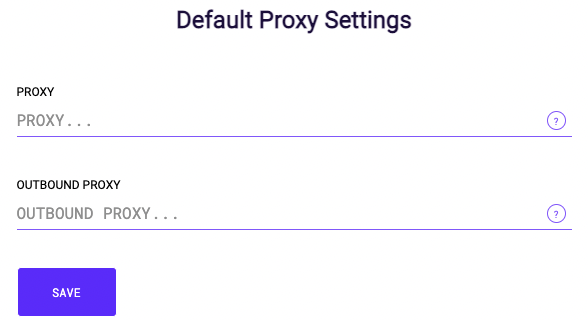
TIP: To simplify SIP registrations, go to the PROXY tab at the top of the screen, specify the default SIP proxy and click "SAVE".
Step 5. Webphone in Zoho
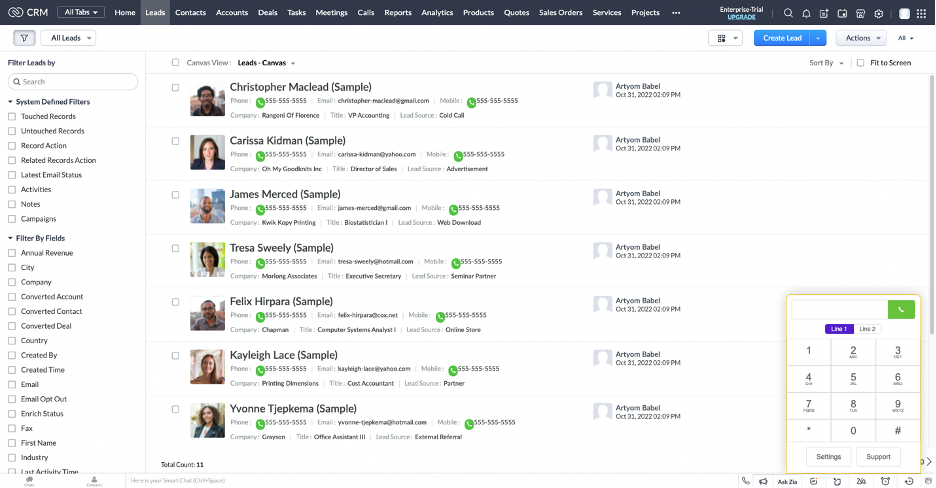
Congrats! SIP registration is complete. A built-in webphone should now be available in your Zoho account in the toolbar. You also have a call button next to each phone number.
How To Use
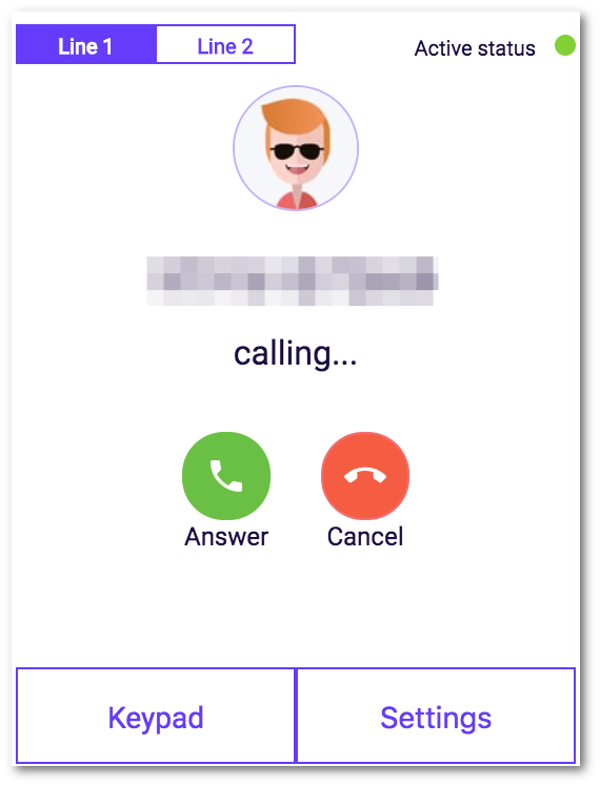
The webphone opens automatically with incoming calls, allowing you to answer or decline a call. To make an outbound call, open the webphone by clicking on the icon in the toolbar, enter a phone number and click the green handset button.
If you see the word NEW under a phone number, you can save it in a Contact or a Lead by clicking on the right buttons. Once saved, you can open the Contact/Lead every time you call that number or get a call from it.
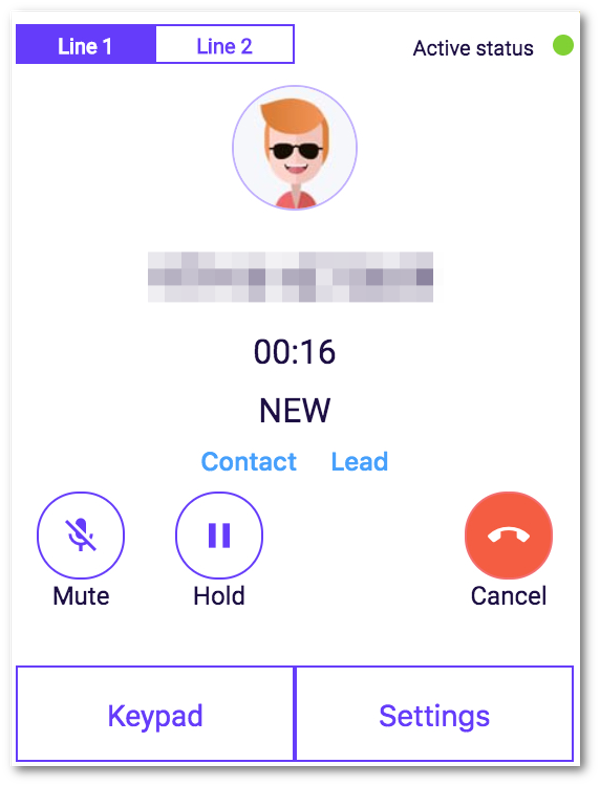
During a conversation, you can:
- Mute/unmute your microphone
- Put a call on hold/take it off hold
- Use the keypad, e.g., to make transfers
- Choose input/output devices in Settings
- Hang up at any time


