There are many reasons why you might need a cloud PBX rather than building or scaling a traditional hardware PBX in your office. A cloud-based PBX will provide you with flexibility, ease of scaling, economic benefits, and at the same time will not be inferior in quality to a traditional PBX. In this article, we will tell you about creating a cloud PBX on the Voximplant platform.
How it Works With Voximplant
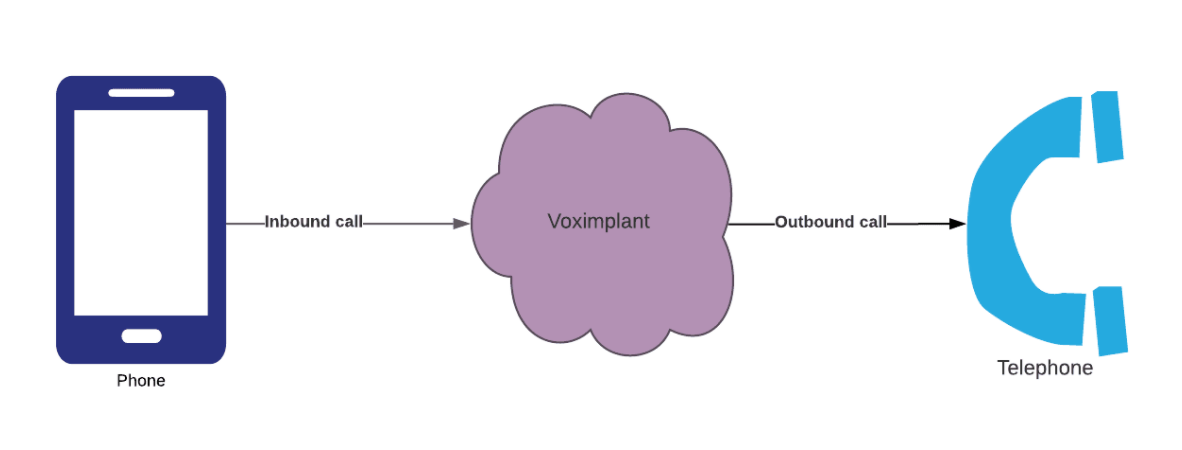
Implementing the Voximplant cloud PBX requires several steps:
- Receiving an incoming call from the Public Switched Telephone Network (PSTN) or from a softphone.
- Further, according to the routing rule, the call is routed to a specific scenario depending on the dialed number.
The scenario must include outgoing call logic. It can be an outgoing call to the PSTN, calling an internal user using an extension, or a local call inside a cloud PBX.
Requirements
- Verified Voximplant account, which can be created here;
- Voximplant application with script and script rule;
- A phone number.
How to Create Cloud PBX
Here are a few steps to make a Cloud PBX Application using Voximplant Platform:
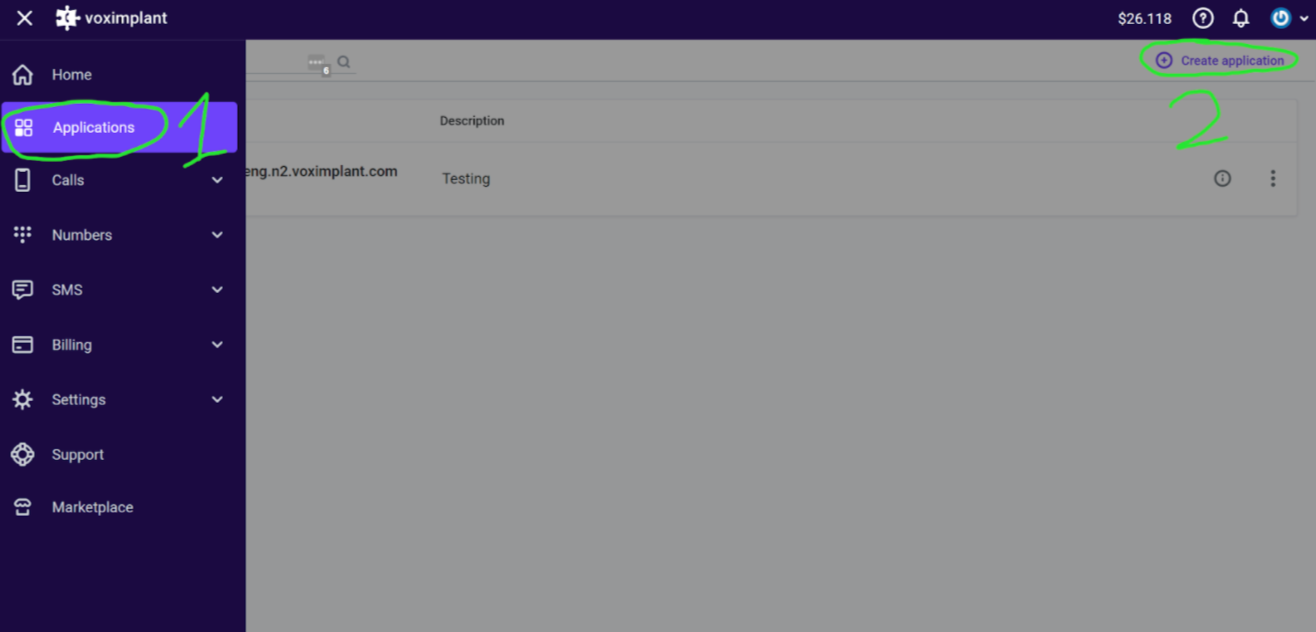
Step 1. Create a Voximplant Scenario Application
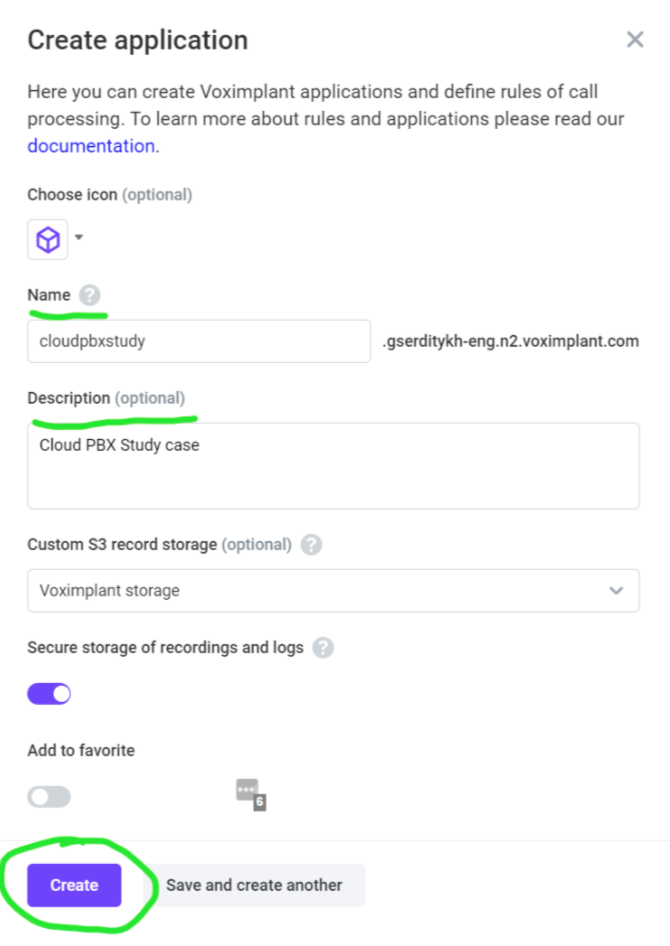
After registering a Voximplant account you need to create a scenario application. To do this, go to the Applications section in the menu and click the Create Application button.
Fill in application data:
Once the application is created, you can log into it via the Application screen:

Step 2. Buy a Phone Number
Voximplant gives you a variety of phone number categories. You can rent a landline number, a mobile number, or a number from the 8800 category.
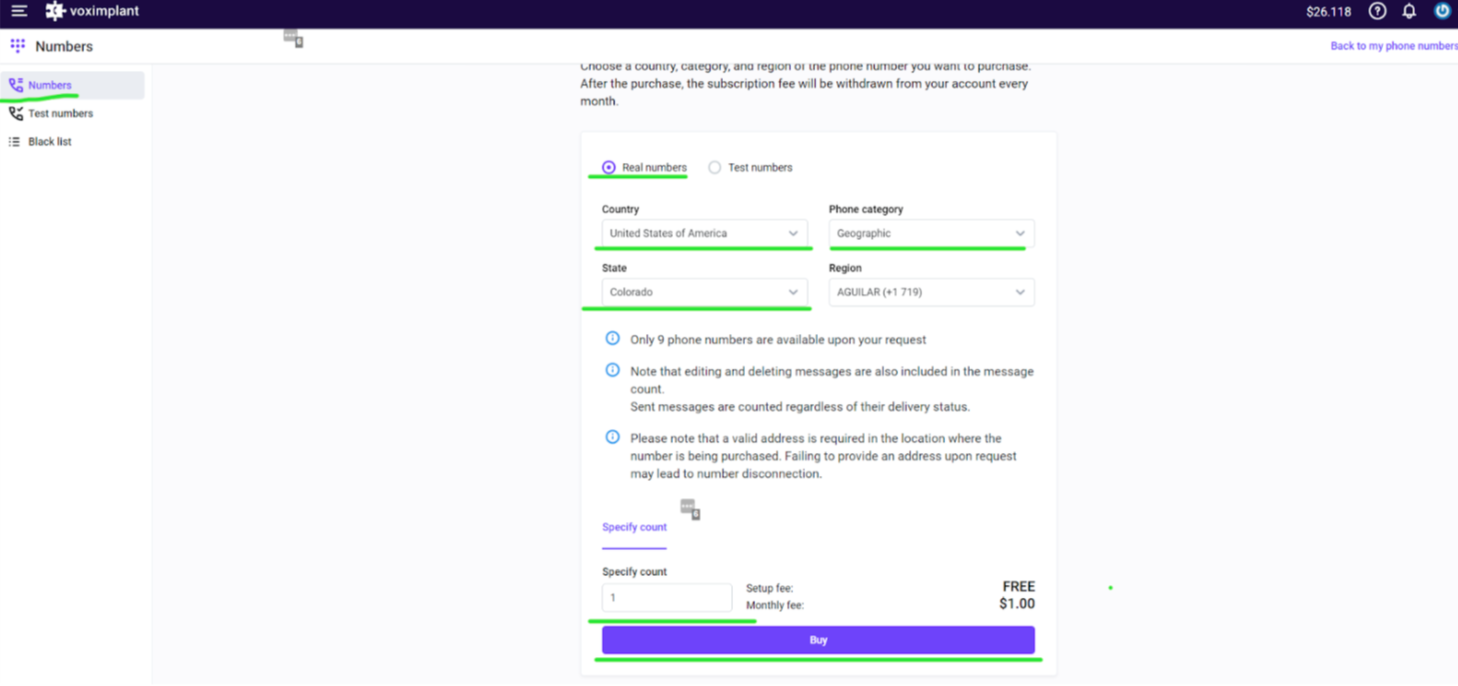
To purchase a number, go to the Numbers section and click the Buy number button. The interface will prompt you to select the proper category and region. Then you can choose the appropriate number from the list.
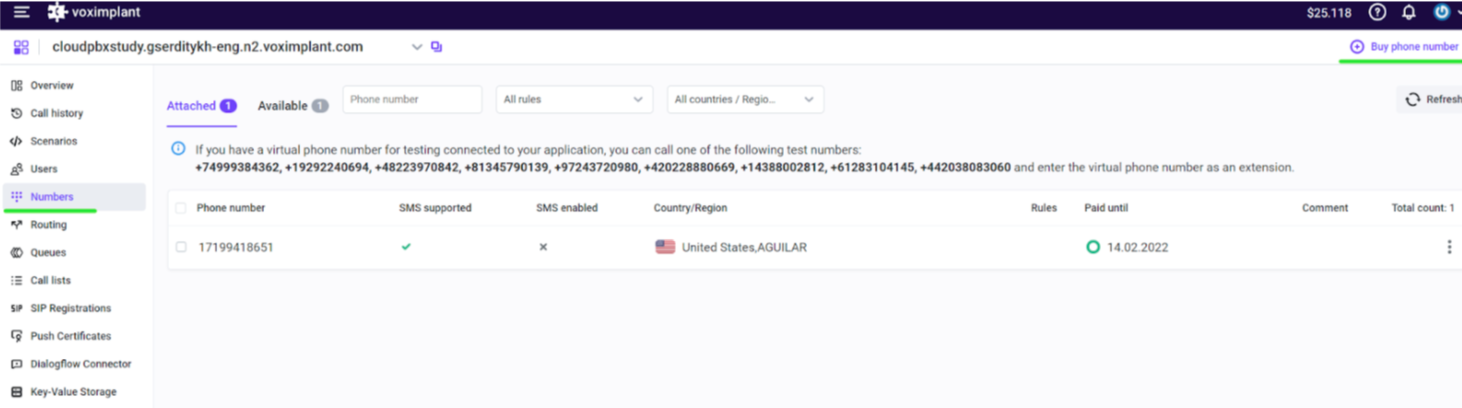

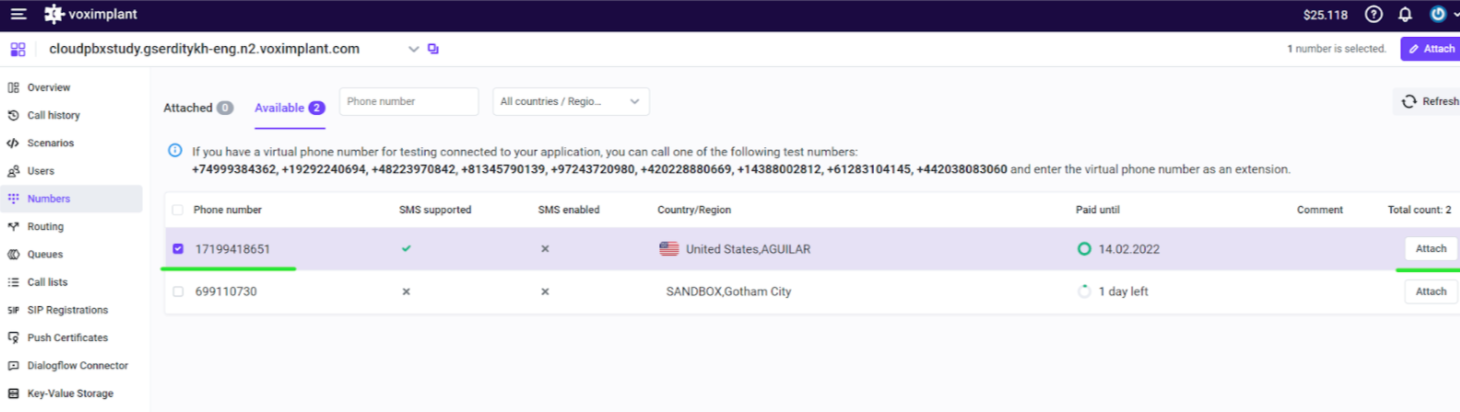
After purchasing a number you must link it to the application. Go to the Numbers section, then the Available tab and click the Attach button.
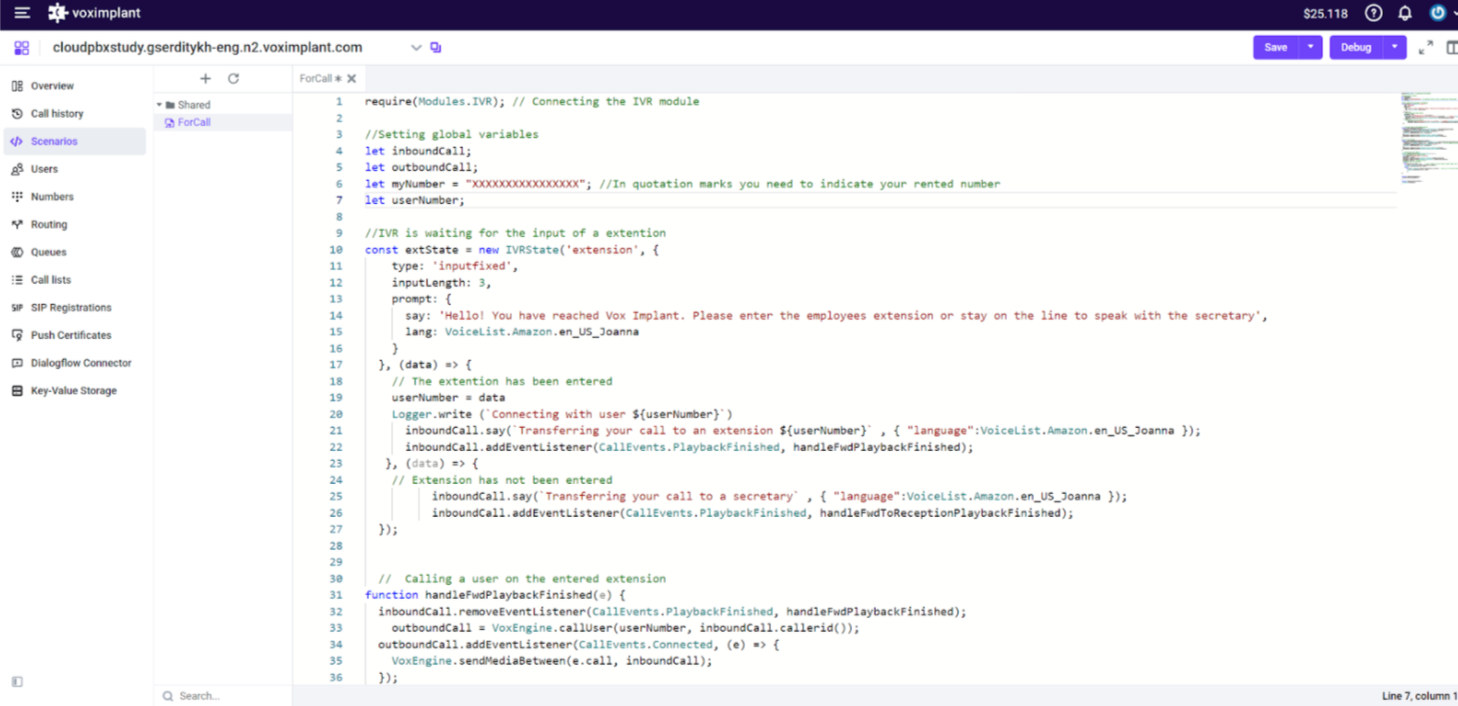
Now go to the created application and create a call processing script. A script is a JavaScript code that describes the call flow logic. Click "Scenario" tab to see a basic scenario for the operation of your cloud PBX
require(Modules.IVR); // Connecting the IVR module
//Setting global variables
let inboundCall;
let outboundCall;
let myNumber = "XXXXXXXXXXXXXXXX"; //In quotation marks you need to indicate your rented room
let userNumber;
//IVR is waiting for the input of a extention
const extState = new IVRState('extension', {
type: 'inputfixed',
inputLength: 3,
prompt: {
say: 'Hello! You've reached Vox Implant. Please enter the employee's extension or stay on the line to speak with the secretary',
lang: VoiceList.Amazon.en_US_Joanna
}
}, (data) => {
// The extention has been entered
userNumber = data
Logger.write (`Connecting with user ${userNumber}`)
inboundCall.say(`Transferring your call to an extension ${userNumber}` , { "language":VoiceList.Amazon.en_US_Joanna });
inboundCall.addEventListener(CallEvents.PlaybackFinished, handleFwdPlaybackFinished);
}, (data) => {
// Extension has not been entered
inboundCall.say(`Transferring your call to a secretary` , { "language":VoiceList.Amazon.en_US_Joanna });
inboundCall.addEventListener(CallEvents.PlaybackFinished, handleFwdToReceptionPlaybackFinished);
});
// Calling a user on the entered extension
function handleFwdPlaybackFinished(e) {
inboundCall.removeEventListener(CallEvents.PlaybackFinished, handleFwdPlaybackFinished);
outboundCall = VoxEngine.callUser(userNumber, inboundCall.callerid());
outboundCall.addEventListener(CallEvents.Connected, (e) => {
VoxEngine.sendMediaBetween(e.call, inboundCall);
});
outboundCall.addEventListener(CallEvents.Failed, VoxEngine.terminate);
outboundCall.addEventListener(CallEvents.Disconnected, VoxEngine.terminate);
};
//Call to the secretary
function handleFwdToReceptionPlaybackFinished(e) {
inboundCall.removeEventListener(CallEvents.PlaybackFinished, handleFwdToReceptionPlaybackFinished);
outboundCall = VoxEngine.callUser("101", inboundCall.callerid()); // In this Example the Secretary extention is 101
outboundCall.addEventListener(CallEvents.Connected, (e) => {
VoxEngine.sendMediaBetween(e.call, inboundCall);
});
outboundCall.addEventListener(CallEvents.Failed, VoxEngine.terminate);
outboundCall.addEventListener(CallEvents.Disconnected, VoxEngine.terminate);
};
// CallAlerting event handler
VoxEngine.addEventListener(AppEvents.CallAlerting, (e) => {
// If the incoming call came from PSTN
if (e.headers["VI-Client-Type"] == "pstn"){
inboundCall = e.call;
inboundCall.addEventListener(CallEvents.Connected, handleCallConnected);
inboundCall.addEventListener(CallEvents.Disconnected, handleCallDisconnected);
inboundCall.answer(); // answer the call
//Outbound calls from PBX users
} else {
if (e.destination.length > 3){ // Call to PSTN if the user dialed a number longer than 3 characters
let call2 = VoxEngine.callPSTN(e.destination,myNumber);
VoxEngine.easyProcess(e.call, call2);
} else {
let call3 = VoxEngine.callUser(e.destination,e.callerid); //Local call if the user dialed a number shorter than 3 characters
VoxEngine.easyProcess(e.call, call3)
};
};
});
function handleCallConnected(e) {
extState.enter(inboundCall);
}
function handleCallDisconnected(e) {
VoxEngine.terminate();
}
You must click the “Create script” button, on the left side, specify the name of the script (for example, “for call”), and copy the code to the workspace.
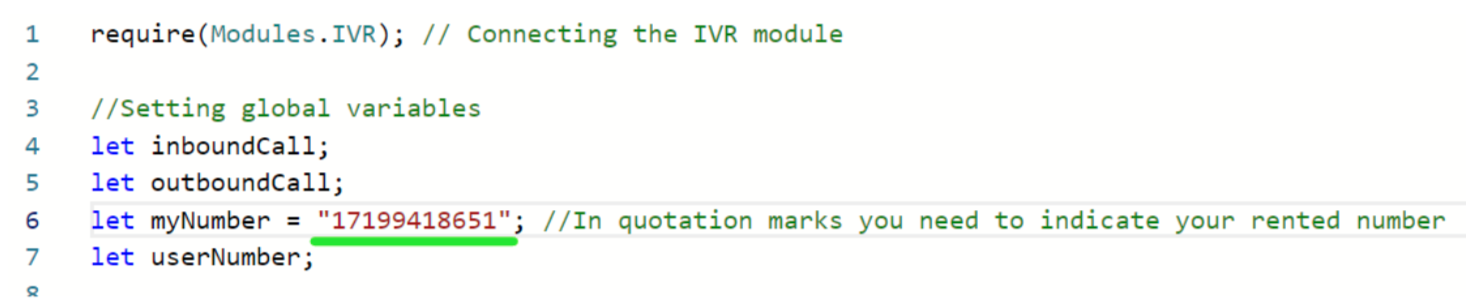
You need to specify your rented number in the script so that it is used for outgoing calls. To do this, in the line let myNumber, enter the number that you rented earlier in quotes.
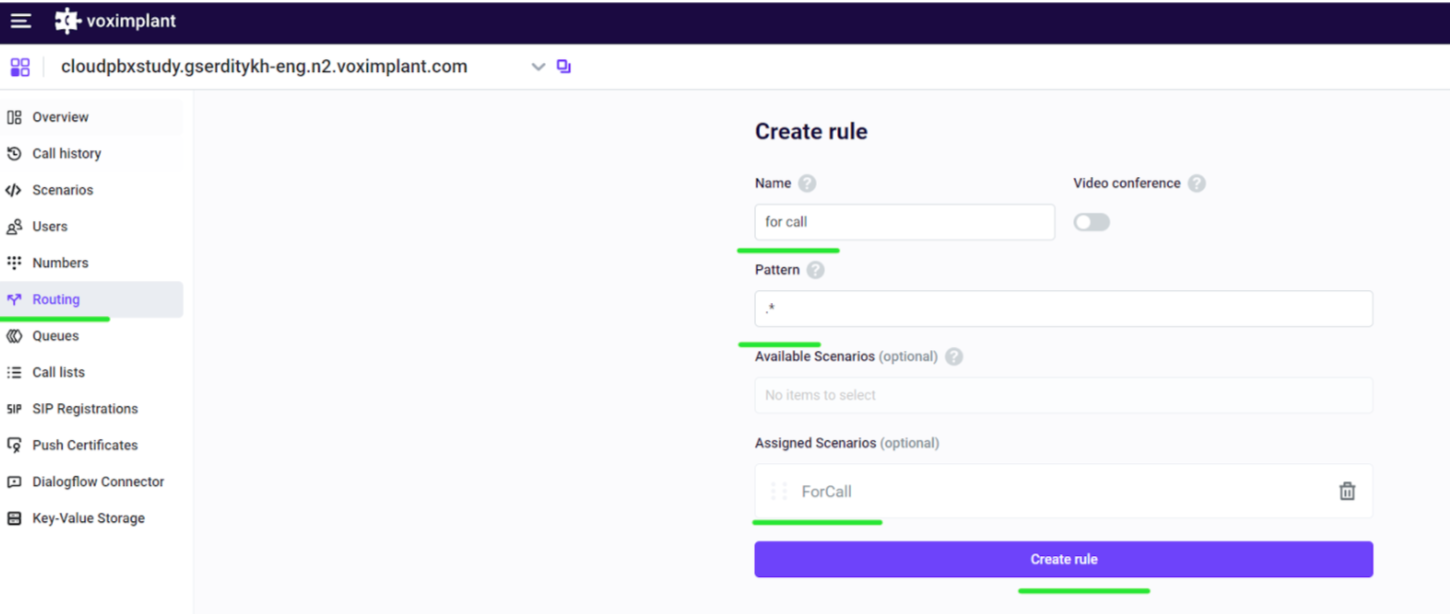
Step 4. Create a Routing Rule
Routing rules are required to direct calls to the specified scenario. Go to the Routing section and create a rule by which calls will be routed to the previously created script. In our case, we can use the .* mask and select our script.
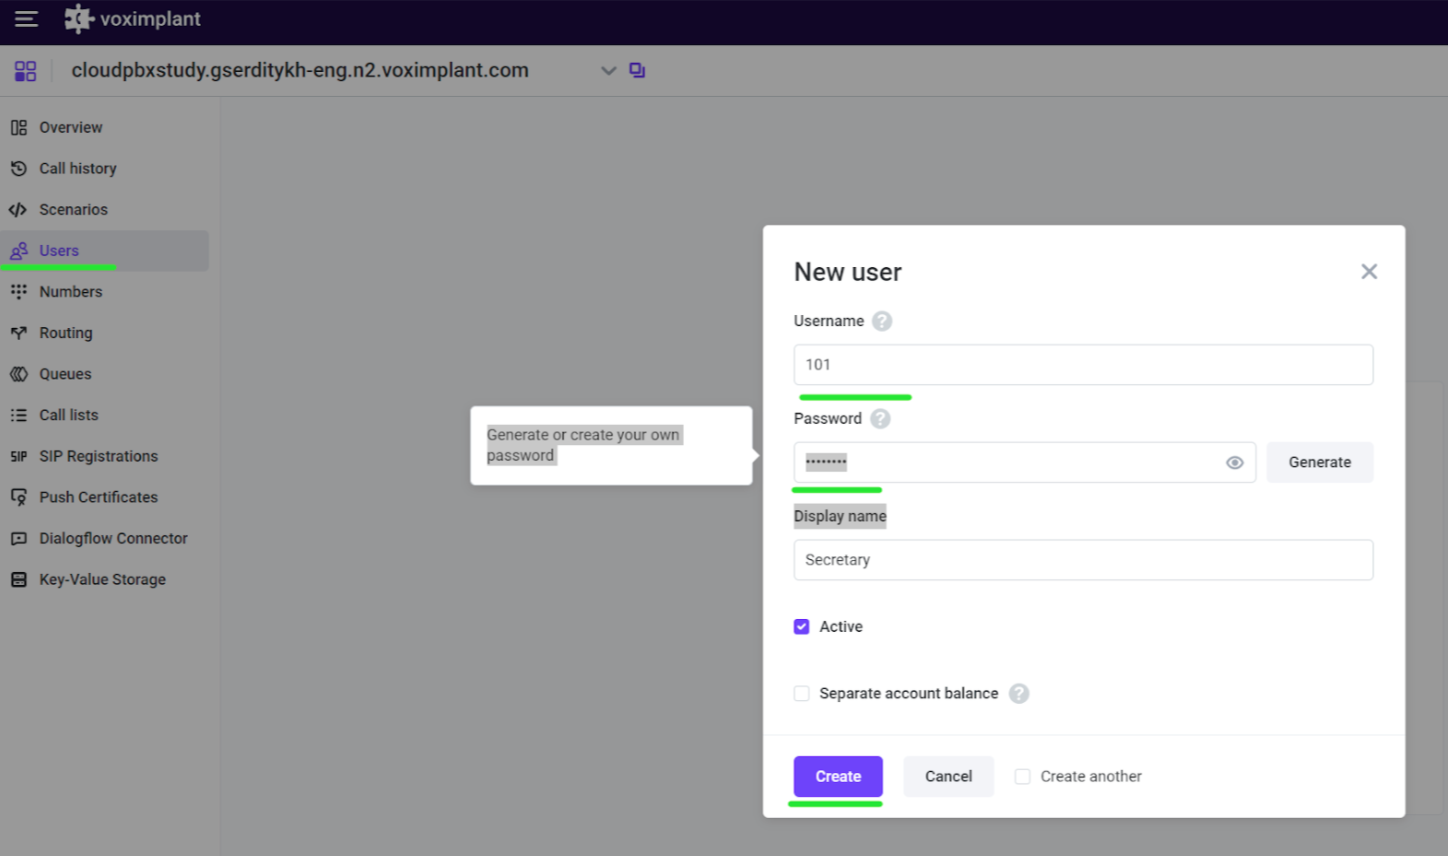
Step 5. Add New Users
The next step is to create internal users, these users will later need to be registered on the softphone. Our scenario assumes that the username is a three-digit number and the number 101 is assigned to the Secretary.
In the application, go to the Users section and create users.
Step 6. Register Users in a Softphone
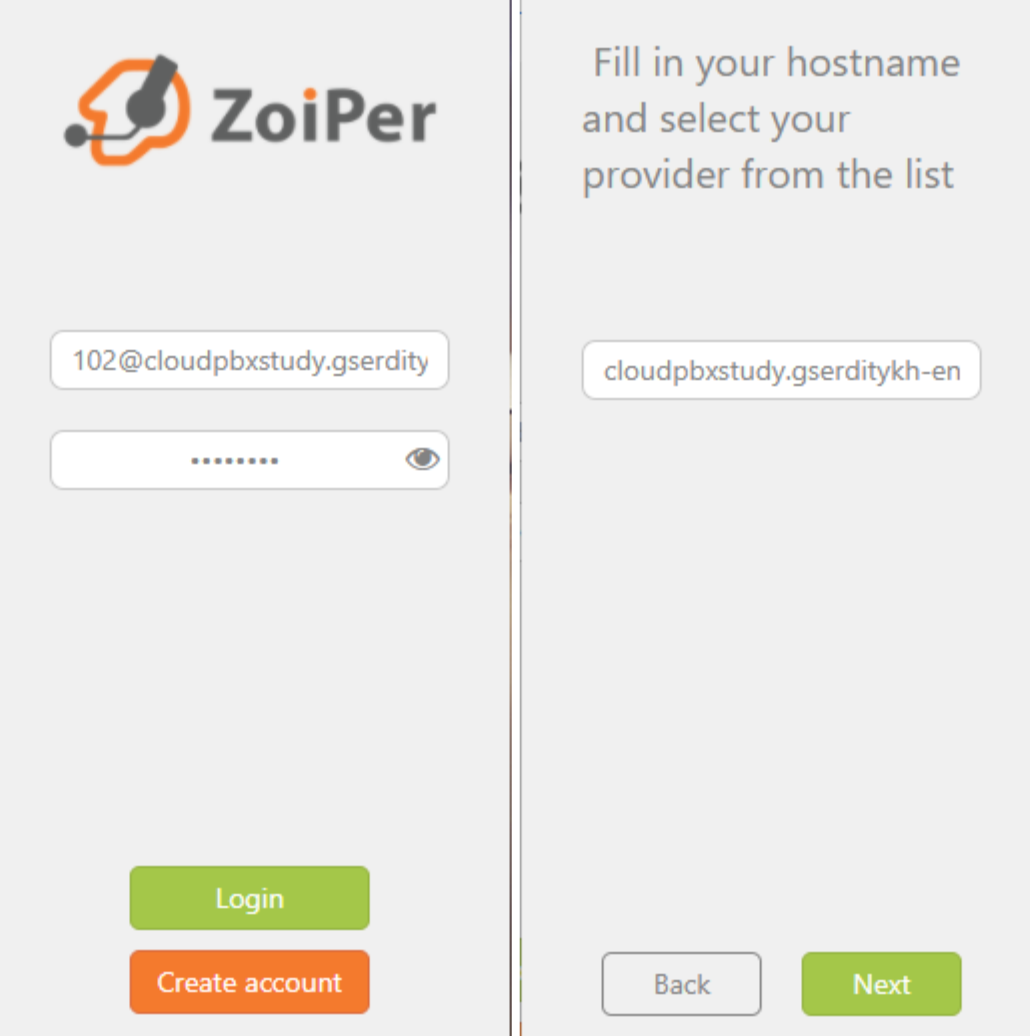
You can choose any softphone, mobile application, or IP phone to use with Voximplant Cloud PBX. The main thing is that the device or application must support the SIP protocol. These applications, for example, are Linphone, softphone.pro, PhonerLite, etc.
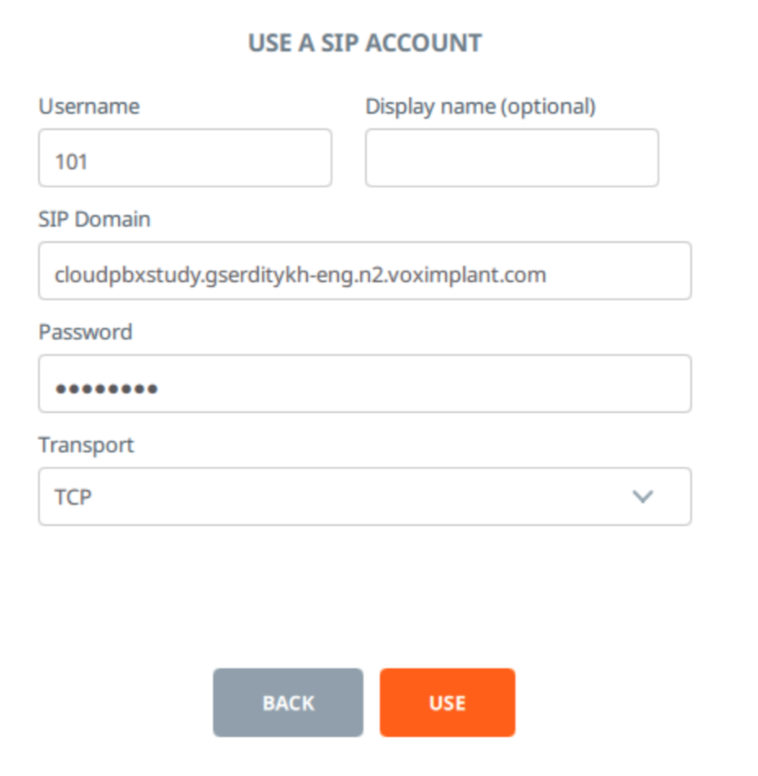
Create a new account to register a user.
As Proxy, you need to specify the address of the form:
your_application_name.your_account_name.voximplant.com
For example: cloudpbxstudy.gserditykh-eng.n2.voximplant.com
The username is a three-digit number that was specified during the user creation phase, for example, 101.
The password is the password that was specified during the user creation phase.
An example of setting up a Linphone softphone:
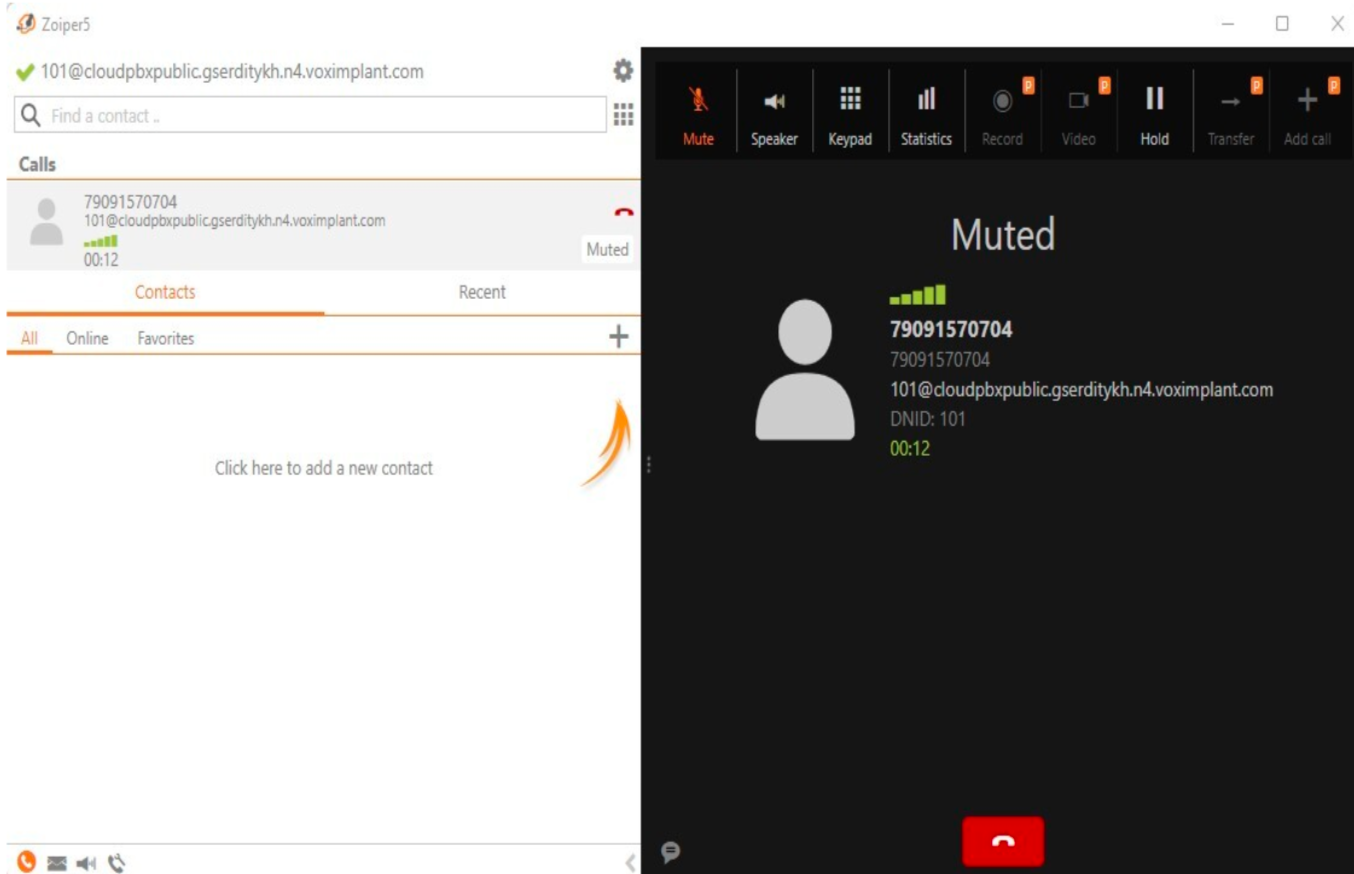
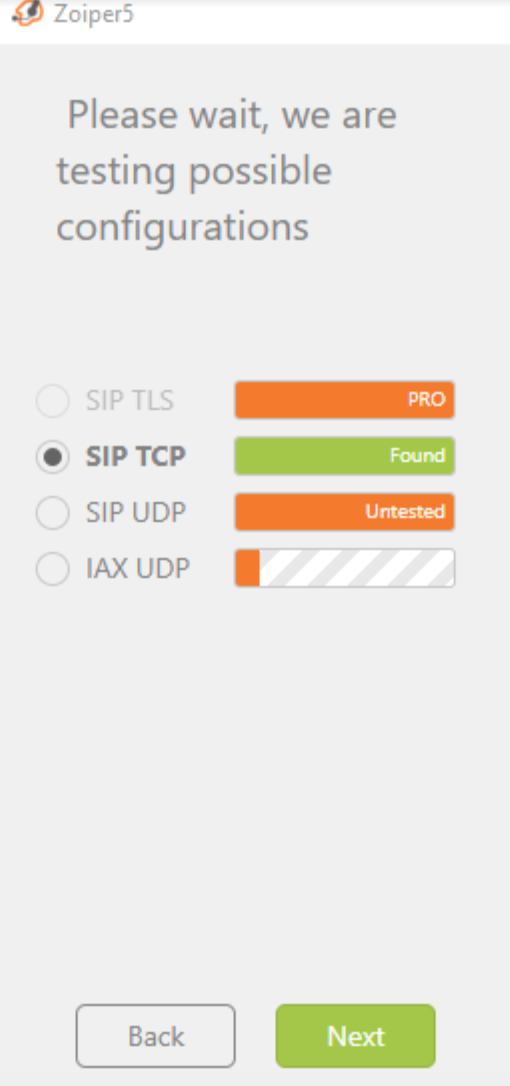
The Zoiper softphone settings example:
This completes the cloud PBX setup. You can make a test call to a rented number or enter an employee's internal number and your call will be forwarded to the user. For local calls, simply dial the employee's internal number.