Call forwarding
Use this block to forward a call to an external resource. You can do it either by calling the phone numbers directly or by SIP (Session Initiation Protocol).
- Connect the block using the Fail and Success ports.
- Double-click the Call forwarding block.
Configuring call forwarding to an external phone number
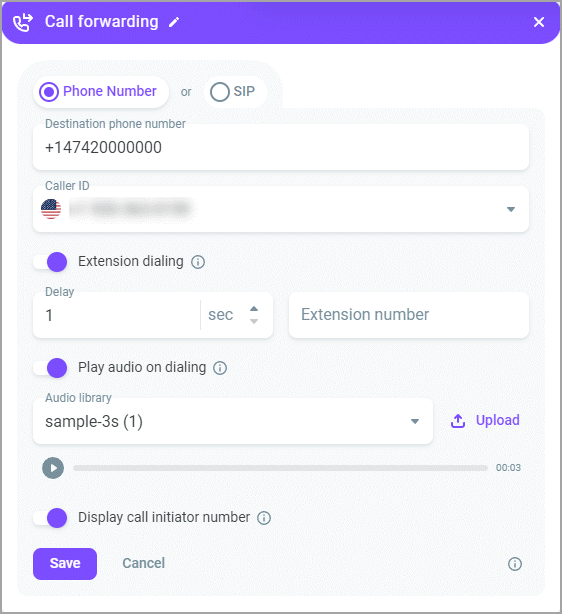
- Select the Phone number tab.
- Enter the phone number to which you want to forward the call in the Destination phone number field.
- Select the phone number to use as a Caller ID in the Caller ID field.
- Enable the Extension dialing switch if you want to forward the call to an extension. Enter the extension number for tone dialing and define the extension dialing delay (1-30 seconds) if needed.
- Enable the Play audio on dialing switch if you want the system to play an audio recording while connecting. Select an audio file from the Audio library drop-down list. Click Upload to upload an audio file from your computer.
- Enable the Display call initiator number switch so that the destination agent sees the phone number from which the original call came. When the setting is disabled, the agent sees the phone number rented in Voximplant Kit to which the call was received.
Note
The setting is only available in inbound scenarios.

Configuring call forwarding by SIP
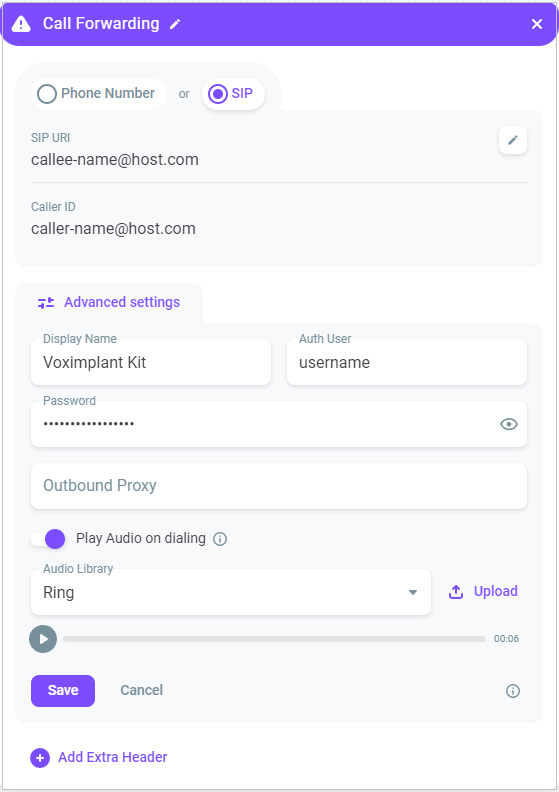
- Select the SIP tab.
- In the SIP URI field, enter the SIP URI of a user you want to call via SIP. Plainly speaking, the SIP URI is the callee SIP phone number.
- In the Caller ID field, enter your own (the caller) SIP URI. The system enters it in the From field in SIP logs.
SIP URI = sip:x@y:Port, where x = username and y = host (domain or IP).
Examples:
username@host.com
username@255.255.255.255
username@host.com:5060;transport=tcp
Information
The default transport type is UDP. To use TCP, follow the pattern: username@host.com:5060;transport=tcp. To use TLS, follow this pattern: username@host.com:5060;transport=tls.

- Optionally, click Advanced settings to configure additional settings.
- In the Display name field, enter the caller name to display for the callee.
- Fill in the Auth user and Password fields for authorization on the SIP server, if required.
Note
If your browser saves the Voximplant Kit password and login, the system automatically fills in the Auth user and Password fields.
- Enter a SIP proxy in the Outbound proxy field if you want to initiate a call through a third-party proxy.
- Enable the Play audio on dialing switch if you want the system to play an audio recording while connecting. Select an audio file from the Audio library drop-down list. Click Upload to upload an audio file from your computer.
- Click Add extra header to add a new header. Enter the required header in the Header field and enter or select a variable from the Create a variable drop-down list. Note that Voximplant Kit supports sending X-headers only.
- Click Save.
