


Automation of calls and related processes has become a widespread business tool. You can make calls to a contact base, receive and distribute calls using robots. Voximplant provides a variety of speech synthesis and recognition vendors so you can choose between them and achieve business results and a comfortable user experience. But what if even the most advanced neural voices sound too artificial for your case? In both our products you can use speech recordings instead of synthesis, so that the robot speaks with human-voiced cues.
A reliable way to get high-quality recordings is to contact a voice-over agency. However, this approach involves several extra steps: signing a general contract for services, preparing a technical specifications list and paying for agency services. Whenever your case requires an urgent launch or the voice-over budget is not included, you can record the voice yourself. You will need а microphone and a PC or mobile device for a quick start.
This how-to will guide you through a selection of hardware and software as well as making the right recordings.
Recording requirements
There is a single requirement for audio recording to be used in scripts on the Voximplant platform and in the Voximplant Kit; it must be stored in MP3 format. Other formats — such as OGG, M4A, WAV — are not supported by the system. If you record audio in a different format, don’t forget to convert it to MP3 using online services or free software.
An important feature of audio recording is it’s bitrate. This value is responsible for how clear and readable the sound will be. Higher bitrate value leads to better voice sound in a telephone conversation.
The table below illustrates the relationship between the recording bitrate and the output file:
| BITRATE | RECORDING PROPERTIES | |
| >96 kbps | Minimum file size, lowest quality. It’s better to avoid using such a recording — the voice will be hollow and compressed, it will be very difficult to make out by ear. | |
| 96-128 kbps | Small file size, poor quality. This recording can already be used, but some sounds, syllables and words can be mismatched and confused due to indistinctness. | |
| 128-170 kbps | Medium file size, high quality. The best option to use in scripts due to perfect balance between file size and sound quality. These frequencies make speech quality indistinguishable from live communication. | |
| 170-320 kbps | Maximum file size, highest quality. You can use this file, although the difference between 170 and 320 kbps is difficult to detect in a telephone conversation and large files take up more memory space. |
In addition to the bit rate, the quality of recording is influenced by the voice and audio device with which the recording is made and processed. The following section will guide you through preparations for recording, choosing the right devices and processing your audio.
How to record the voice
Voice recording entails three stages of creation:
- Preparation: Choosing an audio device and program for recording, preparing a speaker;
- Recording: Reading replicas until an optimal result is obtained;
- Processing: Elimination of noise, sound leveling, and creation of the final file iteration.
PREPARATION
The choice of audio device depends on where you plan to record audio. The safest option is to combine a lavalier microphone with your PC or smartphone. It allows you to record with sufficient quality in almost any environment — even if the soundproofing is poor or absent. If you are going to record sound outdoors or in a noisy room, make sure to use a windscreen over your microphone.
The best sound quality is achieved with a phantom-amplified capacitive microphone connected to the mixer. However, most modern smartphones and recorders will allow you to record audio of sufficient quality using a built-in microphone if you are recording sound in a quiet room or sitting in a car.
You can choose a program for recording sound to your liking — this function is built into most advanced audio editors. Popular options include Audacity, Adobe Audition, Free Audio Editor, and a built-in voice recording utility for Windows and macOS.
The last thing to prepare before recording is your own voice. To make your speech sound legible and well-readable, try following a few simple rules of professional voice-over actors:
- Try to avoid sweet, salty and spicy food as well as carbonated drinks at least 2-3 hours before the recording session;
- If you tend to skip or swallow some sounds in your daily manner of speech — read a few tongue twisters with these sounds an hour before your recording session;
- Take a bottle of still water with you. Limit your recording sessions to a maximum of 15 minutes and take a 5-10 minutes break between them. Try not to drink while recording, but take several sips during each break;
- Relax your shoulders and abdomen and assume a comfortable position. Try to breathe with your diaphragm, and avoid chest breathing during recording.
By following these guidelines, you will be able to achieve smoother voice recordings.
RECORDING
In addition to advice from professional announcers, there are a few more rules for recording sound. They will help you immediately create such files that can be conveniently processed:
- Record background noise without speaking for 15 seconds at the beginning or end of each recording. It will be used to reduce surrounding noises during processing;
- Record each phrase separately. It will be more convenient to work with different files than to split one audio track into several parts;
- Don't concentrate on the volume of your voice or speed of overall speech — try to speak as naturally as possible. Volume and speed can be adjusted later — at the processing stage;
- Once you’re finished recording — let another person listen to the resulting files. One's own voice is difficult to perceive objectively, while an outside observer can usually give an honest assessment;
- If you understand that the voice on the recording is barely audible/there is too much noise/sound is partially interrupted — it is better to record the necessary phrase once more. Audio processing can improve sound quality, but does not solve all possible problems;
PROCESSING
After you’ve created the MP3 files — you can go on and immediately upload them to use in scenarios on the Voximplant platform and in Voximplant Kit scenarios. However the sound quality can be further improved without making the resulting file heavier by processing in an audio editor. You can obtain the best sound for any voice recording in four simple steps. In this example, we will show you how to do this using the free audio editor Audacity:
1. Readable high frequencies
We can easily perceive a bright and clear voice — one in which high frequencies stand out well. You can increase the high frequencies of your voice using the appropriate audio editor tool.
For example, in Audacity you need to select the entire audio track, go to the Effect section and select “Bass and Treble”.
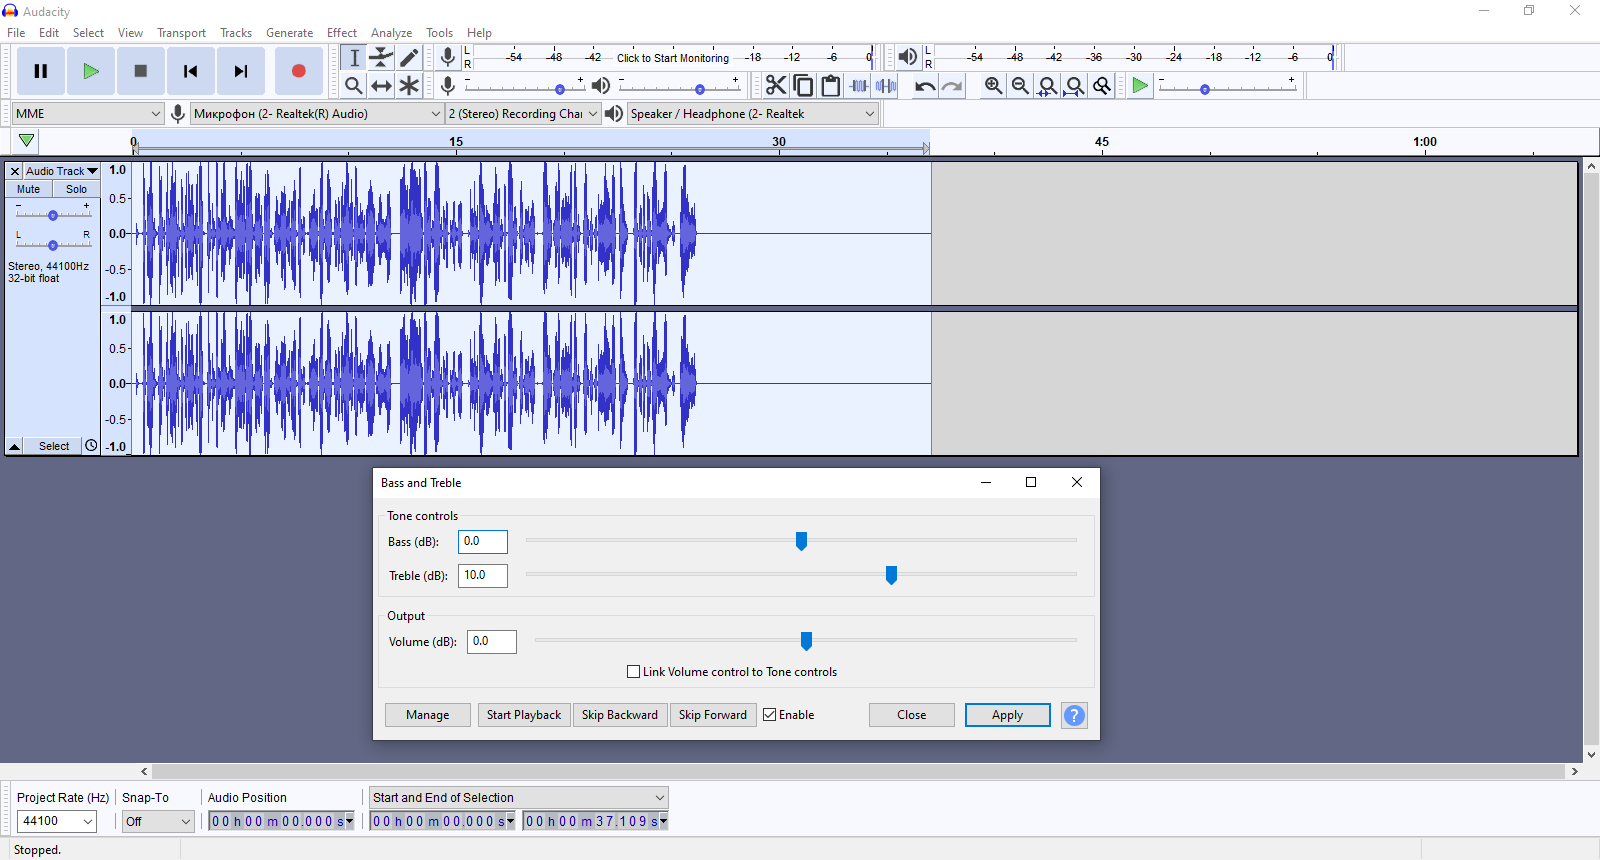
You should add 0-2 decibels to Treble for female voice and 2-12 decibels for male voice. The lower the voice, the higher the amount should be added. Without changing the volume setting, click Apply to increase the treble level for the entire recording.
2. Eliminating audio artifacts
The equalizer can be used to remove overly low and high sounds from the voice. To do this, go to the Effect section, select the "Filter Curve" tool and cut off all sounds below 80 Hz and above 7000 Hz as in the screenshot:
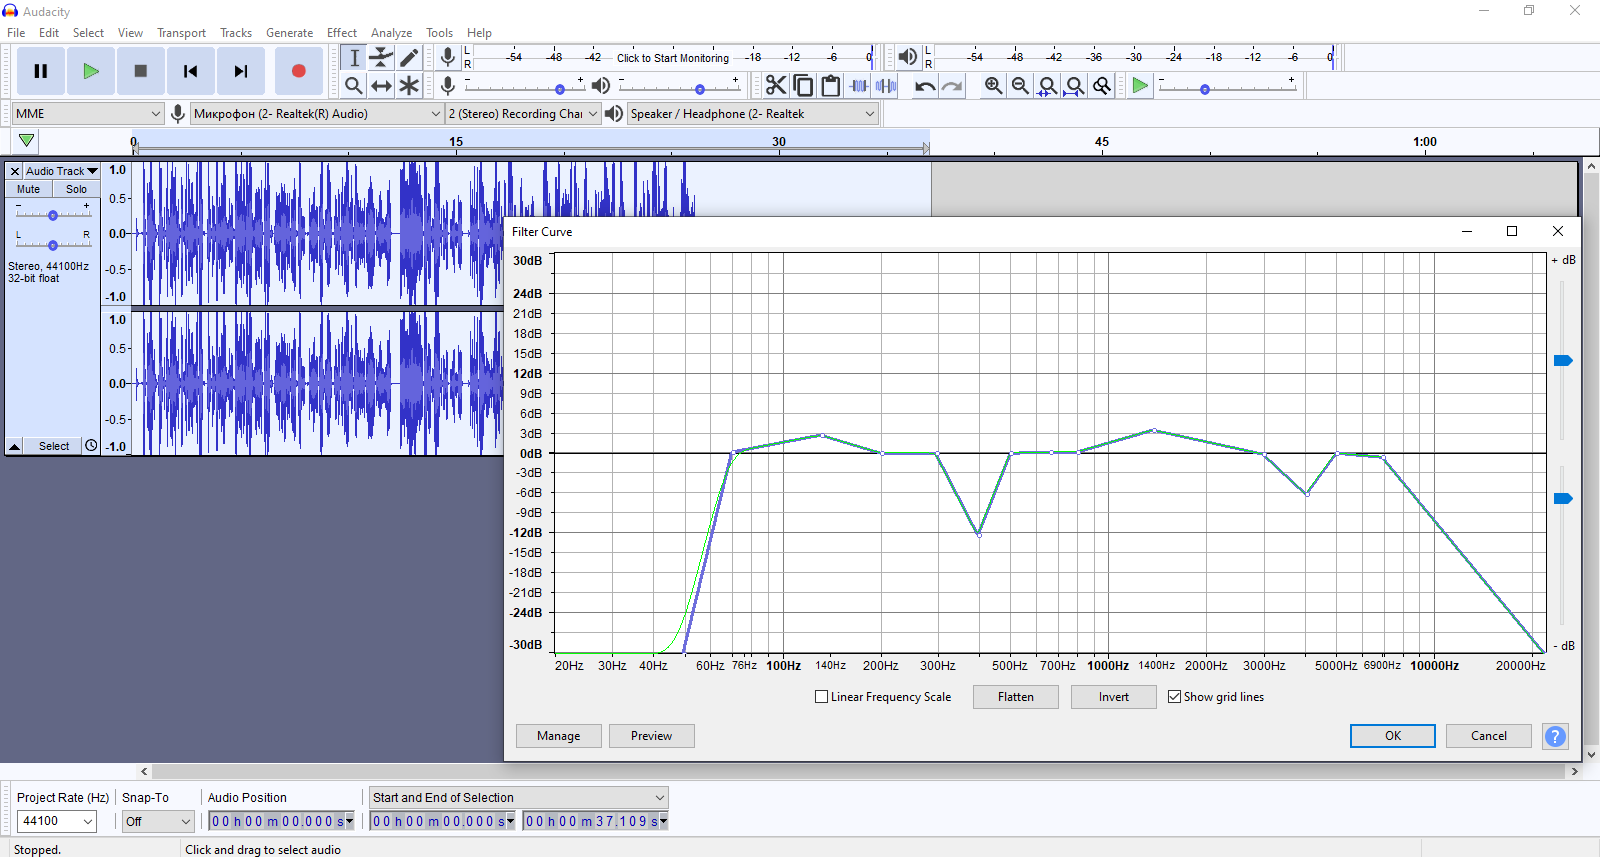
The rest of the EQ values should be changed with care if you want to adjust the recording. Press Listen to check how your speech will sound based on the filter curve settings. When you are satisfied with the sound quality, click “OK”.
3. Smooth sound
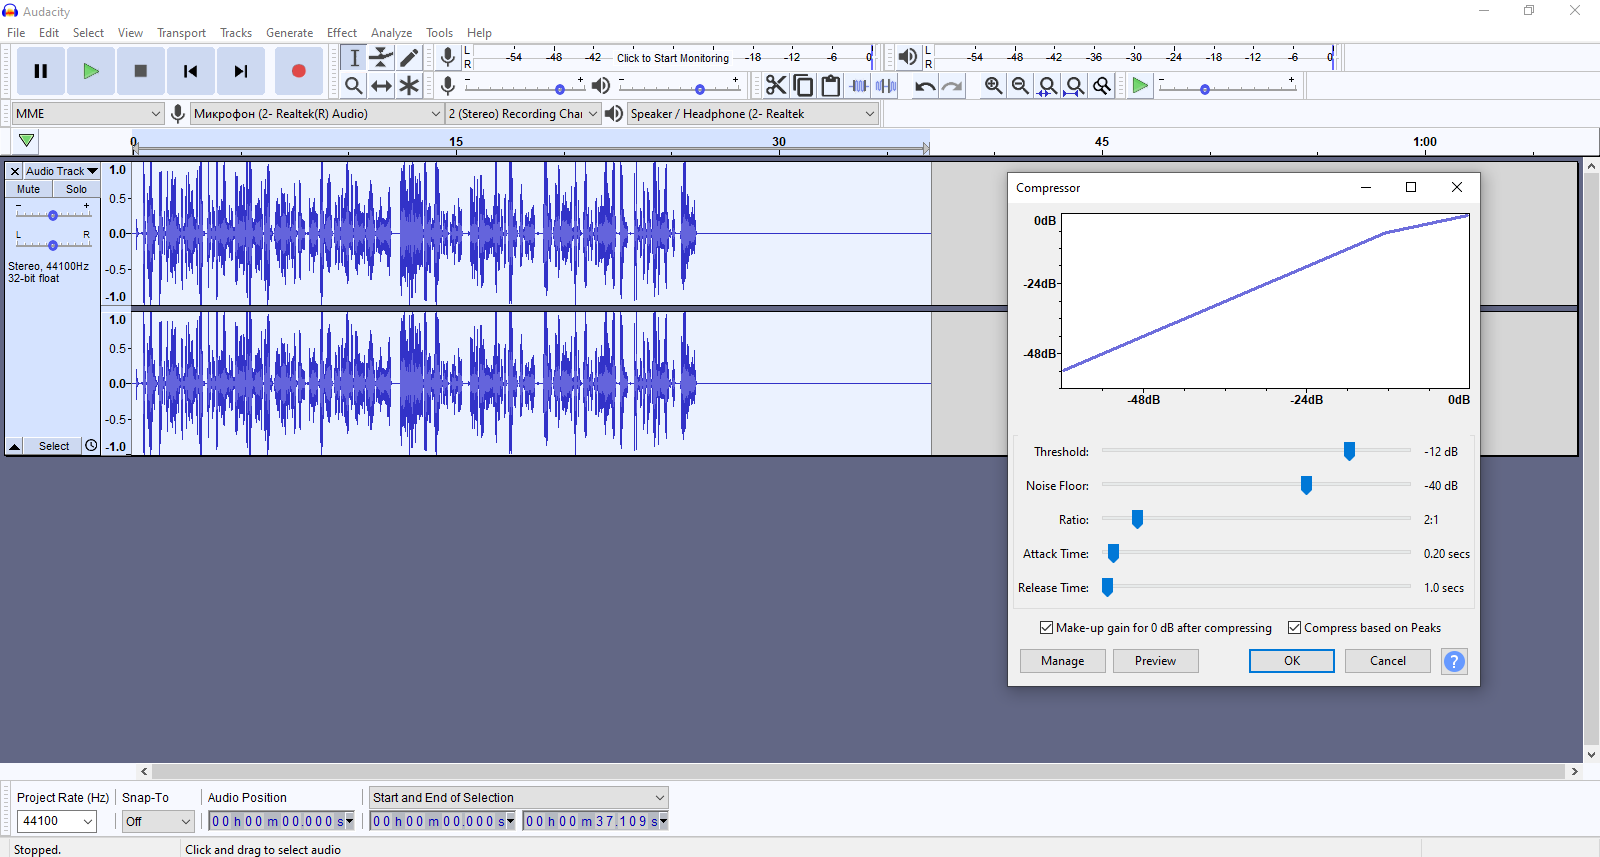
The default audio track has a wavy appearance with sharp rises and falls. They should be eliminated for the sound to become evenly loud along the entire length. In order to achieve this, you have to combine two tools.
First, pass the sound through the dynamic range compressor. Go to Effect -> Compressor and apply this tool using the default settings. Before doing so, make sure that the checkbox “Compless based on Peaks” is active as this will prevent overly loud sections of the track from being amplified.
Next go to Effect -> Limiter and set the limit at -4 decibels to even out the sound without sacrificing its volume.
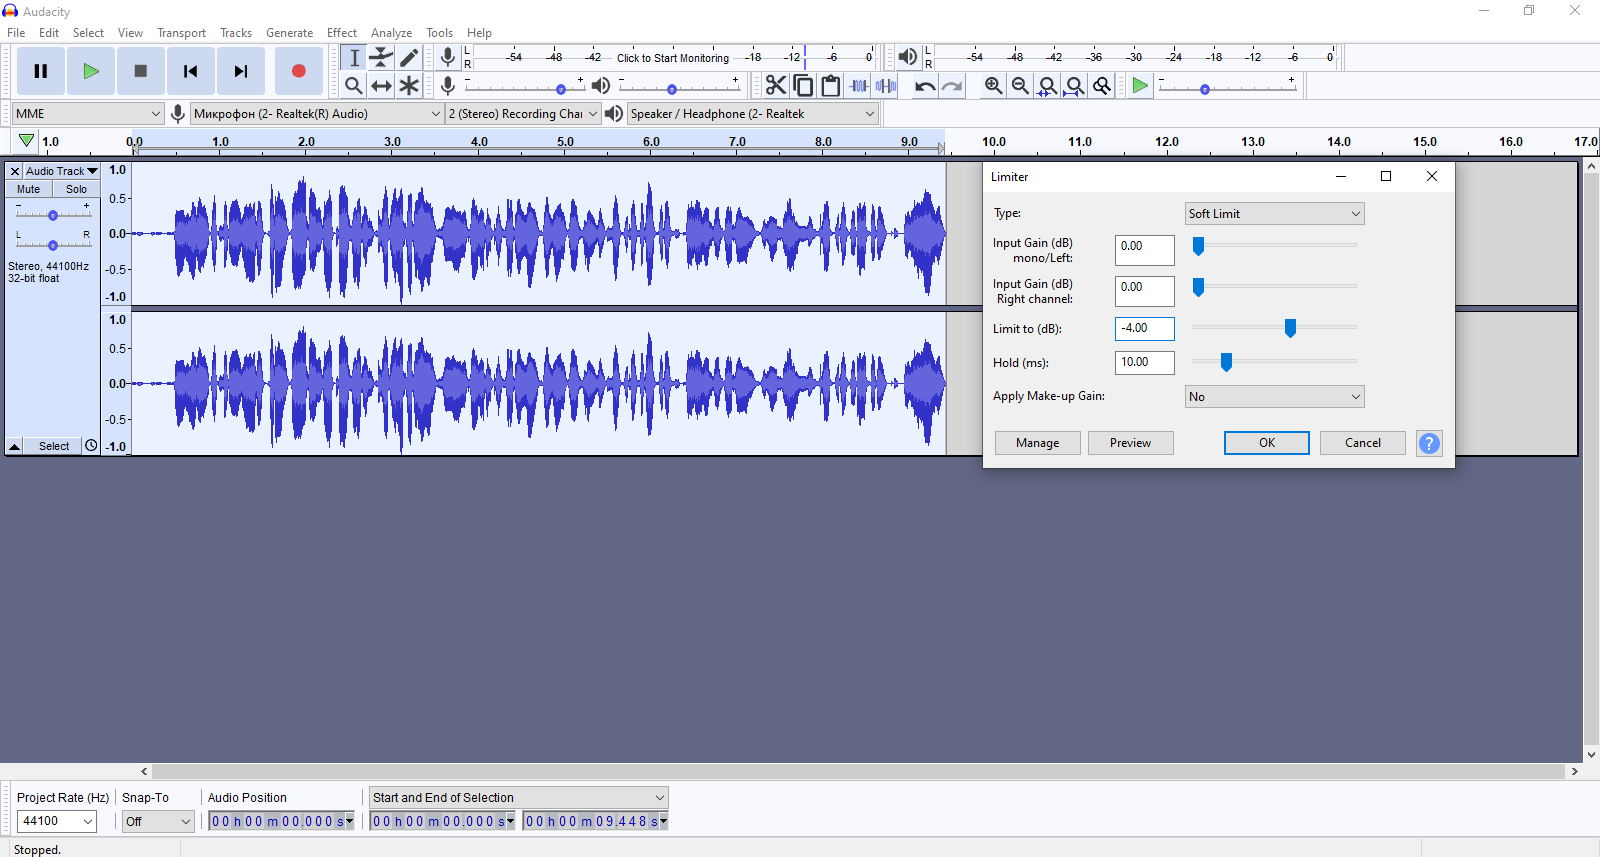
Repeat these steps 2-3 times until the track looks straight, without obvious jumps or drawdowns.
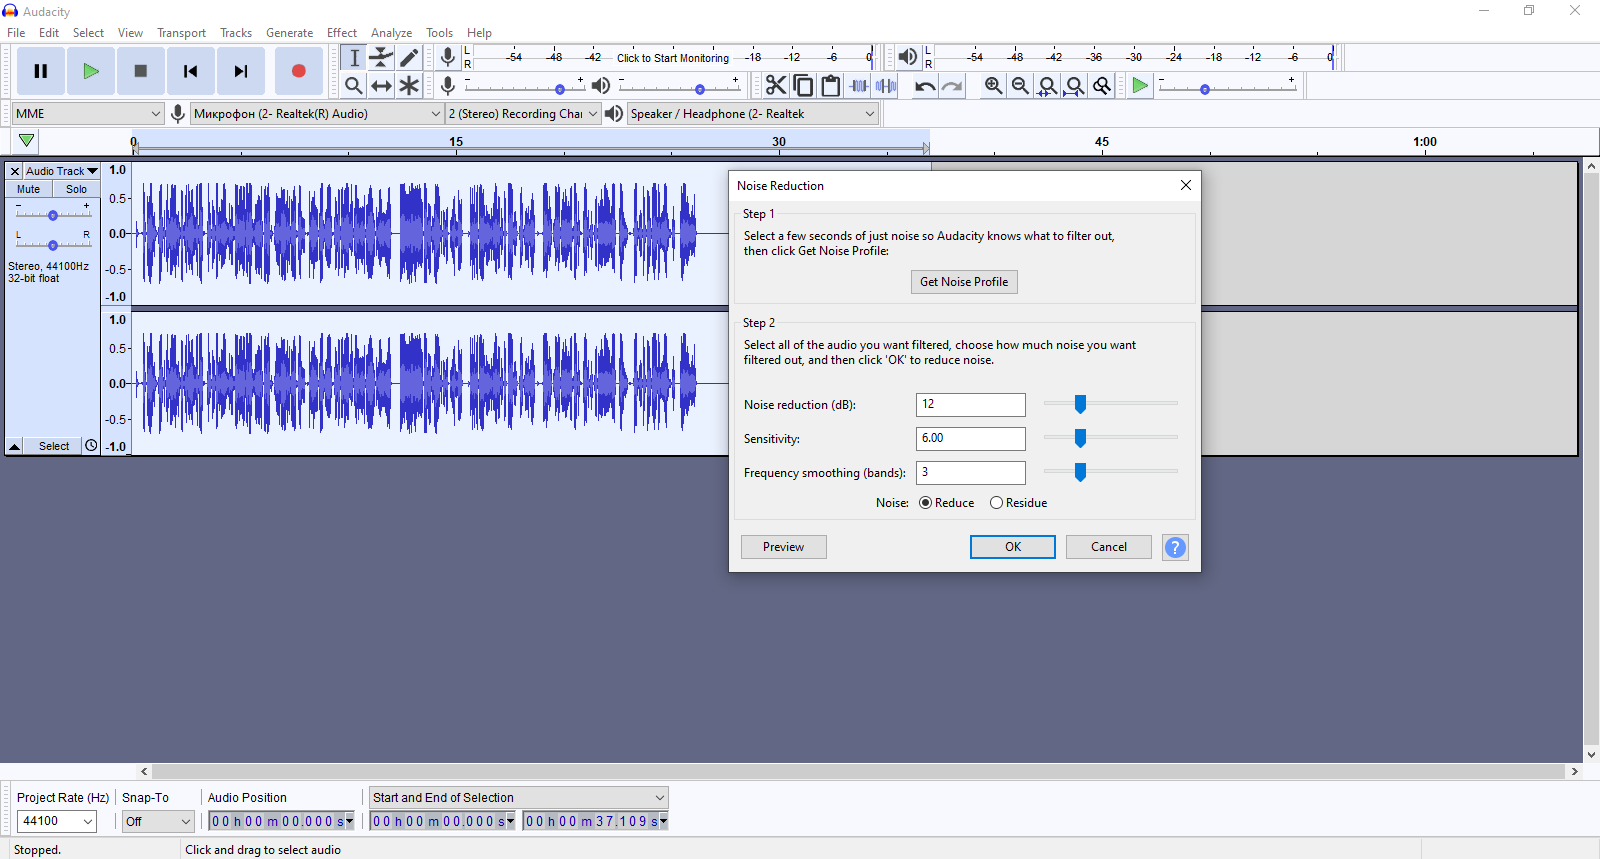
4. Noise reduction
We have recommended recording a segment of background noise without speaking for 15 seconds at the beginning or end of each recording. It will be used to remove background noise at this stage. Select this segment, go to Effect -> Noise Reduction and select “Get Noise Profile”.
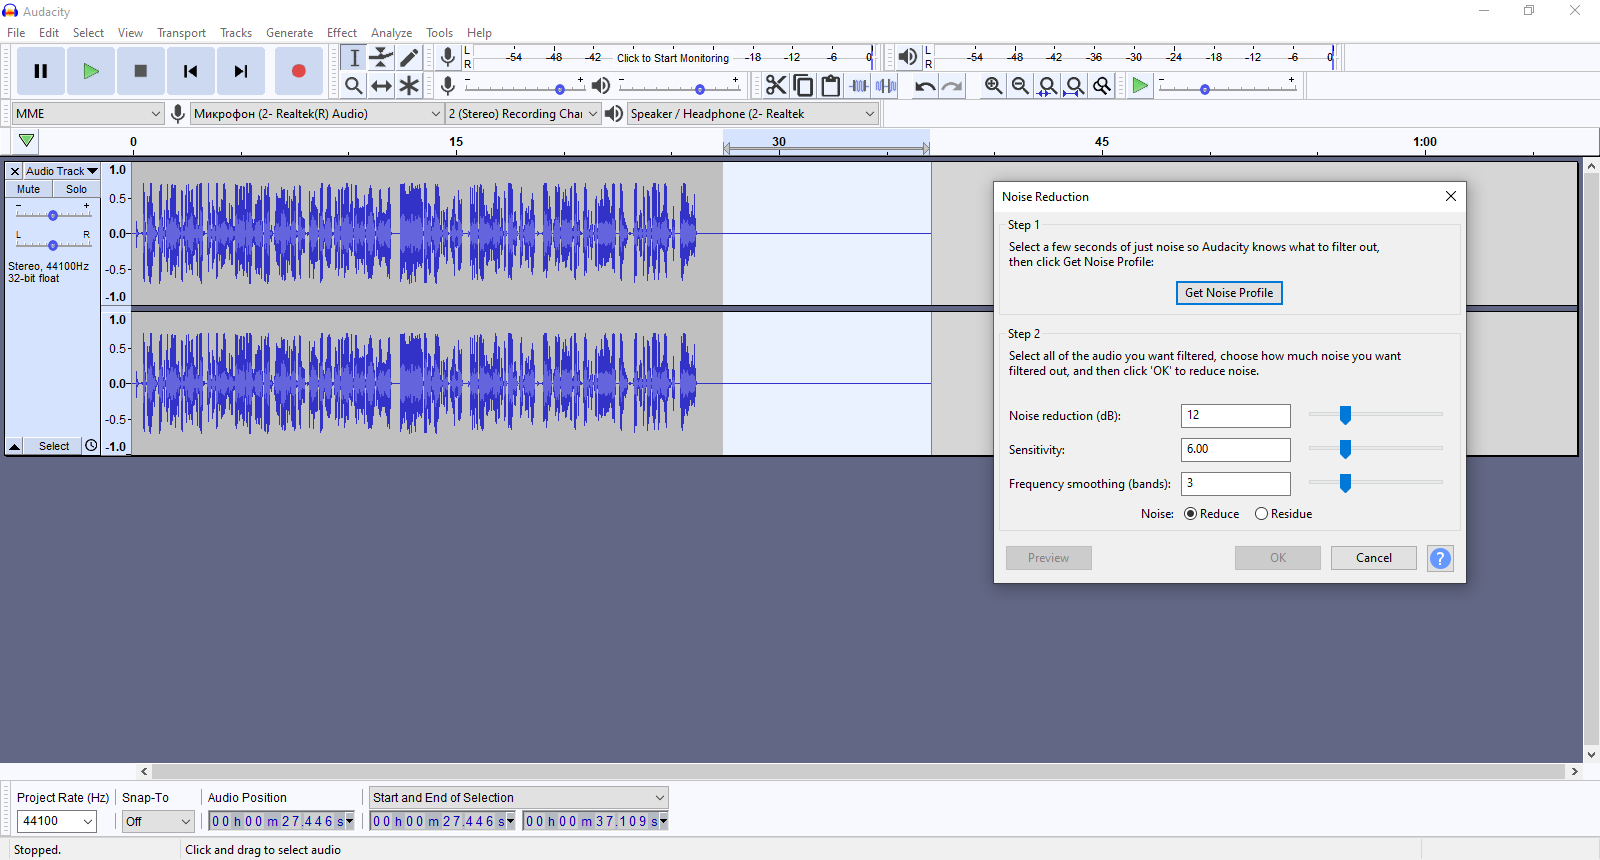
Now you have some noise pattern that the audio editor will try to remove. Select the entire track, go to Effect -> Noise Reduction and click “OK”. Noise reduction will be applied to the entire recording.
Remember to remove any pauses before and after your speech. To do this, select the pause and press the Delete button on your keyboard. After all the steps are completed, go to the File section, select the menu item Export -> Export as MP3.
Warning: do not use the “Save” option — it does not create an MP3 file from your audio project.
Final steps
The finished audio file must be uploaded to the hosting in order to be used on the Voximplant platform or in the “Audio” section of the Voximplant Kit visual editor. Now you can refer to it in the required place of your script to reproduce during the call.


