Defining call permissions
Group settings take precedence over the general CC settings. If you use groups, set them up in the Setup > Contact center > Users > Groups section.
- Log in to your Voximplant Kit account.
- On the left sidebar, select Setup > General settings.
- Go to the Call permissions subsection.
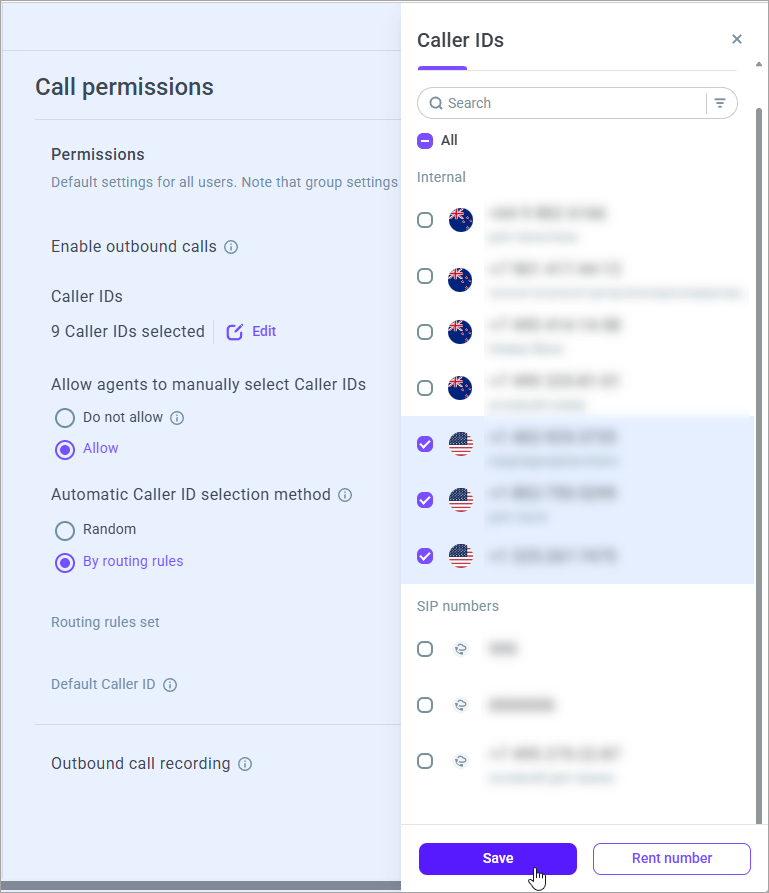
- Use the Enable outbound calls switch to allow users to make outbound calls.
- Click Add in the Caller IDs field to add phone numbers for outbound calls.

- In the panel on the right, select the desired numbers. Please note that you can only choose either Internal numbers or SIP numbers.
- If there are no phone numbers on your account yet or you require an additional phone number, click the Rent number button.
- Click Save.

- Assign one of the selected phone numbers as the Default Caller ID. The system uses this Caller ID if:
Agents cannot edit the Caller ID in the softphone and you disable the Use automatic Caller ID selection switch.
You enable the Use automatic Caller ID selection setting, select the By routing rules option, but the dialed phone number does not match any of the rules in the selected set.

- Enable the Allow agents to manually select Caller IDs switch so that agents can manually select a Caller ID in the softphone.
With the setting disabled, the following logic applies:
The system uses the Default Caller ID if you disable the Use automatic Caller ID selection switch.
The system automatically selects a Caller ID (randomly or by routing rules) if you enable automatic Caller ID selection.

- Enable the Use automatic Caller ID selection switch so that agents can use automatic Caller ID selection for outbound calls from the softphone. Configure how auto-selection should work.
Random - The system automatically selects a random Caller ID.
By routing rules - The system automatically selects a Caller ID based on matches of the dialed phone number with masks from the routing rules in the selected set. Choose a routing rules set. If the system fails to find a match, it uses the Default Caller ID.

How automatic number selection works
If agents are not allowed to select a Caller ID, the system automatically selects it (randomly or by routing rules) without agent involvement.
If agents are allowed to select a Caller ID, they can configure how it should be selected: manually from a list of available phone numbers or automatically (randomly or by routing rules).
For more details on Caller ID selection in the internal softphone, go here. The information on the embeddable softphone and Kit softphone app, can be found here.
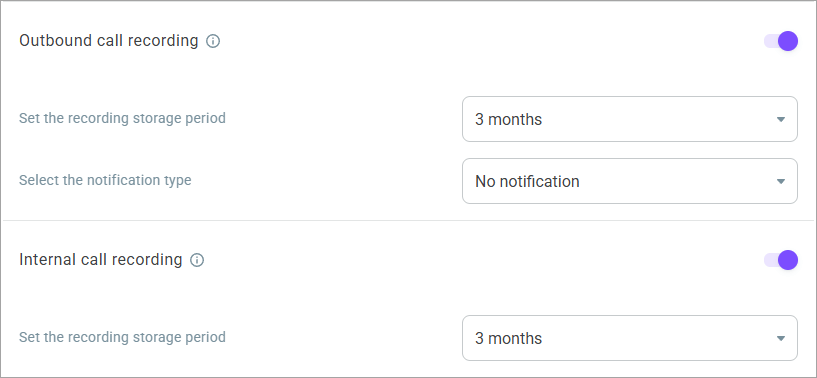
- Enable the Outbound call recording switch to record outbound calls to customers.
Select the storage period from the drop-down list. This is the period when outbound call recordings are available in the call history section. If you want to inform a customer that their call is being recorded, select the notification type from the drop-down list. Depending on the type of the notification (audio or text-to-speech), do the following:
For the audio record type, upload an audio file or select an existing record from the drop-down list.
For the text-to-speech type, configure the synth language, voice, and spoken text.
You can also choose not to notify a customer.
In some countries, you are compelled by law to inform the other party that you are recording the call.
- Enable the Internal call recording switch to record internal conversations of your agents.
Select the storage period during which internal call recordings are available in the call history section.

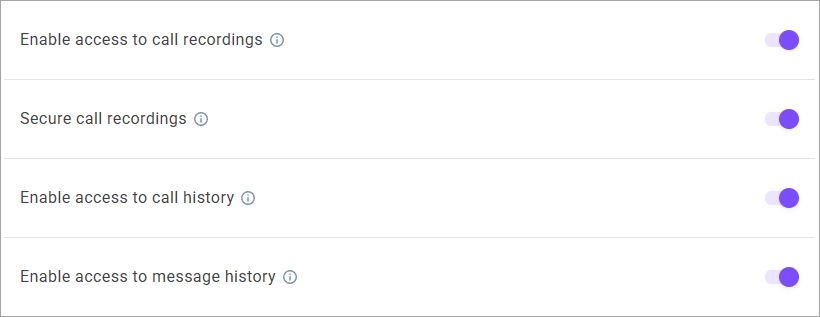
- Toggle the Enable access to call recordings switch to allow agents to access their call recordings in the softphone.
- Enable the Secure call recordings switch so that only authorized users can access audio recordings via links.
- Toggle the Enable access to call history switch to allow agents to access their call history in the History > Calls section.
- Toggle the Enable access to message history switch to allow agents to access their message history in the History > Messages section.

- Enable the Hold notifications switch so that your contact center agents receive reminders that a customer is on hold after a certain period of time and set this time is seconds. When the switch is disabled, your contact center agents do not receive any hold notifications. You can also configure hold notifications individually for a queue in the queue settings.
- If you want the system to play an audio record while a customer is on hold, enable the Audio record on hold switch. After you activate it, upload an audio file or select an existing record from the drop-down list.

- Click Save changes.
