Defining automatic callback rules
Set up automatic callbacks for missed calls. The callback feature allows you to reduce customer loss and save time on manually monitoring missed calls.
How does it work?
In case of a missed call (lost or abandoned), the system automatically dials contact center agents , and only after an employee answers the phone, does it start calling the customer whose call was missed. The system can call back immediately as soon as a missed call is detected, or after some time. You can set up several callback attempts in case a customer does not answer. You can configure automatic callback rules depending on where a call was lost: in a scenario or in the contact center.
The maximum time for the system to connect to a CC agent during an automatic callback is 40 sec. The value is not subject to change and takes precedence over the queue settings. If the system fails to reach an available agent within 40 seconds, it will make further attempts with the first interval set in the automatic callback rule settings an unlimited number of times until an available agent is found.
Automatic callback features:
Automatic callback is triggered for all missed calls, including calls lost in IVR.
The functionality activates when there is a missed call and there is no call queue.
The automatic callback feature is disabled if a customer calls back themselves or an agent manually dialed the number. Customers do not receive unnecessary calls.
If a customer fails to answer a callback attempt, the system can make further dialing attempts depending on the settings.
If you disable a callback rule, the system cancels associated callback tasks.
When you edit an automatic callback rule, new settings apply to new missed calls and to new attempts for current missed calls, BUT the attempts already loaded into the call lists follow the old settings.
When deleting a user, queue, or group that lost a call, the associated automatic callback task does not start.
When an account is frozen, the system disables automatic callback rules and dialing stops. After the account is unfrozen, you need to manually activate automatic callback rules.
The maximum number of lines for automatic callbacks is limited to 15.
- Go to the Automatic callback subsection.
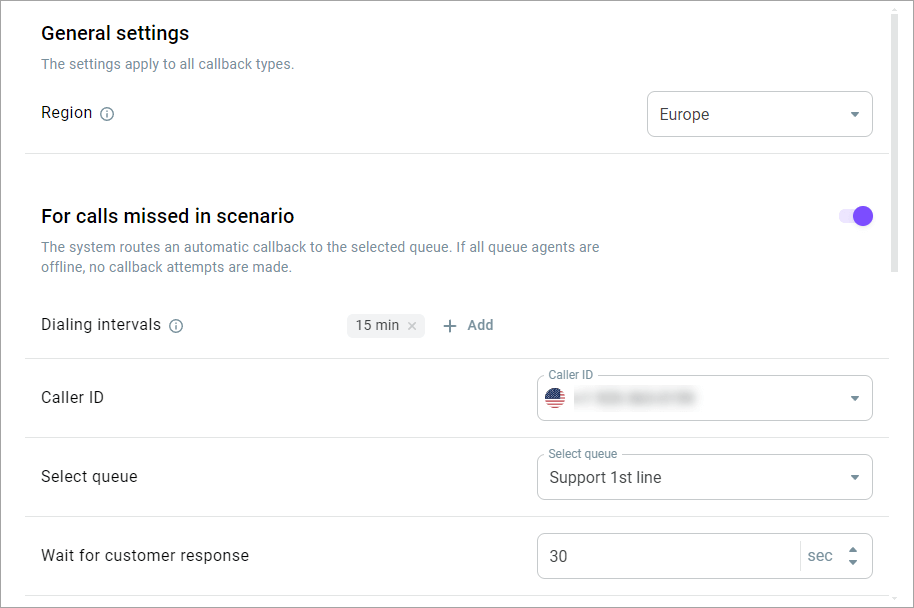
- Enable the For calls missed in scenario switch to set up a rule (set of conditions) for placing callbacks to calls missed in a scenario. The system routes an automatic callback to the selected queue.
- In the Region field, select the region to launch automatic callbacks. The setting applies to calls missed both in the contact center and scenarios.
The region options depend on your account.
- In the Dialing intervals field, define intervals for each callback attempt (from 1 to 60 min). The first interval is the time from the initially missed call to the first callback attempt, each subsequent interval is the time from the previous unsuccessful attempt to the next attempt. If a callback is successful, the system does not make any further attempts.
- Select an outbound phone number in the Caller ID field.
By default, the system uses the Caller ID the customer called. If the system fails to identify this phone number (SIP numbers, for example), it uses the selected Caller ID.
- Select the queue to process callbacks. You can only select 1 queue.
- In the Wait for customer response field, define how long an agent should wait for a customer response. When this time elapses, the current dialing attempt ends.

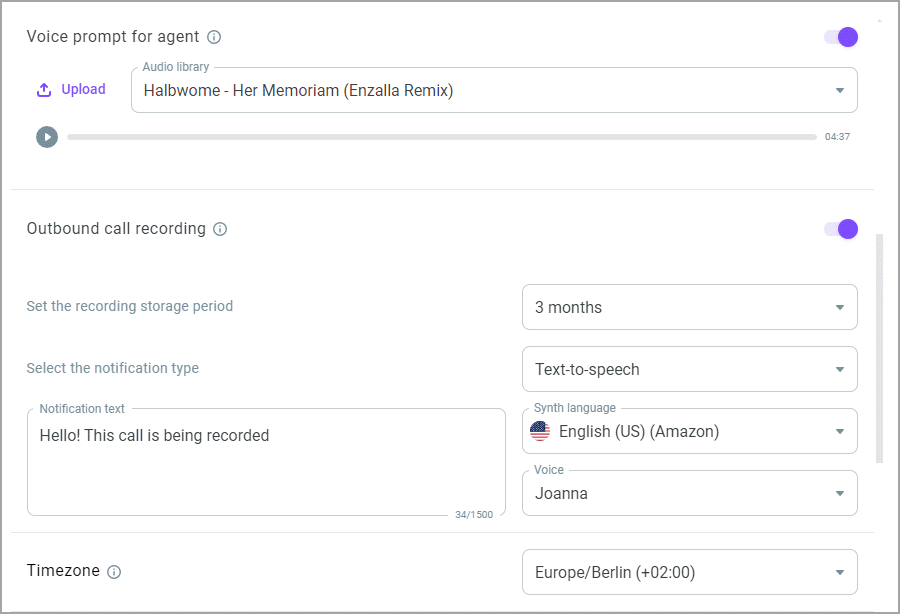
Enable the Voice prompt for agent switch to select an audio file the system will play to an agent before the call is started. The goal of the prompt is to inform an agent that the call is triggered by an automatic callback rule. Upload a file from your PC or select a recording from the library.
Enable the Outbound call recording switch to record outbound calls initiated by an automatic callback rule.
Select the storage period from the drop-down list. This is the period when callback recordings are available in the call history section.
If you want to inform a customer that their call is being recorded, select the notification type from the drop-down list. Depending on the type of the notification (audio or text-to-speech), do the following:
For the audio record type, upload an audio file or select an existing record from the drop-down list.
For the text-to-speech type, configure the synth language, voice, and spoken text.
You can also choose not to notify a customer.
In some countries, you are compelled by law to inform the other party that you are recording the call.
- Optionally, select the Timezone that will be used to schedule automatic callbacks if the system fails to automatically detect it. If the timezone is neither selected nor automatically detected, no callback is started.

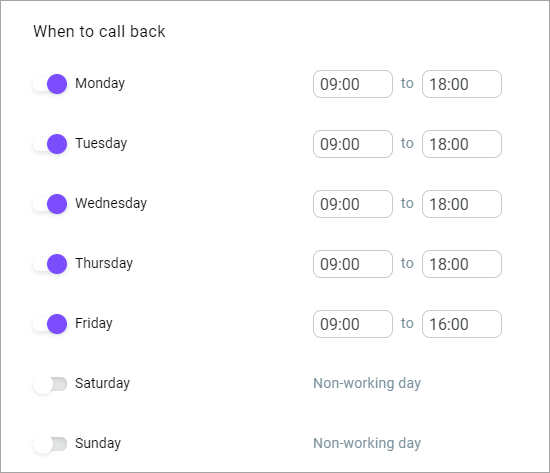
- Set up a schedule for automatic callbacks, considering weekends and weekdays.

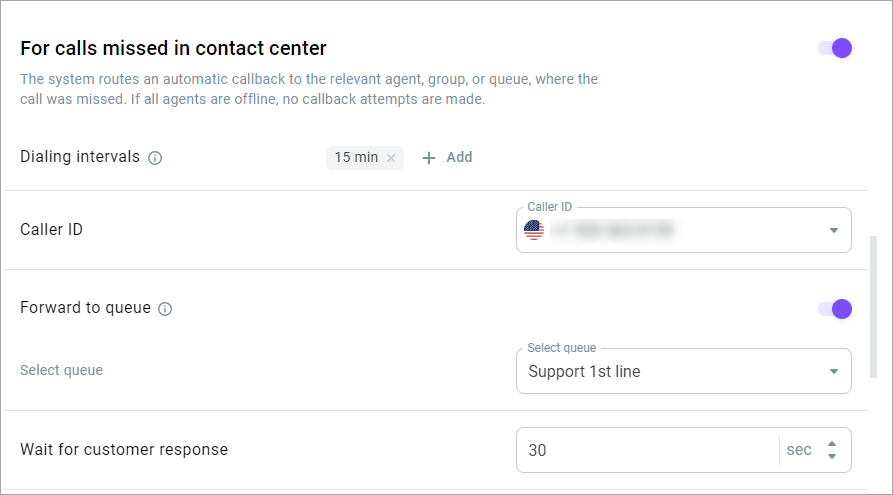
- Enable the For calls missed in contact center switch to set up a rule (set of conditions) for placing callbacks to calls missed by an agent, queue, or group.
- In the Dialing intervals field, define intervals for each callback attempt (from 1 to 60 min). The first interval is the time from the initially missed call to the first callback attempt, each subsequent interval is the time from the previous unsuccessful attempt to the next attempt. If a callback is successful, the system does not make any further attempts.
- Select an outbound phone number in the Caller ID field.
By default, the system uses the Caller ID the customer called. If the system fails to define the phone number (in case of external numbers, for example), it uses the selected Caller ID.
- Enable the Forward to queue switch to route automatic callbacks to a queue and select the required queue from the dropdown list. If the switch is disabled, an automatic callback is routed to the agent, queue, or group that missed the initial call.
- In the Wait for customer response field, define how long an agent should wait for a customer response. When this time elapses, the current dialing attempt ends.

- Enable the Voice prompt for agent switch to select an audio file the system will play to an agent before the call is started. The goal of the prompt is to inform an agent that the call is triggered by an automatic callback rule. Upload a file from your PC or select a recording from the library.
- Enable the Outbound call recording switch to record outbound calls initiated by an automatic callback rule.
Select the storage period from the drop-down list. This is the period when callback recordings are available in the call history section.
If you want to inform a customer that their call is being recorded, select the notification type from the drop-down list. Depending on the type of the notification (audio or text-to-speech), do the following:
For the audio record type, upload an audio file or select an existing record from the drop-down list.
For the text-to-speech type, configure the synth language, voice, and spoken text.
You can also choose not to notify a customer.
In some countries, you are compelled by law to inform the other party that you are recording the call.
- Optionally, select the Timezone that will be used to schedule automatic callbacks if the system fails to automatically detect it. If the timezone is neither selected nor automatically detected, no callback is started.

- Set up a schedule for automatic callbacks, considering weekends and weekdays.

- Click Save changes.
