Creating SIP trunks
A SIP trunk is a virtual communication channel that transports calls from one PBX to another.
With the SIP trunking feature you can:
connect the Kit contact center and your external PBX users (remote extensions)
make outbound SIP calls
The advantages of SIP trunking:
SIP trunking services give you the ability to have employees work from anywhere in the world.
SIP trunks support multiple simultaneous calls on a line.
SIP trunks combine the Kit CC and your PBX into a single communication channel.
SIP trunking provides a customizable caller ID functionality, allowing you to set the users or businesses’ names.
Contents
Adding a SIP trunk
- Log in to your Voximplant Kit account.
- On the left sidebar, click Setup > SIP trunks.
- Click Add SIP trunk.
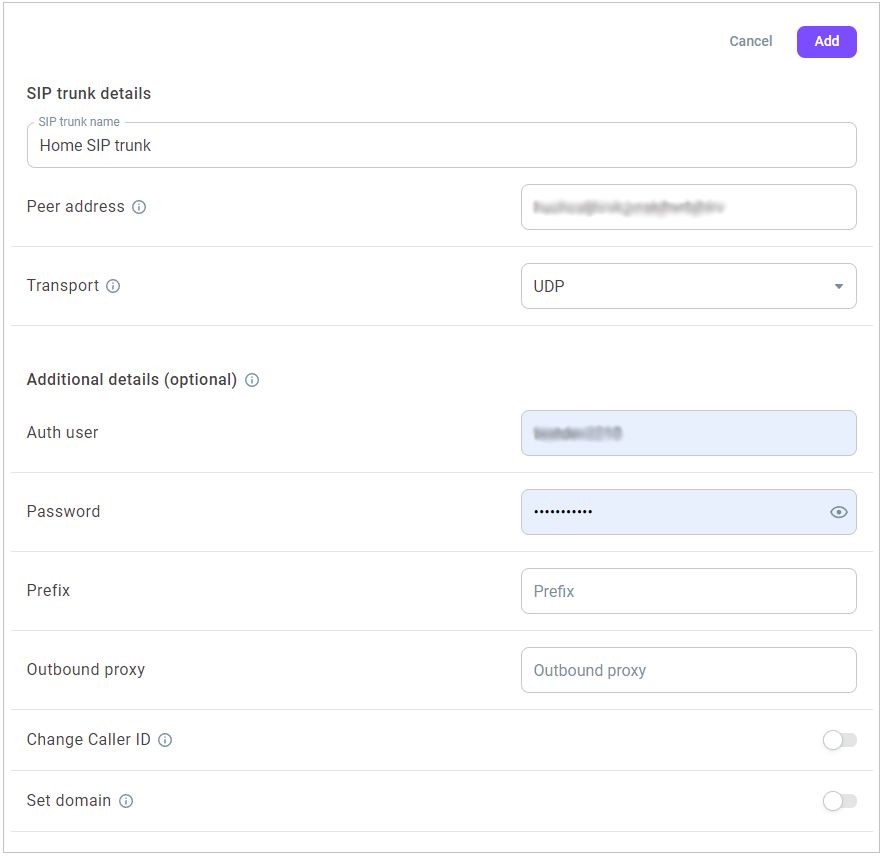
- Enter the SIP trunk name.
- Enter the IP address or the domain of the SIP proxy in the Peer address field.
- In the Transport field, select the SIP transport protocol (UDP/TCP/TLS).
- Optionally, enter the credentials for SIP authentication you received from the provider in the Auth user field, add a phone number prefix, and an outbound proxy.
- Enable the Change Caller ID switch if you want to replace the Caller ID set by the user for an outbound call with the default Caller ID for this SIP trunk. Enter the default Caller ID for the SIP trunk in the Caller ID field.
- Enable the Set domain switch to set the domain in the From field. Enter the domain for outbound calls in the Domain field.

- Click Add.
- To edit a SIP trunk, click the Action menu icon and select Edit.
Adding remote extensions
A remote extension belongs to an external user who works in your remote PBX connected to the Kit contact center through a SIP trunk. After you add a remote extension, you can transfer calls to this number, like you do to internal extensions in your contact center.
To add a remote extension, do the following:
- Log in to your Voximplant Kit account.
- On the left sidebar, click Setup > SIP trunks.
- Select the SIP trunk and click the Action menu icon.
- Select Manage remote extensions.
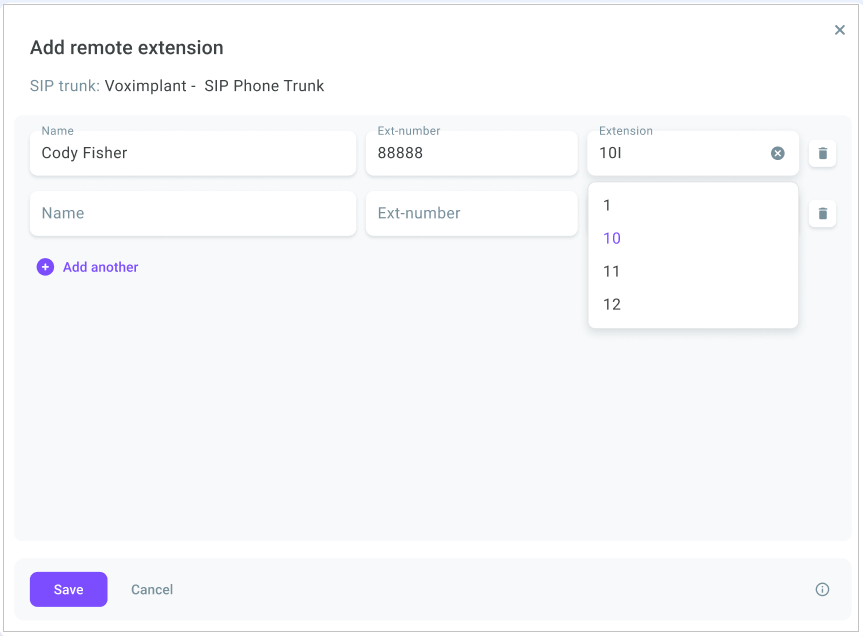
- Click Add.
- Enter the name of the external user in the Name field.
- In the Ext-number field, enter the number of the user working in your remote PBX who will receive a call to the peer address defined for the SIP trunk.
For outbound SIP calls to remote extensions, SIP URI will consist of two parts. The first part is the phone number you entered in the Ext-number field, i.e. user's phone number that will receive the call. The second part is the host to which the call will be launched. This is the host (peer address) of the associated SIP trunk.
- Optionally, assign a Kit internal extension to the remote user in the Extension field.

- Click Add another to add another remote extension.
- To edit a remote extension, select it from the list and click the Action menu icon.
- Select Edit.
- Enter a different name, ext-number, or internal extension if needed and save your changes.
- To delete a remote extension, click the Action menu icon and select Delete.
Making outbound SIP calls
- To make outbound calls via a SIP trunk, you first need to add a SIP number in the Administration > Numbers section. For details on how to add a SIP number, go here.
- Once you add a SIP number and bind it to a SIP trunk, you can select it as a Caller ID for outbound calls anywhere in Voximplant Kit: automated and PDS campaigns, outbound scenarios, softphone.
If you use whitelists, add the IP addresses for SIP traffic listed here.
Receiving SIP calls
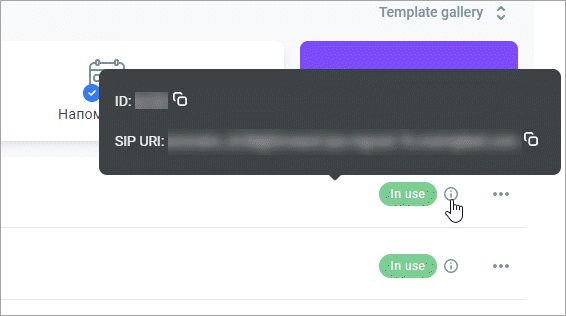
To receive SIP calls, create an inbound scenario and copy its SIP URI. SIP URI is the number that will receive inbound calls from customers.

To allow particular IP addresses to make SIP calls to Voximplant Kit, add them to a SIP whitelist as shown here.
