Managing agent statuses
An agent's status displays in the upper right-hand corner of the screen. The system uses statuses to track how long employees spend at their workspaces and records this information in the contact center statistics.
By default, Voximplant Kit offers you a range of predefined system statuses that cannot be deleted.
System statuses are divided into two groups. The statuses in the first group are automatically assigned to agents, and you cannot change their display order. These are Offline, Ready, Dialing, In service, After service, and Banned. The second group of system statuses (Online and DND) can be assigned to agents manually, and their display order can be changed.
System statuses
Dialing - Indicates that a call is assigned to an agent. Agents remain in this status until they answer the call, the call is ended by the customer, or assigned to another agent. Agents can schedule which status should go next be clicking the current status and selecting one of the unavailability statuses. The transition to the scheduled status will occur after the call is processed.
In service - Indicates that an agent has answered the phone and is currently attending a customer call. Agents can schedule which status should go next be clicking the current status and selecting one of the unavailability statuses. The transition to the scheduled status will occur after the call is processed.
After service - This status is automatically assigned to an agent after they end a call from queue. Agents can change this status to Ready by clicking the Complete button. If the after service time limit is specified in the queue settings, the system will automatically force agents out of the after service when this limit is reached. Agents can schedule which status should go next be clicking the current status and selecting one of the unavailability statuses. The transition to the scheduled status will occur after the call is processed.
Banned - Indicates that an agent failed to answer the call on time. Agents need to manually change this status by clicking the Unban button next to the status. Agents can schedule which status should go next be clicking the current status and selecting the status they need from the drop-down list.
In the Kit softphone app, the Banned status automatically changes to the previously scheduled status upon detection of any activity, for example, if an agent moves a mouse.
Offline - Indicates that an agent is not online.
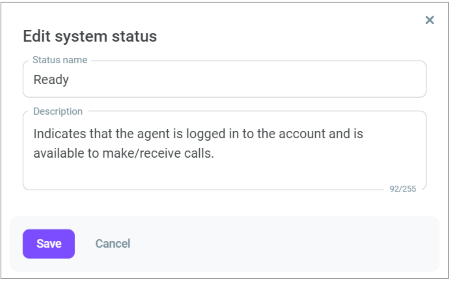
Ready - Indicates that an agent is available to make and receive calls. Agents in this status can receive calls from queues and process chats from channels connected to queues. Agents can change this status by clicking on it and selecting one of the unavailability statuses (Online, DND, or custom) from the drop-down list.
Online - By default, this status is assigned to all agents when they log in to their Workspace. You can transfer calls to online agents and call them via the softphone. Agents in this status can receive customer calls made to their personal or group extensions. Online agents do not receive calls from queues. Agents can change this status by clicking on it and selecting Ready from the drop-down list.
DND (Do not disturb) - Indicates that an agent is not available to process calls. Agents in this status can neither receive calls from queues nor can you transfer them calls/chats. Agents can change this status by clicking on it and selecting Ready from the drop-down list.
You can personalize system statuses as follows:
- Go to the Statuses subsection.
- Click the Edit icon.
- Change the Status name, if required. Note that after renaming a status, all its historical statistics will be displayed with the updated status name.
It is possible to rename a system status, but its meaning does not change. For example, if you rename DND to Away, the color and behavior associated with this status remain the same.
- If you need, you can also add, change, or delete the description of a system status.
- Click Save.

Custom statuses
In addition to system statuses, you can add custom statuses that correspond to your business processes, for example Break, Lunch, Meeting, etc. Any custom status indicates that an agent is unavailable. Agents in custom statuses can neither receive calls from queues nor can you transfer them calls/chats.
To add a custom agent status:
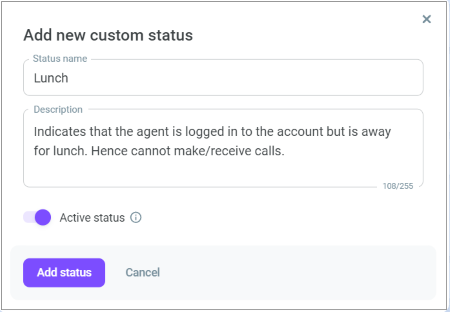
- In the Statuses subsection, click Add.
- Enter the Status name.
- Enter additional information for the status in the Description field.
- Every custom status you add is active by default, and all users can see and select it. To deactivate a status, disable the Active status switch.
Agents do not see inactive statuses. Historical reporting of inactive statuses is not tracked.

- Click Add status.
- If required, drag and drop custom statuses to change the order they display for agents.
- To delete a custom status, click the Delete icon.
If you delete a status, the system deletes it from all historical reports.
