PDS campaigns
A PDS campaign is a dialing campaign that uses agents to call customers. Agent campaigns are useful if you not only need to convey information to customers, but also to answer questions or provide clarifications.
PDS campaigns can work in one of the following modes:
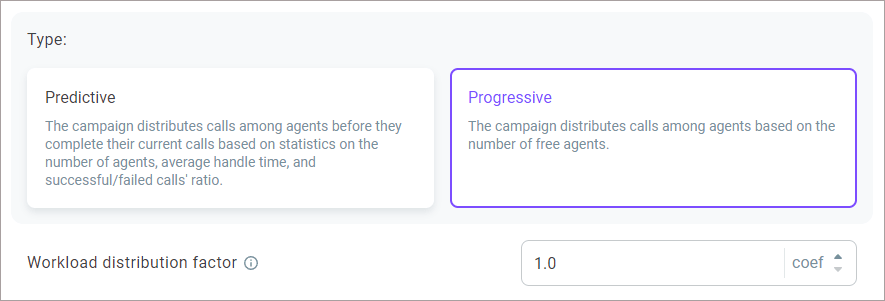
Predictive campaign — is based on the statistical analysis of outcomes of most recent dialing attempts. In this mode, the system “knows” the average duration of a conversation between an agent and a customer, the number of agents, average dialing time, etc. and dials a customer before an agent is available.
Progressive campaign — is based on the agent availability analysis. The system automatically dials numbers from contact lists and connects successful call attempts to available agents.
The Automation section is available to users with the Administrator and Owner roles. Supervisors have limited access to the section for the campaigns to which they are assigned as supervisors with editor permissions.
Contents
Defining the PDS campaign general settings
Let us configure your first PDS campaign.
- Log in to your Voximplant Kit account.
- On the left sidebar, select Administration > Automation > PDS campaigns.
- Click Create campaign.
Supervisors are not allowed to create campaigns.
- Select the General tab to configure the general settings of the campaign.
- Enter the name of your campaign in the Campaign name field.
- Click the Add button to select one or several Caller IDs the campaign will use for outbound calls. When you select several numbers, the system automatically rotates (shuffles) the pool of numbers and randomly selects a Caller ID. This will help improve the contact rate of your database.
Supervisors are not allowed to add or edit Caller IDs.
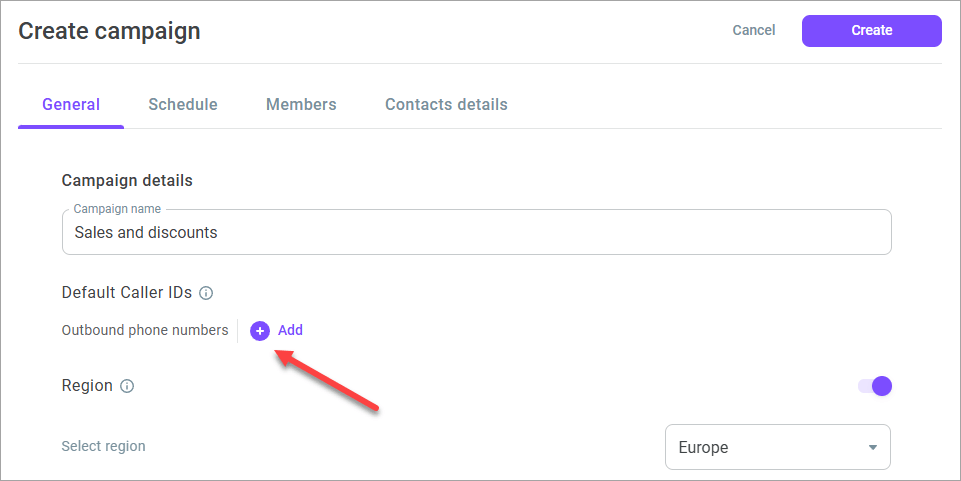
- In the sidebar, select the required Caller IDs from the list. You can choose either Internal (own and rented) or SIP numbers. You can select ONLY external or ONLY SIP numbers.
You can select a maximum of 100 numbers.
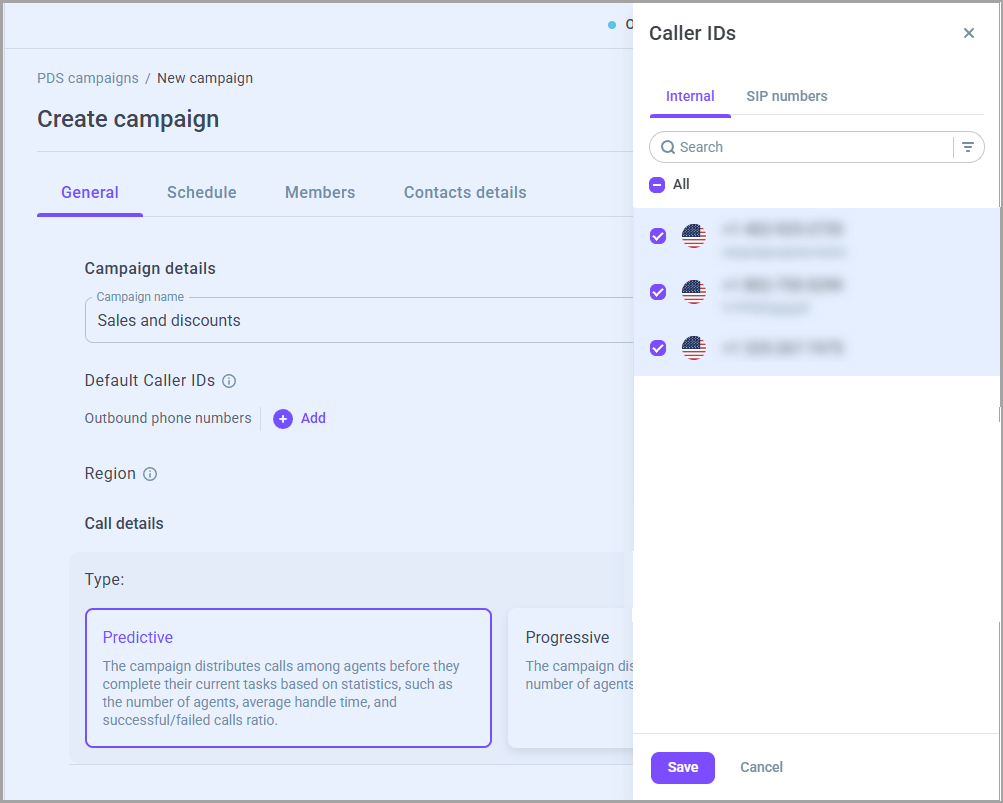
- Optionally, enable the Region switch to select the region to launch the campaign.
This feature is available for accounts with the following limitations: for US accounts - USA, Europe, South America, and Singapore; for European accounts - Europe and Kazakhstan; for South American accounts - South America; for Kazakhstan - Kazakhstan.
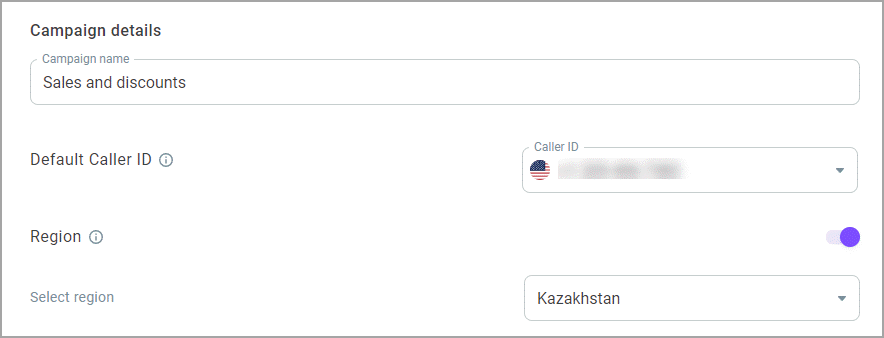
- In the Call details section, define your PDS campaign: Predictive or Progressive.
- Depending on the campaign type, set up the pace of placing calls to agents:
For a predictive PDS campaign, configure the Abandon rate parameter that determines the pace of placing calls by adjusting the percentage of abandoned calls. It helps you control how quickly calls should be placed to keep agents busy while staying within the configured abandon rate limit. Minimun value is 1%, maximum - 99%.
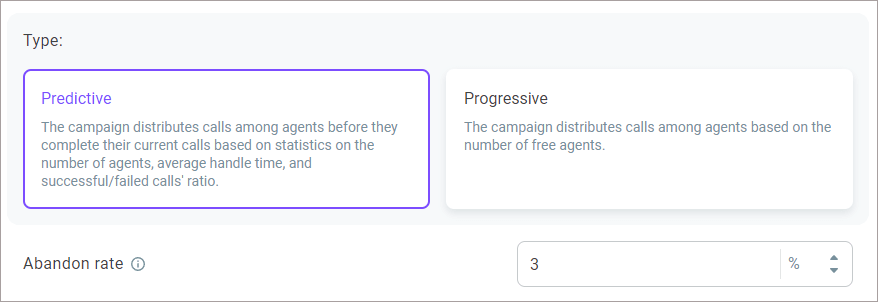
For a progressive PDS campaign, configure the Workload distribution factor that determines the pace of placing calls to each idle agent. The minimum value is 1.0, the maximum is 25.0. The factor value can be either an integer or a fraction. When you specify a fractional factor, the total number of calls per idle agent is rounded up.
Example 1
In the campaign, there is 1 agent with a Workload distribution factor of 3. Calculation: 1*3 = 3. Result: 3 campaign calls are simultaneously routed to the agent.
In the campaign, there is 1 agent with a Workload distribution factor of 1.5. Calculation: 1*1.5 = 1.5 (rounded up to 2). Result: 2 campaign calls are simultaneously routed to the agent.
Example 2
In the campaign, there are 12 agents with a Workload distribution factor of 1,6. Calculation: 12*1,6 = 19,2 (rounded up to 20). Result: 20 campaign calls are simultaneously routed to 12 idle agents.
In the campaign, there are 12 agents with a Workload distribution factor of 1,7. Calculation: 12*1,7 = 20,4 (rounded up to 21). Result: 21 campaign calls are simultaneously routed to 12 idle agents.
The calculations are only applicable if all campaign agents are idle (in the Ready status).
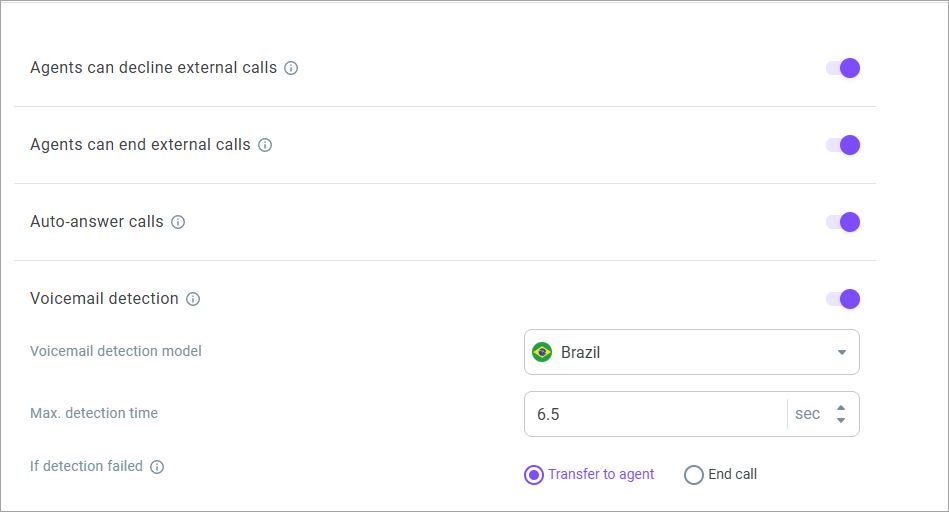
- Enable the Agents can decline external calls switch to allow your agents to decline external calls.
- Enable the Agents can end external calls switch to allow your agents to end external calls.
- Activate the Auto-answer calls switch to enable automatic connection of agents to customers.
- Enable the Voicemail detection switch if you want to distinguish whether you reached a live person or a pre-recorded voicemail prompt during a call. Select the Voicemail detection model from the drop-down list.
Currently, the following voicemail detection models are available:
Brazil
Colombia
Mexico
Philippines
Peru
Chile
USA
Europe
Kazakhstan
Russia
If your country is not on the list and you need the voicemail/answering machine detection feature, please contact support.
Configure the maximum detection time and define what to do with the call if the system fails to detect whether it reached a live person or voicemail. If you select Transfer to agent, the call is routed to a campaign agent; if you choose the End call option, the call is terminated.
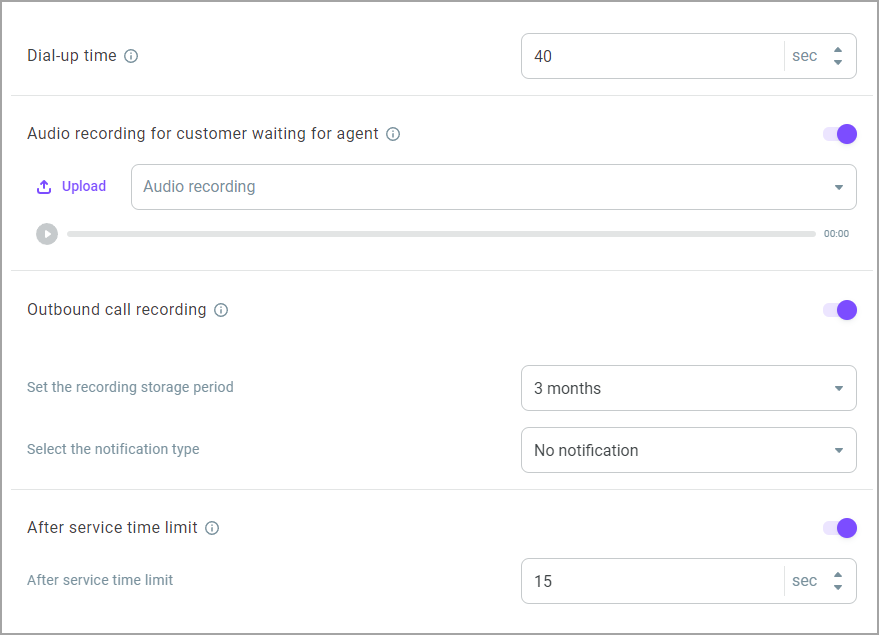
- In the Dial-up time field, specify how long agents should keep calling a contact before moving on to the next one.
- Enable the Audio recording for customer waiting for agent switch to set an audio recording to be played to a customer while waiting for an agent. Select a recording from the drop-down list or upload a file from your PC. When disabled, a customer waits for an agent in silence.
- Enable the Outbound call recording switch if you want the system to notify a customer that their call is being recorded.
Select the notification type: text-to-speech, audio record, or no notification.
Specify how long the recording is available in the call history section.
- Enable the After service time limit switch if you want to limit the time agents spend on post-call activities required after they end the phone conversation, including recording data and marking the call outcome. When this time is up, the agent’s status changes from After service to Ready.
- Enable the Use a wrap-up codes set switch if you want agents to label the outcome of their calls after interaction with a customer. Then select the wrap-up codes set from the drop-down list.
If the selected wrap-up codes set contains the Add to DNC list wrap-up code, the system prompts you to bind a DNC list.

- Enable the Use tags switch to allow the campaign agents to use tags for conversations' classification. All tags added in the settings are available for the campaign agents in their Workspace.
- Enable the Use topic set switch to allow the campaign agents to use a topic set for conversations' classification.
- Select a topic set from the drop-down list.
A PDS campaign can only have one topic set assigned. The assigned topic set is then available for the campaign agents in their Workspace. When you select another set, it automatically replaces the previous one.

- You can bind a DNC list to your PDS campaign. Search for and select the one(s) you need from the drop-down list. The selected DNC list(s) filters out the contacts that do not want to receive calls within the campaign. Note that the system automatically adds the DNC list you have already bound in step 16 to your selection.
Global DNC lists, if any, automatically apply to all outbound calls in Voximplant Kit.

Configuring scheduling parameters
- Go to the Schedule tab.
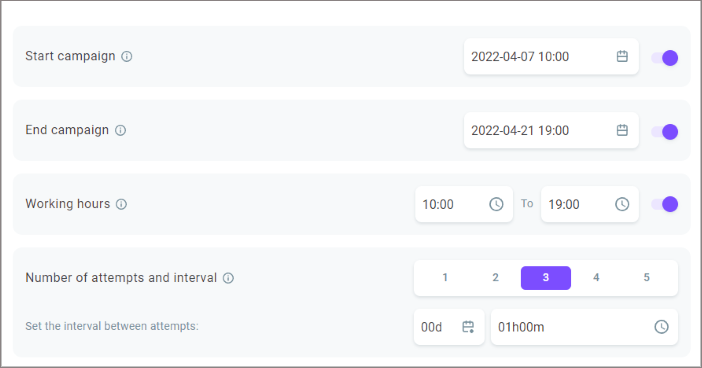
- Enable the Start campaign switch to set the date and time when your campaign should start calling customers. Otherwise, the campaign starts calling customers immediately after you launch it.
- Enable the End campaign switch to set the date and time when the campaign should stop calling customers. When deactivated, Voximplant Kit continues calling customers until it reaches the limit of attempts pre-defined for each phone number.
- Enable the Working hours switch to configure the time when your campaign calls customers. The system uses customers’ local time. If you disable the switch, Voximplant Kit calls customers 24/7.
Local time is calculated according to the {{UTC}} parameter in your .xlsx file.
- In the Number of attempts and interval field, select how many times the campaign should dial each contact from your list. If the campaign fails to reach a contact within the specified number of attempts, the contact is labeled unsuccessful in the campaign statistics. Define the period between call attempts to the same contact.
If you edit the number of attempts after the campaign has started, the new settings will only apply to new contacts uploaded after your changes take effect.
Adding agents and supervisors
- Go to the Agents tab.
- Click + Assign supervisors to assign one or several supervisors to manage the campaign. Note that a supervisor is not considered a campaign member and does not handle conversations. Every supervisor can simultaneously manage several campaigns.
Supervisors are not allowed to assign supervisors or view the list of assigned supervisors.
- The dialog window displays the list of users with the Supervisor role.
- Select the required user(s) and click Continue.
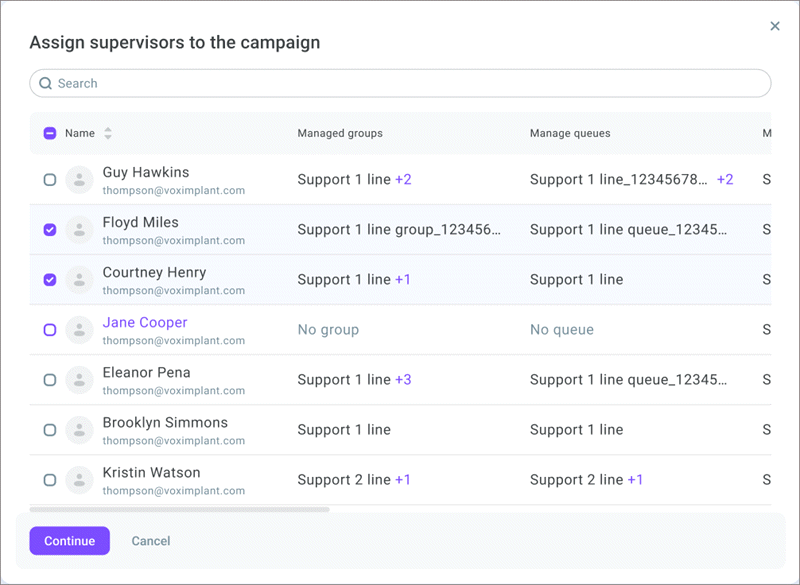
- In the User permissions column, define the permissions you want to grant to each supervisor.
Viewer - A supervisor can view performance indicators of the assigned campaigns but cannot manage campaign agents.
Editor - A supervisor can assign/unassign their group agents to/from the reporting campaigns (in Live monitoring).
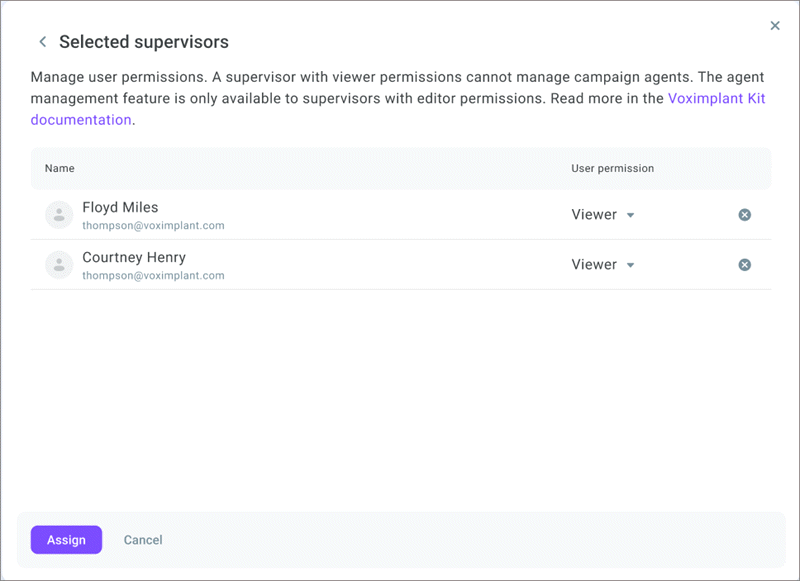
- Click Assign.
- Now click + Add agents. You can add users with any role, their functions in the campaign will differ depending on the role.
The window that opens displays the list of all contact center employees with their roles, skills, and assignments.
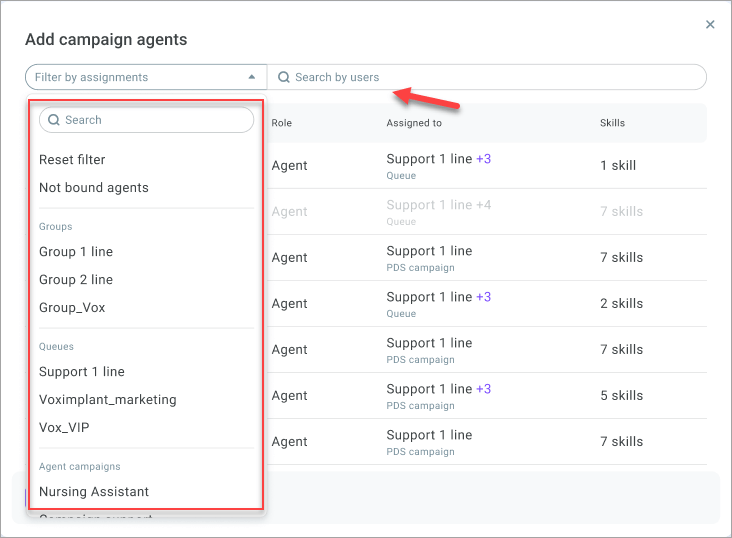
- In the Search by users field, start typing the agent's name or email to find a specific employee.
- Use Filter by assignments to retrieve only unassigned agents or members of specific groups, queues, or campaigns.
- Select the agents you want to add to the campaign and click Add.
You cannot assign agents if they are already assigned to the maximum number of queues allowed (the limit per agent is 5) or a PDS campaign.
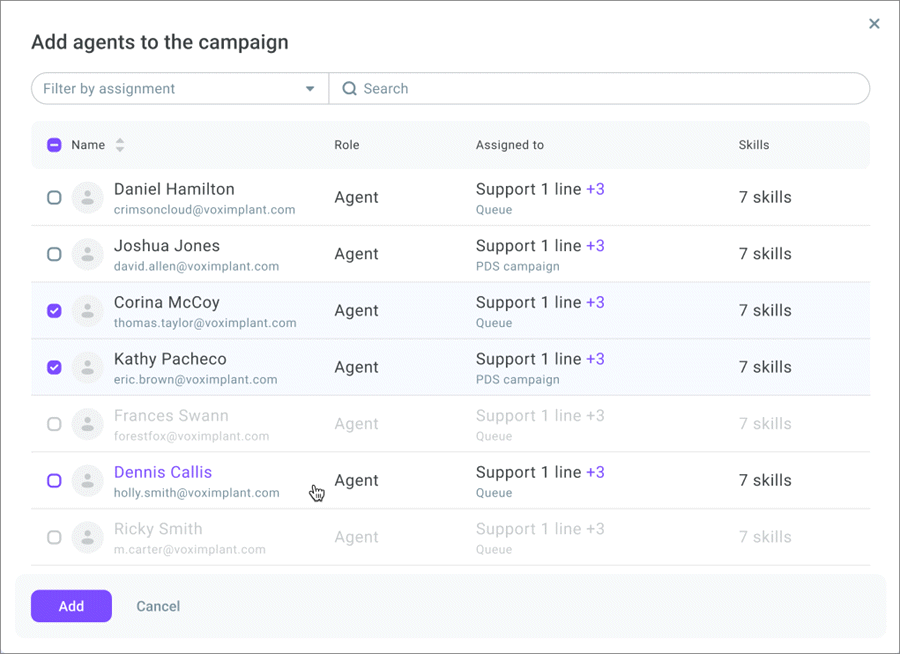
- The agents now display as the campaign members. If required, unassign agents from the campaign by clicking the cross icon.
- Click Save changes.
Uploading contacts
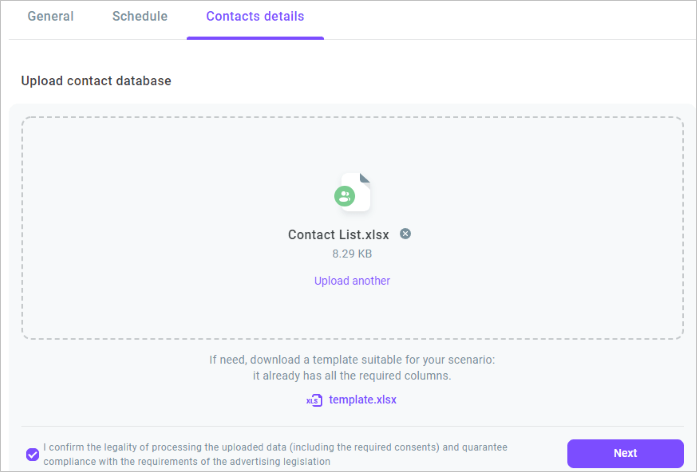
- Select the Contact details tab.
- Select the checkbox to confirm the legality of processing the uploaded data.
- Upload or drag and drop the contact list in .xls or .xlsx format. For your convenience, there is a contact list template you can use that already contains the two required columns: customer number and timezone (phone and UTC columns). If you need to upload any of your custom data, you can add it to the contact list. Add new columns and enter the required information in front of the contacts.
PDS campaigns can call several contact lists. The system dials each customer according to their UTC. For example, the campaign working hours are from 10AM till 7PM, and the account timezone is New York (-04:00). The uploaded file contains contacts from other timezones, for example, from Buenos Aires (-03:00). The customer from Buenos Aires will receive calls from 10AM till 7PM local time.
Enter phone numbers in Е.164 format ((country code)(city code)(number)), and UTC as per this table (time without parentheses). Cells must be in text format.
The uploaded contact list can contain maximum 100 columns. The maximum file size is 20 MB.
- Create variables for the columns of the uploaded file if you want them to be visible for agents in their Workspace.
While mapping variables, add variables for the extra columns in the Variable field and press Enter. The system adds this data to the contact list.
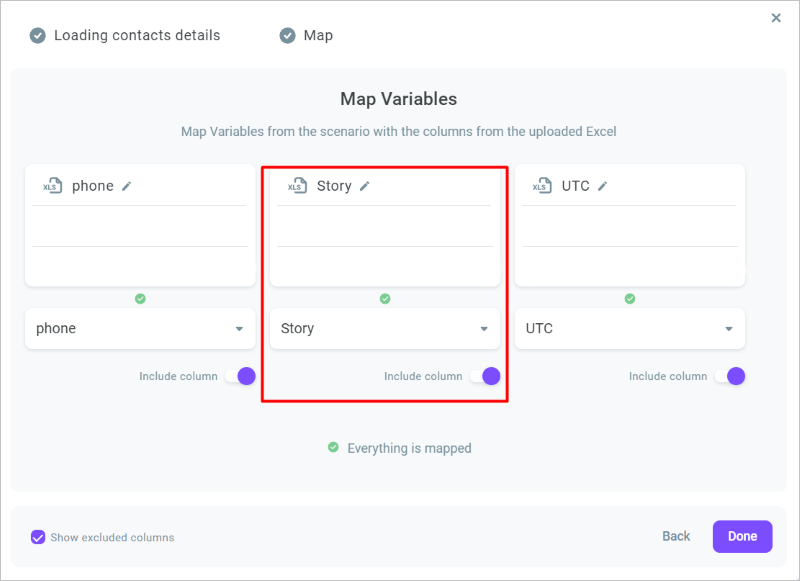
- Select the Show excluded columns checkbox if needed.
- If you do not specify the timezone in your contact list, the system enables the timezone setup function after you map the variables. Set the timezone if needed.
- Click Create.
Storing PDS campaigns
Voximplant Kit allows you to arrange PDS campaigns in folders and make them more accessible to the team.
- Select the campaign, click the Action menu icon, and select Move.
- Select the folder you need in the Move campaign to… window.
- Click Move to.
- If you do not have any folders yet, click Create new folder in the same window.
- Enter the folder name and click Create.
- Select the newly created folder name.
- Click Move to.
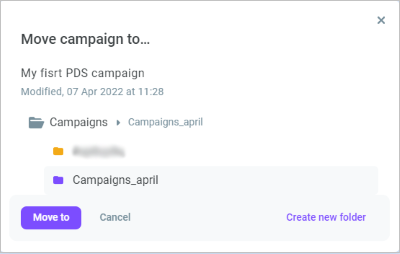
To edit or delete a folder, click the corresponding icon next to the folder name.
Managing PDS campaigns
In the PDS campaigns section, you can review your campaigns. You can select to retrieve All, Ongoing, Draft, or Completed campaigns. You can also view the campaigns stored in a specific folder.
- Select the campaign and click the Action menu icon. The following options display:
View call history — Review the call history of your campaign
View report — View or download the campaign report
Edit — Edit the campaign parameters
Upload contacts — Add more contacts to the campaign
Add agents — Add more agents to the campaign
Move — Move the campaign to a specific folder
Pause — Suspend the campaign
Stop — Terminate the campaign
Stop and delete — Terminate and delete the campaign
The option is not available for supervisors.
The options may differ depending on the campaign status.
View detailed information on the options later in this article.
- Expand the uploaded contact list to review the details. Next to each contact list, you can view the actual status.

- Click the Action menu icon next to the list name and select one of the actions you want to perform:
View
Download
Cancel
Viewing campaign reports
You can review the history of each call made within your PDS campaign.
- Select the campaign, click the Action menu icon, and select View call history.
- Review the requested data in the window that opens.
- Expand any call to see its details.
Download call history in .xls or .csv format- if needed.
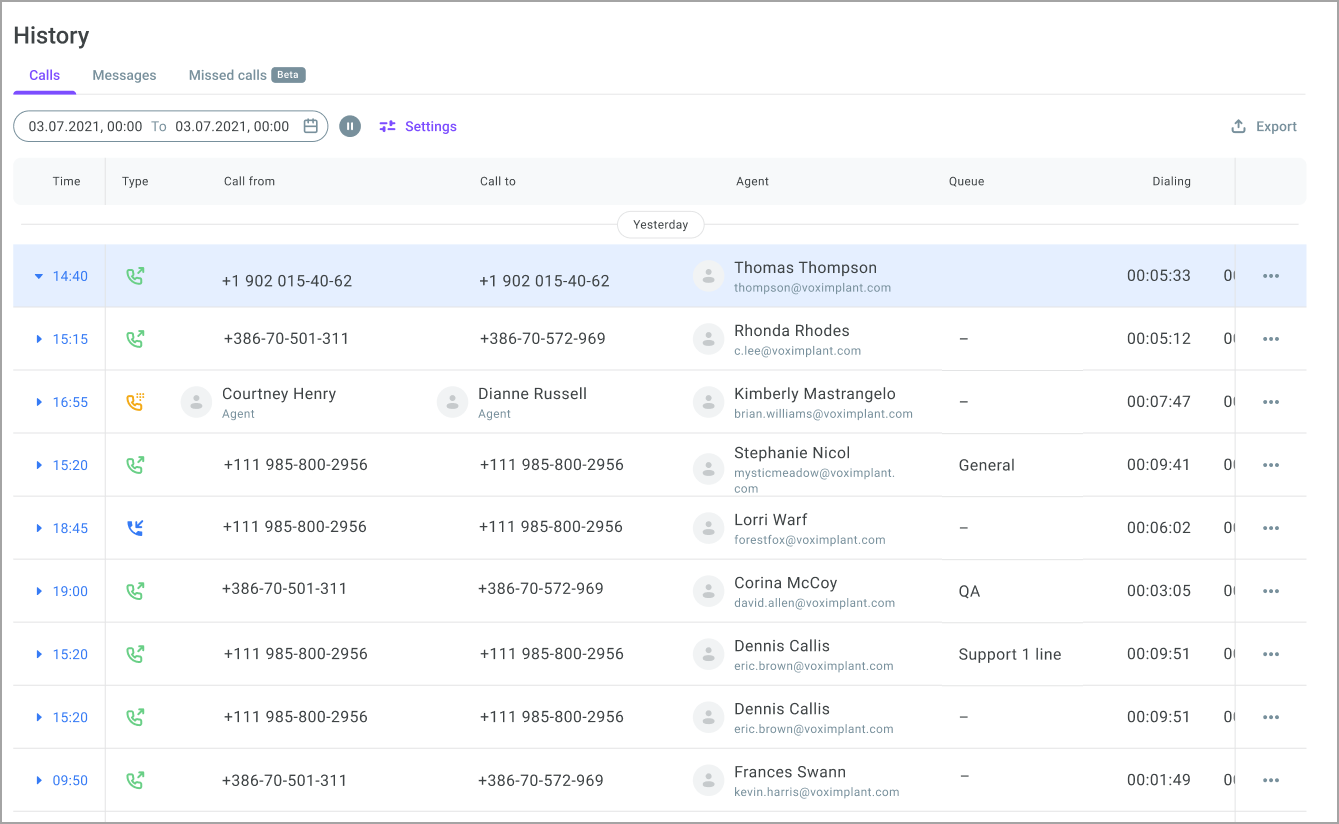
You can view the campaign report for a specific period.
- Select the campaign, click the Action menu icon, and select View report.
Review information about your campaign contacts.
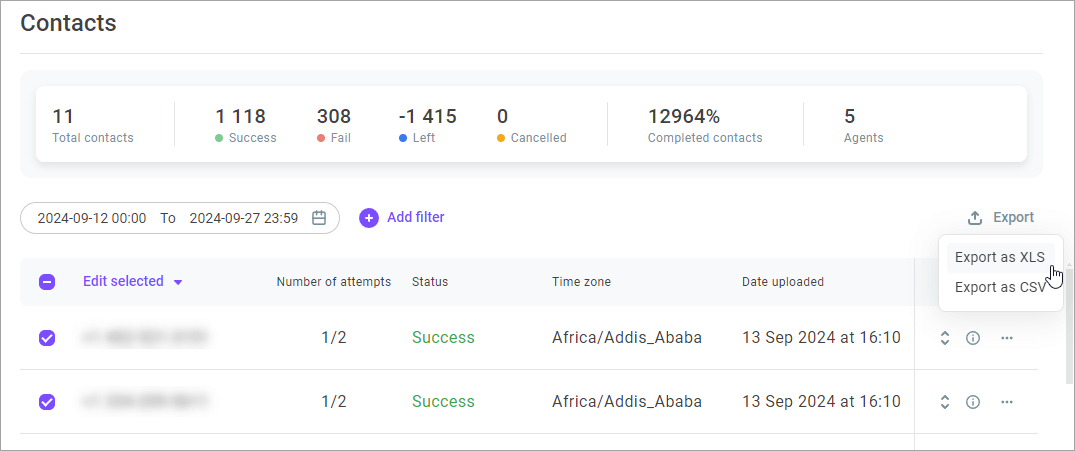
- At the top of the screen, view contacts' summary statistics: total number of uploaded contacts, number of successful and unsuccessful contacts, how many contacts are completed and remaining.

- The table displays data for all contacts: number of dialing attempts (scheduled vs completed), contact status, timezone, upload date, and date/time of the last call.
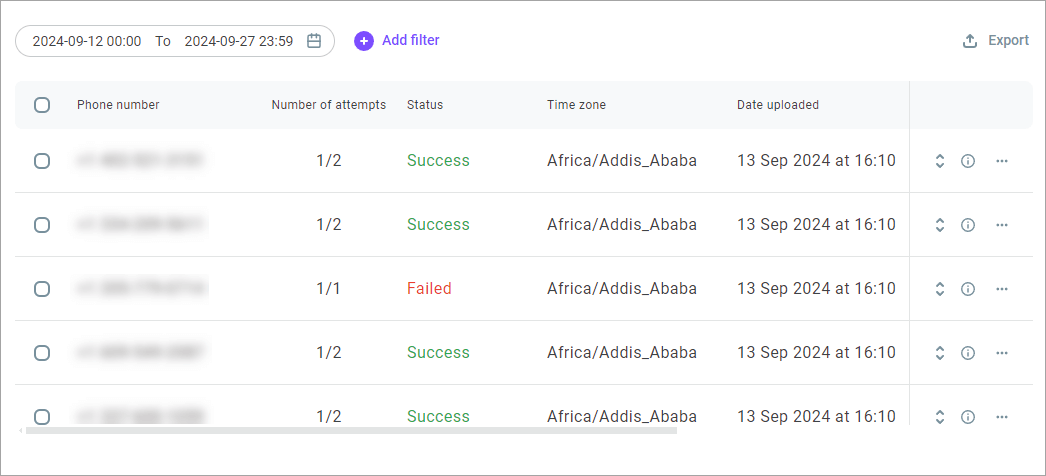
- Click the arrows icon on the right side of the screen to view contact details.

Date - Date and time of the dialing attempt
Attempt - Attempt number within the campaign
Attempt result - Result of the dialing attempt (a wrap-up code or a system call result code)
Wrap-up code - Wrap-up code, assigned to the call by the agent
Dialing time - Time FROM the start of dialing TO the moment the subscriber receives the unavailable status from the telecom operator OR until the customer picks up the phone / voicemail (voice assistant) is connected
Talking time - Time FROM the moment the subscriber or voice assistant picks up the phone TO the moment the call ends (the agent/customer hangs up or voicemail (AMD) is detected)
Record - Link to the call recording, if available
Agent - Username of the employee who handled the call
Tags - Tags assigned to the call by the agent
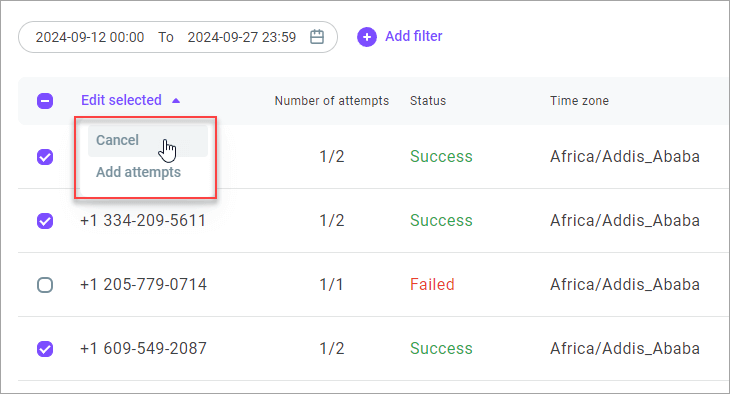
- Click the Action menu icon next to a contact to cancel it or add attempts to it (applicable for ongoing campaigns).

You can also select multiple phone numbers and in the Edit selected menu cancel the selected contacts or add dialing attempts for them (applicable for ongoing campaigns).
- Click the Export button and download the report in .xls or .csv format, if required.
You can view detailed agent campaign reports in the Reports section.
Adding contacts and agents to ongoing campaigns
If required, you can add more contacts to ongoing campaigns.
- Select the campaign, click the Action menu icon, and select Upload contacts.
- In the window that opens, upload the required contact list.
- Map the columns and click Next.
You can add new agents to the ongoing campaigns.
- Click the Action menu icon and select Add agents.
- The PDS campaign agent management dialog displays the list of all agents not assigned to the current PDS campaign.
- Select the agents you want to assign to the PDS campaign from the left column and click the right arrow button. The agents now display in the right column.
You can assign agents to several queues or one PDS campaign. If an agent is already assigned to a queue(queues), you get a warning message that the system will automatically unassign this agent from the current queue(s).
- To remove agents from the PDS campaign, select them from the right column and click the left arrow button.
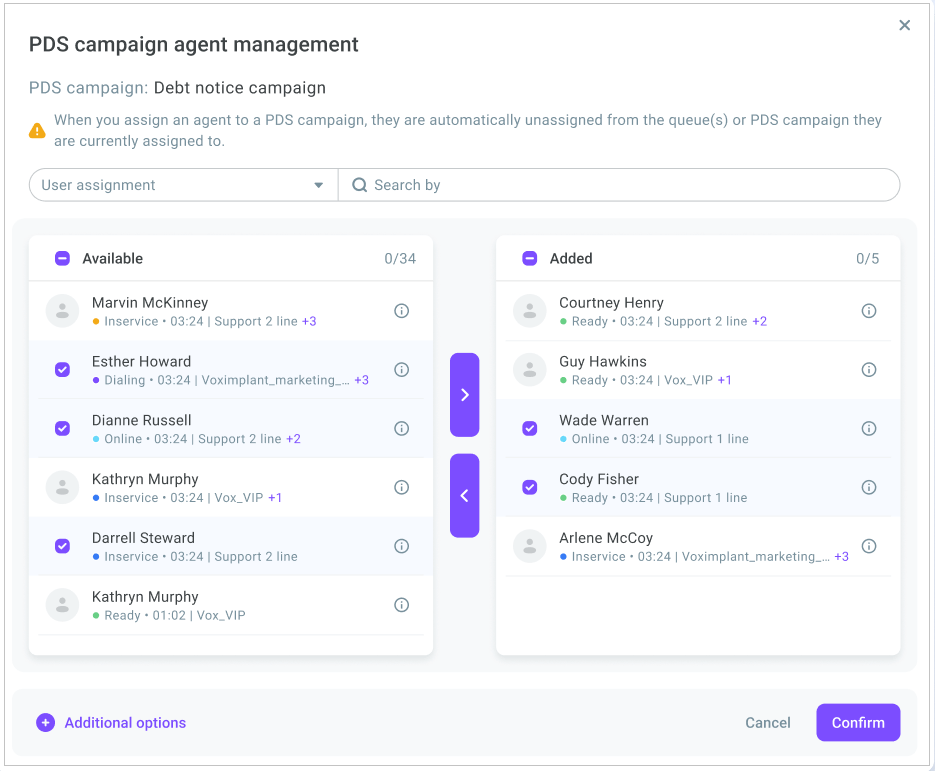
- Click Additional options to add comments for the removed/added agents, if required.
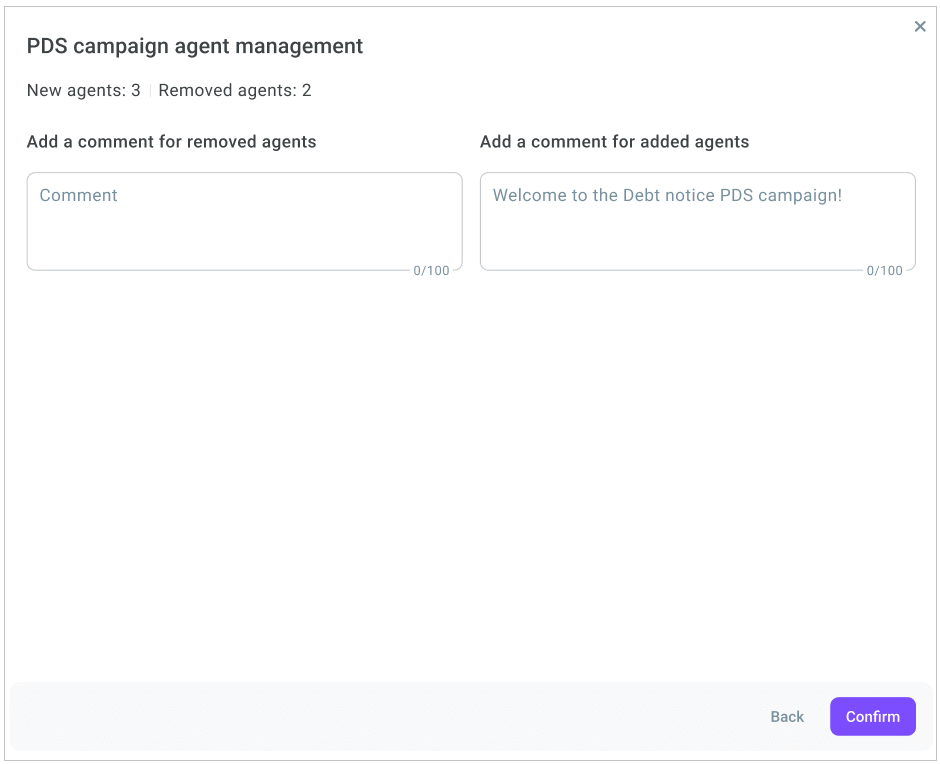
- Click Confirm.
