Automated campaigns
An automated campaign is one of the main elements of automated calling in Voximplant Kit. You can launch a customized call campaign based on a specific scenario and control it directly from Voximplant Kit.
An automated campaign allows you to configure the following settings:
Date and time of a call
The number of lines used for simultaneous calls
Time intervals between redial attempts
The number of dial attempts
Your data for easier contact sorting
The Automation section is only available to users with the Administrator and Owner roles.
Creating an automated campaign
- Log in to your Voximplant Kit account.
- Select the Administration > Automation > Automated campaigns section.
- Click Create campaign.
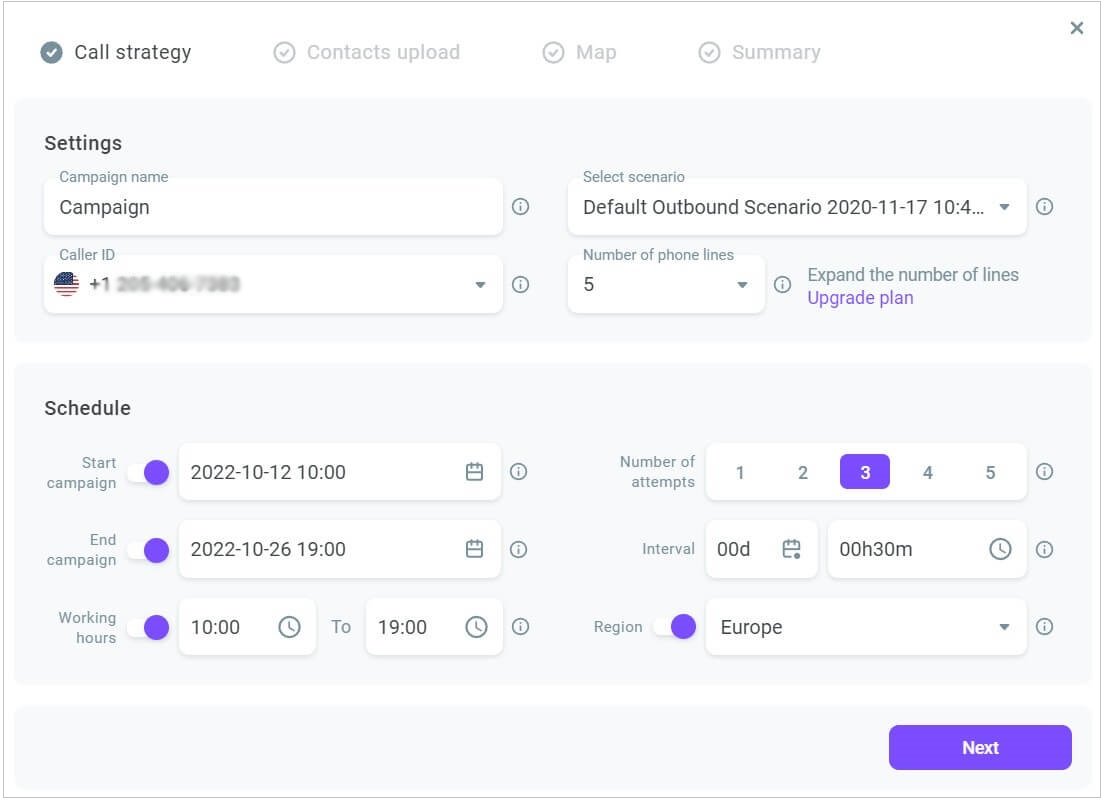
- On the Call strategy tab, in the Settings group box, enter the campaign name.
- Select the Caller ID the system will use to call customers. A Caller ID can be a rented phone number, your own number, or a SIP number.
A customer should be able to call back to the number you selected as the Caller ID. For the call to be answered, forward it from the Caller ID to your contact center or your personal phone number. You can set up call forwarding in the Numbers section. Each phone numer you rent can have its own forwarding number. If you do not set up call forwarding, your dialing campaign will not start.
For outbound SIP calls, SIP URI will consist of two parts. The first part is the phone number from the attached contact list, i.e. the user phone number that will receive the call. The second part is the host to which the call will be launched. This is the host (peer address) of the SIP trunk associated with the SIP number you selected as a Caller ID.
- Select the scenario to use in the campaign. This scenario will determine the campaign flow.
- In the Number of lines field, define how many calls the system should simultaneously perform. As soon as a call on one phone line is finished (for any reason), Voximplant Kit calls the next phone number on the list.
Please note that the account lines are occupied by all automated campaigns in the Scheduled, Ongoing, and Paused statuses.
If there are not enough lines on your account, you can contact the Voximplant Kit team through the feedback form. To do this, click Upgrade plan.
- In the Schedule group box, define the campaign scheduling parameters:
Enable the Start campaign switch to define the date and time when the system starts calling customers. If the switch is disabled, the system starts calling customers immediately after you launch the campaign. If the date and time you specify are before the current date and time, Voximplant Kit starts calling customers immediately after the campaign launch.
Enable the End campaign switch to specify the date and time when the system stops calling customers. If the switch is disabled, Voximplant Kit continues calling until it uses all specified attempts to each phone number. Note that the end date and time cannot precede the current date and time.
Enable the Working hours switch to define the campaign's operating time, that is the active time when the campaign is calling customers. For each contact, their local time is applied. The system calculates local time according to the {{UTC}} value defined in the XLS file.
You can use all the existing UTC values from -12:00 to +14:00. To set the contact's timezone, specify a value from the table. For example, to configure UTC -04:00, specify the America/Puerto_Rico UTC values.
If the Working hours switch is disabled, the campaign calls customers 24/7.
Select the Number of attempts the system should undertake to dial each customer on the contact list. If the system fails to reach a customer within these attempts, the customer is marked unsuccessful in the campaign statistics. Define the Interval between call attempts to the same customer.
The attempts number applies to the calls made until the script passes the Successful call block. Place the Successful call block correctly to ensure that your customers no longer receive calls after the scenario end.
The system launches recall attempts from the point where the scenario ended during the previous call attempt. The system saves preliminary specified data and variables you can further use in the scenario.
Optionally, enable the Region switch to select the region for the campaign launch if it differs from your current IP address. For example, you are launching the campaign from your office in the USA, but you need to call customers in France. In this case, you select the Europe region. If you do not specify the region, the system determines it by the IP address of the region where you start the campaign.
This feature is available for accounts with the following limitations: for US accounts - USA, Europe, South America, and Singapore; for European accounts - Europe and Kazakhstan; for South American accounts - South America; for Kazakhstan - Kazakhstan.
- Click Next.

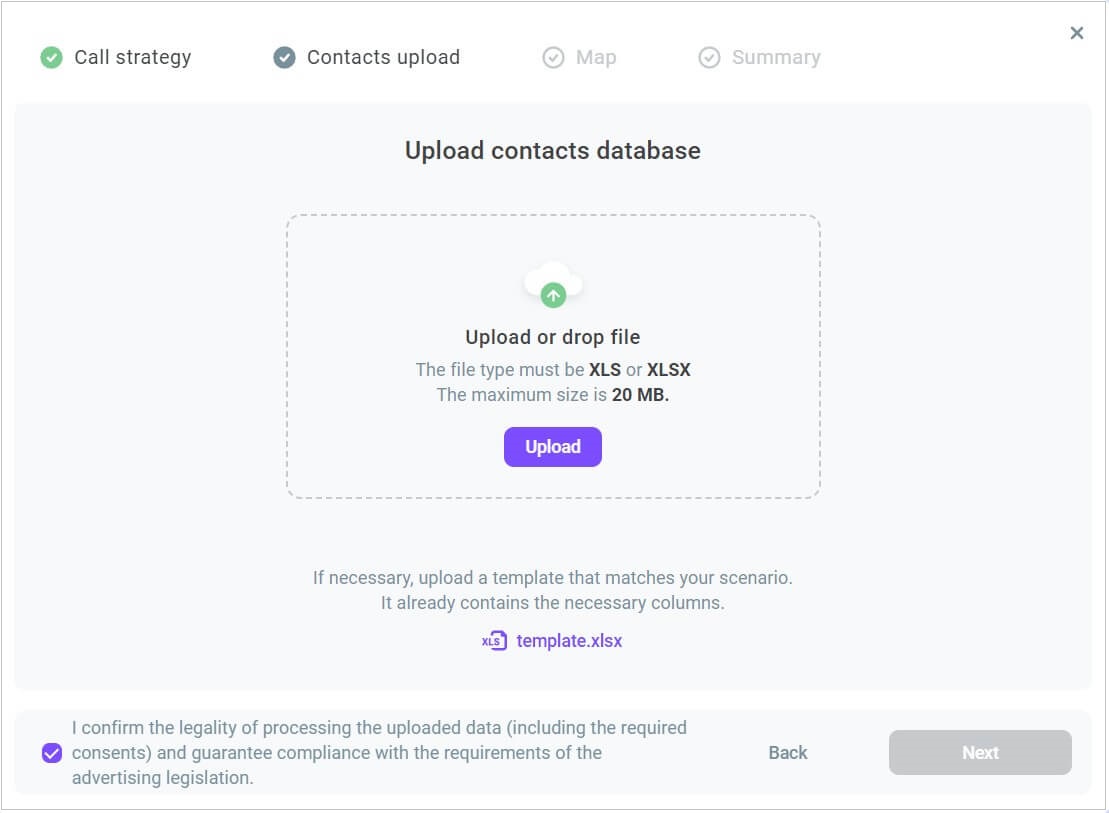
- On the Contacts upload tab, upload your contact database and click Next. For your convenience, there is a contact list template you can use that already contains the two required columns: customer number and timezone (phone and UTC columns). Depending on your scenario sctructure, you can add extra columns to the file corresponding to the scenario variables.
The system dials each customer according to their UTC. For example, the campaign working hours are from 10AM till 7PM, and the account timezone is New York (-04:00). The uploaded file contains contacts from other timezones, for example, from Buenos Aires (-03:00). The customer from Buenos Aires will receive calls from 10AM till 7PM local time.
Enter phone numbers in Е.164 format ((country code)(city code)(number)), and UTC as per this table (time without parentheses). Cells must be in text format.
The uploaded contact list can contain maximum 100 columns. The maximum file size is 20 MB.

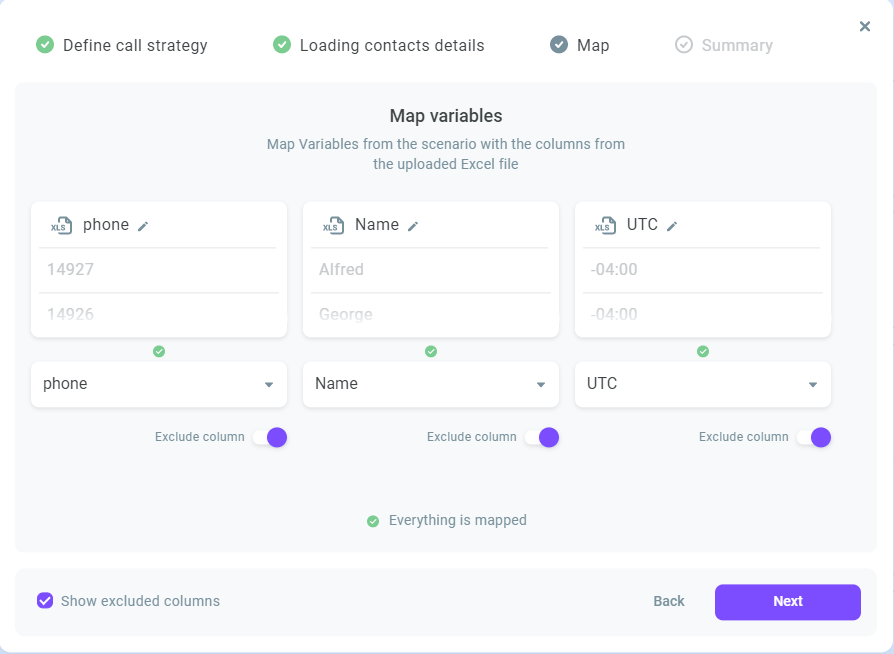
- Now, map the variables. Match the fields from the uploaded file with the scenario variables. You can exclude columns if needed. Click Next.
When using a .xls template with extra columns, you may need to add variables not specified in the Variable drop-down list. Enter the required variables in the field and press Enter. The system adds this data to the contact list.

- Review the configured campaign and click Launch. You can save your campaign as a draft if needed.
After you launch the campaign, you can check its status in the campaigns list. Click the i button next to the campaign name to review the details, including errors that occurred while uploading contacts.
You can also upload more contacts to the campaign and review its report by clicking the Action menu icon in the upper left-hand corner.
After you launch the campaign, you cannot change the campaign settings.
