Configuring queues
Create queues to distribute inbound calls and messages.
The maximum number of queues per account is 20.
Contents
Configuring general settings
- On the left sidebar, select Setup > Contact center > Queues.
- Click Create queue.
- Enter the queue name and description on the General tab.
- Enter the Extension for the queue agents.
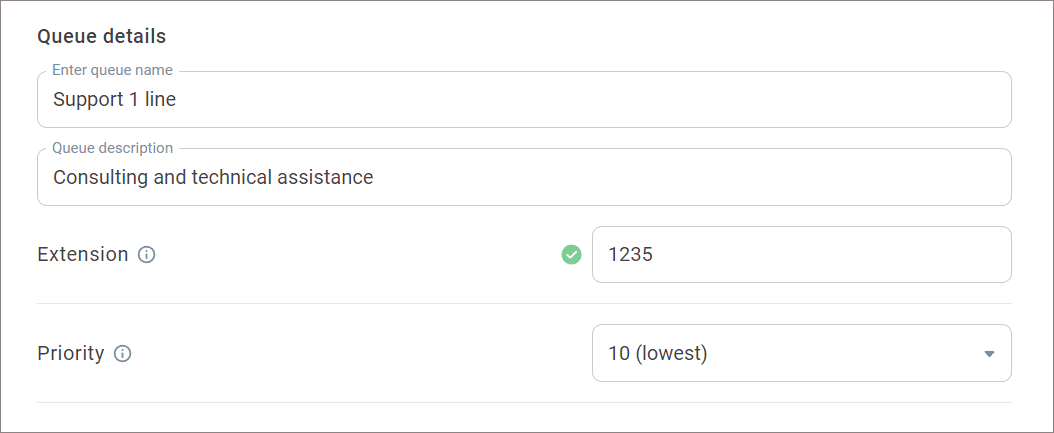
- Define the queue Priority. This setting determines how much longer requests from this queue should wait for an agent if compared to requests from other queues. Tasks are first distributed to high-priority queues and then to low-priority ones.
The available values are from 1 to 10. The higher the priority of the queue, the lower the value must be specified in the setting. The default queue priority is 10.
How does queue prioritization work?
Example 1: You have two queues: Queue A (priority 3 – higher) and Queue B (priority 7 – lower). There are 5 agents assigned to these queues.
Each queue receives 5 calls. The 5 agents handle calls from Queue A and do not start working on tasks from Queue B until all tasks from Queue A have been processed.

Example 2: You have two queues: Queue A (priority 3 – higher) and Queue B (priority 7 – lower). There are 5 agents assigned to these queues.
Each queue receives 4 calls. 4 agents handle calls from Queue A, while 1 agent starts processing the first call from Queue B.

Example 3: You have two queues: Queue A (priority 3) and Queue B (priority 3). There are 5 agents assigned to these queues.
Each queue receives 5 calls. The 5 agents handle calls alternately, one from each queue, until both queues are empty.

Configuring calls setting
- Go to the Calls tab.
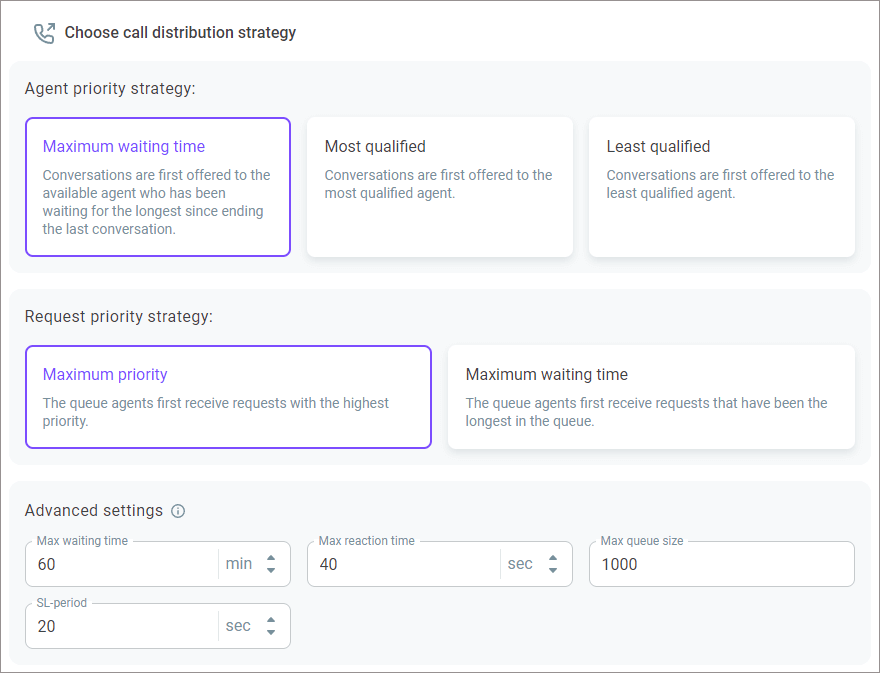
- In the Agent priority strategy field, configure the priority of inbound call distribution to agents based on the maximum waiting time or employee qualification level.
Maximum waiting time - Conversations are first offered to the agent who has been available (in the Ready status) for the longest since ending the last conversation (including calls from other queues/groups and direct calls to extension numbers).
Most qualified - Conversations are first offered to the most qualified agent.
Least qualified - Conversations are first offered to the least qualified agent.
An agent's qualification level is determined by their skills and level of proficiency. You assign skills to employees in the Setup > Contact center > Users section. Qualification requirements for agents to handle calls, i.e. the required skills and level of proficiency, are specified in the Call properties block. For more details on how skills are assigned and calls are distributed accordingly, go here.
- In the Request priority strategy field, configure the priority of inbound call selection based on its priority level or time in the queue:
Maximum priority - The queue agents first receive requests with the highest priority. You configure call priority in the Call properties scenario block.
Maximum waiting time - The queue agents first receive requests that have been the longest in the queue.
- In the Maximum waiting time field, define the longest time a customer waits in the queue for an available agent. When this time elapses, the call is terminated and goes through the Fail port of the Call to queue scenario block. The maximum value is 120 sec.
- In the Max reaction time field, define the longest time from the moment the system assigns a call from queue to an agent until the agent answers the phone. When this time is over, the agent gets Banned, and the system assigns the call to another agent. The timer only applies to queue calls that arrive at an extension number. The maximum value is 60 sec.
- In the Maximum queue size field, define the maximum number of customers that can simultaneously wait in the queue. All customer requests beyond this limit are terminated and go through the Fail port of the Call to queue scenario block. The maximum value is 1000.
- In the SL-period field, specify the threshold time customers wait in the queue for an available agent required for the queue service level calculation (SL). By default, the queue SL-period is 20 seconds. The maximum value is 999 sec.
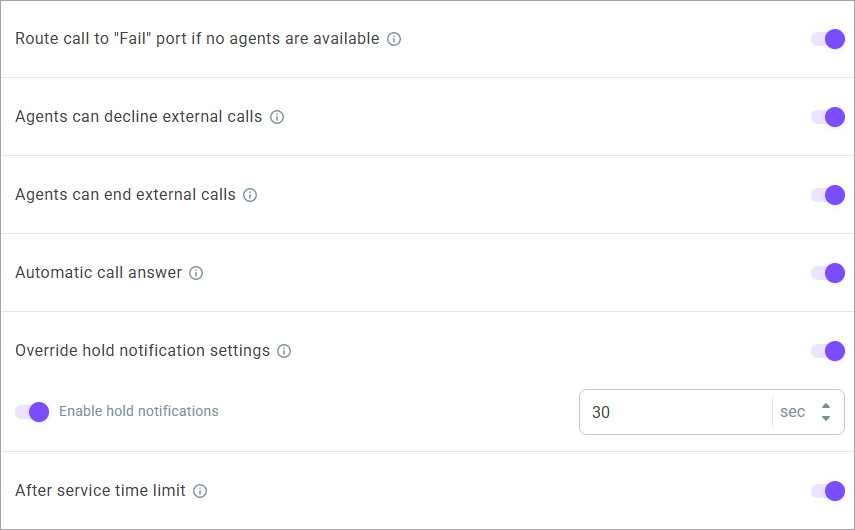
- Use the Route call to "Fail" port if no agents are available switch to configure what should happen to a call in the queue if no queue agents are available (in the Banned, DND, or custom status).
With the switch enabled, the call goes through the Fail port in the Call to queue block.
With the switch disabled, the call continues to wait in the queue until the maximum waiting time is reached or until an agent becomes available.
- Enable the Agents can decline external calls switch to allow agents to initiate the decline of external calls.
- Enable the Agents can end external calls switch to allow agents to initiate the ending of external calls.
- Enable the Auto-answer calls switch to allow automatic customer connection to an agent.
- Enable the Override hold notification settings switch to set up hold notifications for the current queue. These settings take precedence over the general contact center settings. You can enable or disable notifications for the queue. Once enabled, set the threshold time when the queue agents receive a reminder that a customer is on hold. The minimum value is 1 sec., maximum - 120 sec.
- In the After service time limit field, define the longest time agents can spend on post-call activities.
Configuring messaging settings
- Go to the Messaging tab.
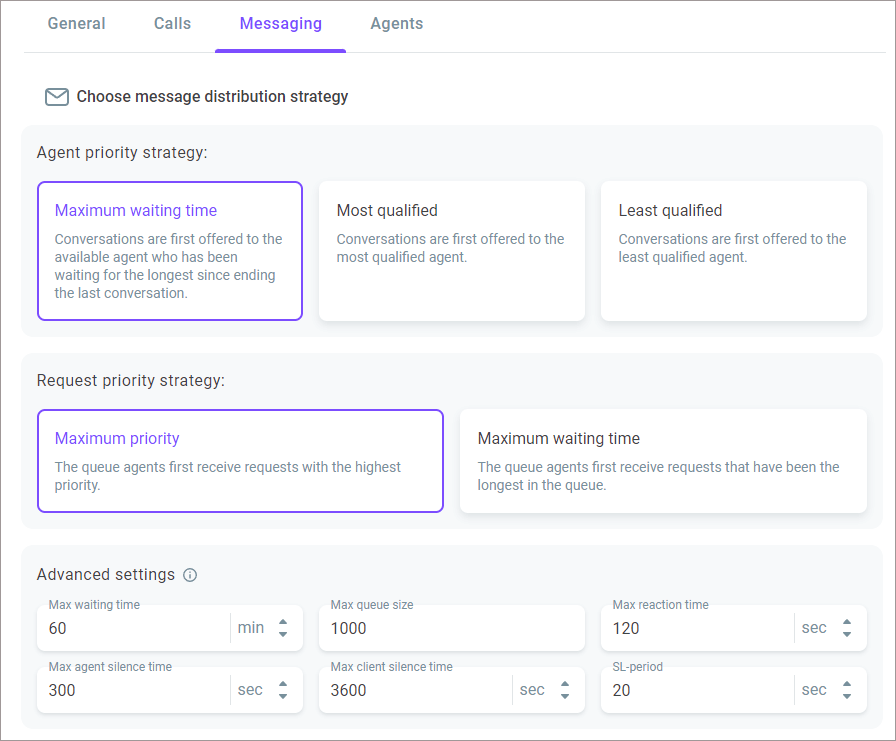
- In the Agent priority strategy field, configure the priority of inbound conversation distribution to agents based on the maximum waiting time or employee qualification level.
Maximum waiting time - Conversations are first offered to the available agent who has been waiting for the longest since ending the last conversation.
Most qualified - Conversations are first offered to the most qualified agent.
Least qualified - Conversations are first offered to the least qualified agent.
An agent's qualification level is determined by their skills and level of proficiency. You assign skills to employees in the Setup > Contact center > Users section. Qualification requirements for agents to handle messages, i.e. the required skills and level of proficiency, are specified in the channel settings.
- In the Request priority strategy field, configure the priority of inbound conversation selection based on its priority level or time in the queue.
Maximum priority - The queue agents first receive requests with the highest priority.
Maximum waiting time - The queue agents first receive requests that have been the longest in the queue.
- In the Maximum waiting time field, define the longest time a customer waits in the queue for an available agent. When this time is over, the system adds the request to the unassigned list. If all queue agents are unavailable when a customer message arrives, the chat is immediately added to the unassigned list.
- In the Maximum queue size field, define the maximum number of customers that can simultaneously wait in the queue. All customer requests beyond this limit are added to the unassigned list.
- In the Maximum reaction time field, define the longest time from the moment the system assigns a conversation to an agent until an agent sends the first message to a customer. When the time is over, the request returns to the queue, and the system assigns it to another agent.
- In the Maximum agent silence time field, specify the longest time it takes an agent to respond to the latest customer message. When this time is over, the system adds this conversation to the unassigned list.
- In the Maximum customer silence time field, define the longest time for a customer to respond to the latest agent's message. The system closes the conversation once this time is over.
- In the SL-period field, define the threshold time a customer waits in the queue for an available agent; this is required for the queue service level (SL) calculation. By default, the queue SL-period is 20 seconds.
- In the Auto replies section, configure messages the system will automatically deliver to customers in the queue with the information about the status of their conversation. You can add different templates - the system chooses a random reply and sends it to a customer.
General automatic replies:
Chat is closed by timeout - This message is automatically delivered to a customer when the chat is closed by the timeout defined in the Close channel conversations settings for agent, bot, and unassigned conversations.
Automatic replies for agents:
Welcome message - This message welcomes a customer on behalf of an agent assigned to the conversation.
After transfer message - This message welcomes a customer on behalf of an agent that the request has been transferred to.
Answer timeout message - This message is sent to a customer when the maximum agent's response waiting time elapses.
Chat is closed by agent - This message is automatically delivered to a customer when an agent closes their chat.
Queue automatic replies:
Added to the queue - This greeting message informs a customer that their request has been added to the queue.
No agents available - This message informs a customer that all agents are currently unavailable (in Offline, DND, Banned, or custom statuses).
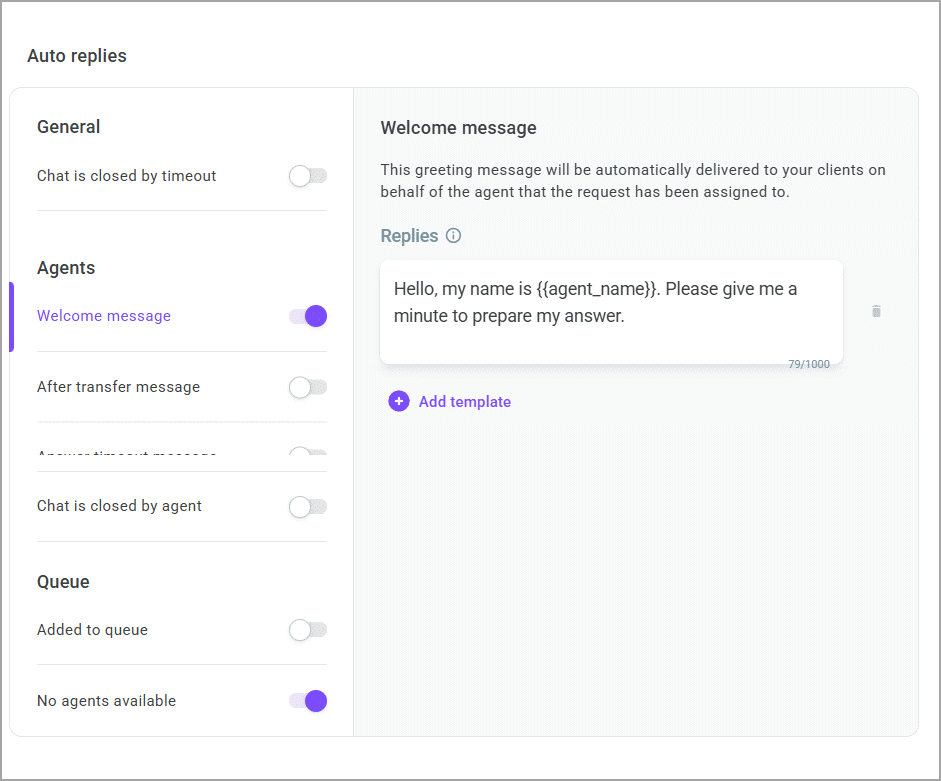
The following variables are available for use in automatic messages:
{{agent_name}} - Agent's first, middle, and last name (the values are taken from the First name, Middle name and Last name fields in the Personal settings)
{{agent_first_name}} - Agent's first name (the value is taken from the First name field in the Personal settings)
{{agent_last_name}} - Agent's last name (the value is taken from the Last name field in the Personal settings)
{{agent_middle_name}} - Agent's middle name (the value is taken from the Middle name field in the Personal settings)
Adding agents and supervisors
- Go to the Members tab.
- In the Queue supervisors section, click + Assign to assign one or several supervisors to manage the queue. Note that a supervisor is not considered a queue member and does not handle conversations. Every supervisor can simultaneously manage several queues.
- The dialog window displays the list of users with the Supervisor role.
- Select the required user(s) and click Continue.
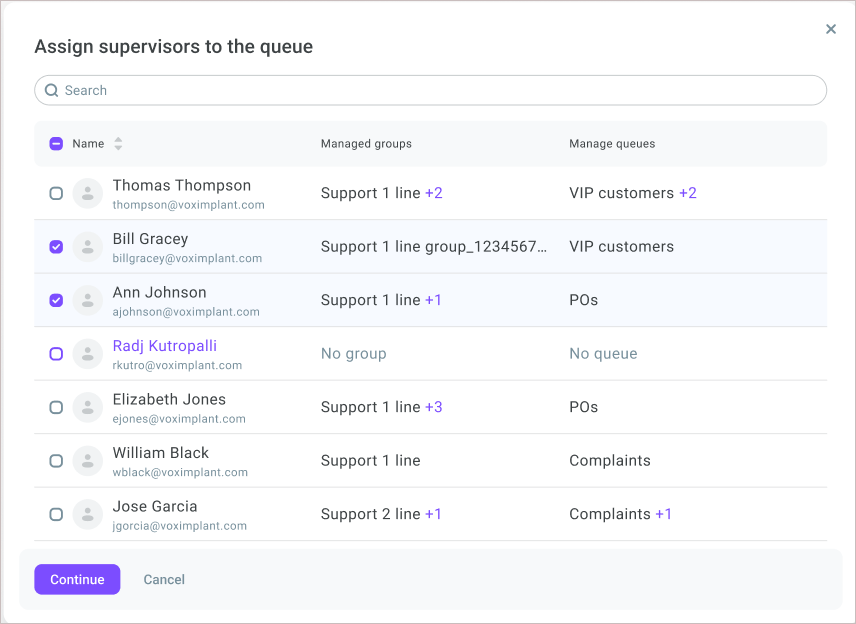
- In the User permissions column, define the permissions you want to grant to each supervisor.
Viewer - A supervisor can view performance indicators of the assigned queues but cannot manage queue agents.
Editor - A supervisor can assign/unassign their group agents to/from the reporting queues (in Live monitoring).
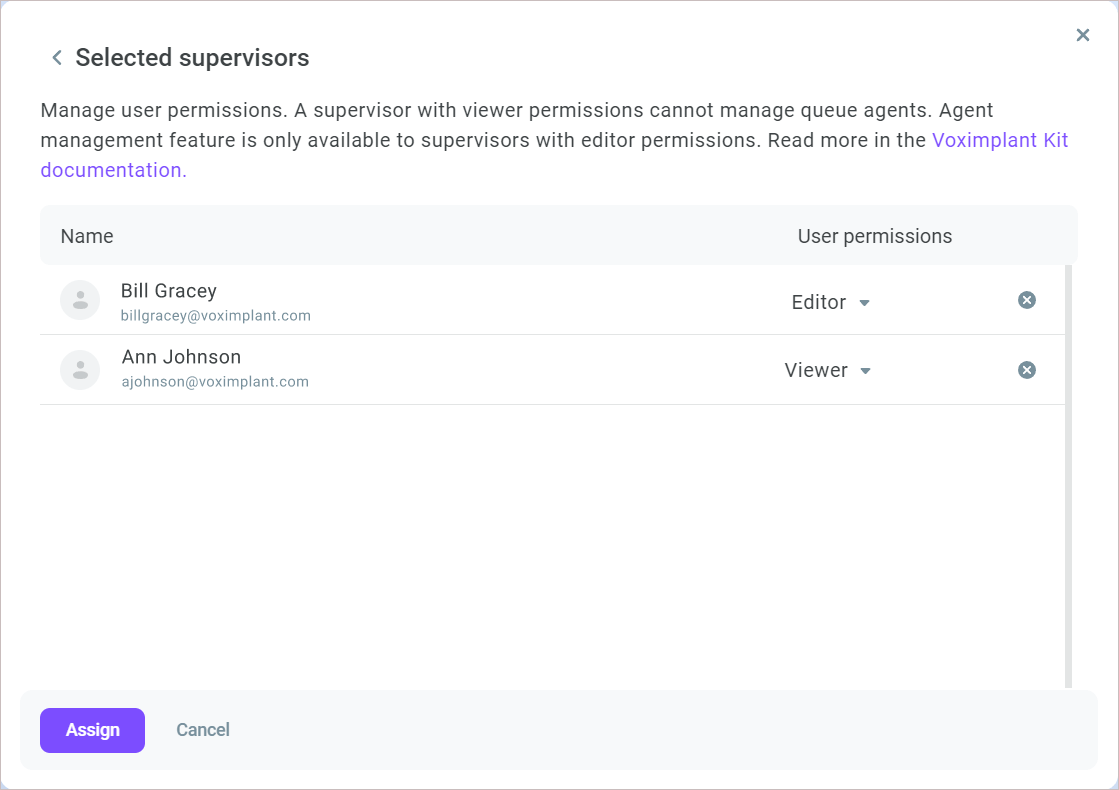
- Click Assign.
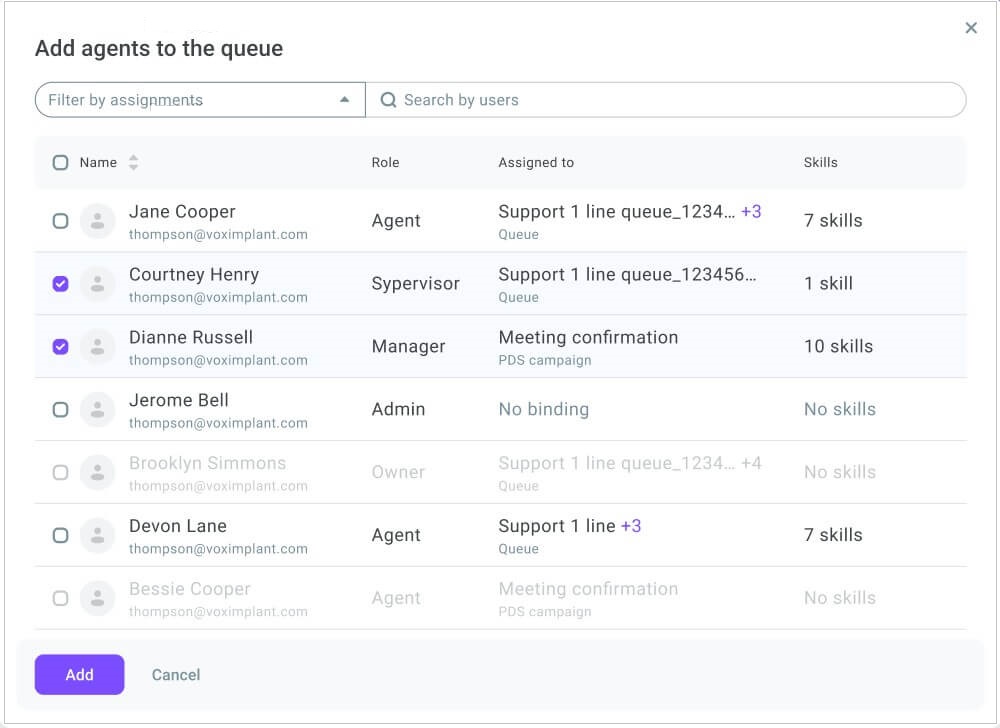
- Now click + Add agents. You can add users with any role, their functions in the queue will differ depending on the role.
The dialog that opens displays the list of all agents not assigned to the current queue.
- In the Search by users field, start typing the agent's name or email to find a specific employee.
- Use Filter by assignments to retrieve only unassigned agents or members of specific groups or campaigns.
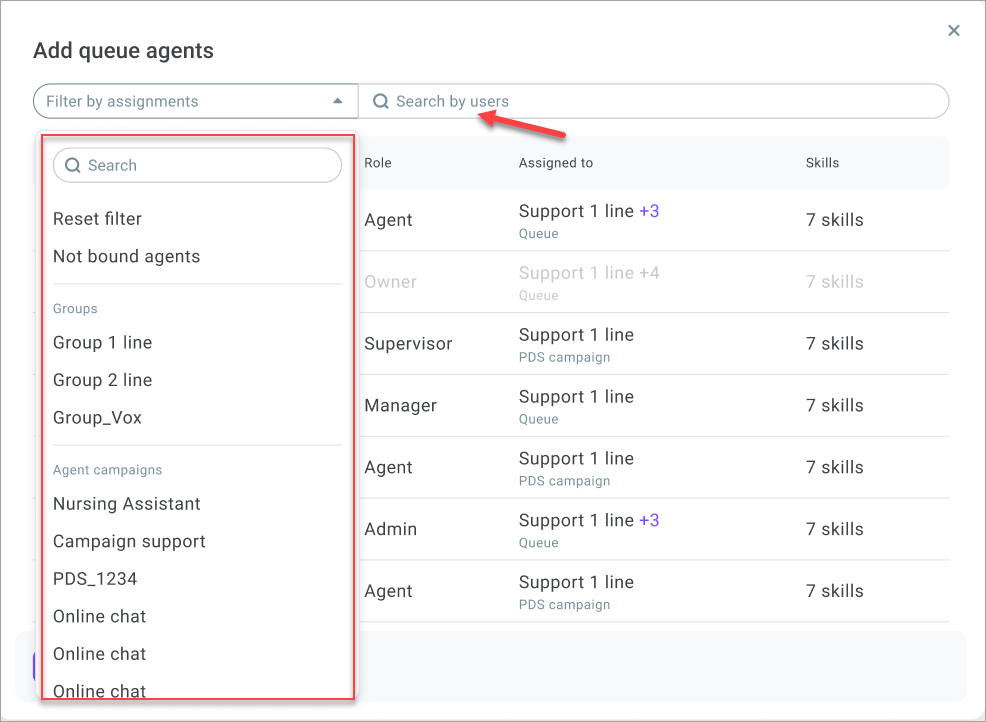
- Select the agents you want to add to the queue and click Add.
You cannot assign agents if they are already assigned to a campaign or to the maximum number of queues allowed. By default, a user can be a member of maximum 5 queues. To increase the limit, please contact technical support.
- The agents now display as the queue members. If required, unassign agents from the queue by clicking the cross icon.
- Click Create.
Editing a queue
- Click the Action menu icon next to the queue you need.
- Select Edit from the drop-down list.
- Edit the necessary settings.
- Click Save changes.
