iOS
This article will help you to start building your iOS application with Voximplant.
There are two methods to incorporate Voximplant libraries into your Xcode project: Cocoapods and Swift Package Manager.
Start with Cocoapods
Skip this section if you are using Swift Package Manager.
- Install CocoaPods (Refer to the CocoaPods getting started guide)
- If you don’t have a podfile, create one by executing
pod initin the project directory. - Add the VoxImplantSDK dependency to the Podfile:
platform: ios, '11.0'
use_frameworks!

target 'MyApp' do
    // other dependencies and configurations
    pod 'VoxImplantSDK'
end
- Execute the
pod installcommand in the project directory to install the SDK. - From now on, open your project using the newly created .xcworkspace file.
We discontinued bitcode support since the 2.48.0 SDK version.
Start with Swift Package Manager
Skip this section if you are using CocoaPods.
Alternatively, you can use Swift Package Manager to add the dependencies to your project.
- Open your project in Xcode.
- Go to File → Swift Packages → Add Package Dependency.
- Add the iOS SDK GitHub repository contents.
- Select the desired SDK version.
- Declare the package in the Package.swift file’s
dependenciessection:
dependencies: [
    .package(url: "https://github.com/voximplant/ios-sdk-releases.git", .upToNextMinor(from: "2.56.1"))
]
The Voximplant Swift Package does not fully adhere to semantic versioning, so backward compatibility is not guaranteed. Before a version update, please review the changelog.
Initialize the SDK
- If you intend to use the camera and microphone in your app, open the Info.plist file in your project and add the following keys:
Privacy — Camera Usage Description
Privacy — Microphone Usage Description
Provide values for these added keys. These values represent what a device displays when it prompts for camera or microphone access.
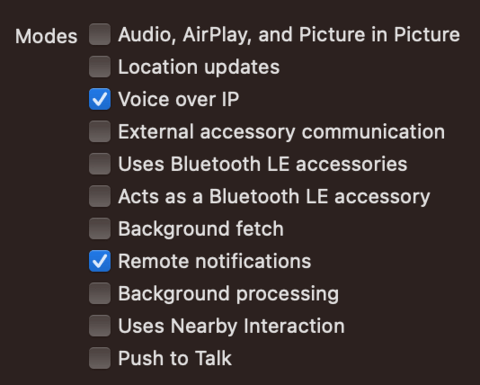
- Declare four Background modes. Go to your project’s main file, navigate to the Singing & Capabilities tab, and click the “+” button at the top. Select “Background modes” from the dropdown menu. To enable call and push notification functionalities, choose the following modes as depicted in the screenshot:

Now, you are ready to create a Voximplant client instance. To do this, import VoxImplantSDK into your Swift class and create an instance of VIClient as shown below:
Connect to the Voximplant cloud and log in
To create a client instance and connect, import VoxImplantSDK into your Swift class. Additionally, your class must conform to the VIClientSessionDelegate protocol.
On class initialization, create a Voximplant client instance and declare your class as a session delegate for the client instance (see the code example below). Then, call the connect method to connect to the cloud.
In the clientSessionDidConnect function, call the login(password) method to log in to the platform using a password. Alternatively, use the login(oneTimeKey) method to log in using a one-time key.
When initializing and connecting the SDK to the Voximplant cloud, you need to specify the node to connect to. Your node is bound to your Voximplant account.
To find which node your account belongs to, log in to your control panel and see the Credentials for working with API, SDK, SIP section on the main dashboard.
Refer to this code example to understand the login process:
Start implementing functionality
Now that your application and SDK are set up and successfully connected to the Voximplant cloud, you can start implementing the desired functionality, such as making calls, participating in conferences, sending messages, and more. To achieve this, visit the Guides section of our documentation and select the features that align with your needs.
iOS SDK demos
To implement the desired functionality, follow the step-by-step Guides or download and test our latest iOS SDK:
Audio call: Demonstrates the basic voice call functionality of the Voximplant iOS SDK.
Audio call with CallKit: Demonstrates the CallKit integration with the basic voice call functionality of the Voximplant iOS SDK.
Video call: Demonstrates the basic video call functionality of the Voximplant iOS SDK.
Video call with CallKit: Demonstrates how to integrate CallKit with the basic video call functionality of the Voximplant iOS SDK.
Messaging: Demonstrates how to create your web and mobile messaging client based on the Voximplant SDKs.
